
Behavioral signals in the Connect web library (Pro)
Guide for Connect Pro customers
Behavior signals are events that are typically important to any business, regardless of the industry. You can configure the Connect library to generate them while visitors are interacting with your website.
Not sure what your license type is?
You can quickly check what type of Connect license your company is using. Log in to your Connect account and see the label on the home screen.
Sample Connect Pro subscription
If your subscription is Premium or Ultimate, see Behavioral signals in the Connect web library (Premium and Ultimate). If it's Pro, continue reading.
Available behavioral signals
With a Connect Pro subscription, you can capture key user behaviors on your website and map them to contacts in your audience. Four signals are available:
-
Add-to-cart - Captures when a user adds products, services or offerings to their shopping cart. Provides product names, IDs, prices and quantities.
-
Remove-from-cart - Captures when a user removes products from their shopping cart. Helps track cart modification behavior and purchase hesitation.
-
Order - Captures completed orders with total amounts and detailed product breakdowns.
-
Identification (legacy) - Captures visitor emails or contact IDs as they browse your website and feeds the data to your audience in Connect.
Important considerations
The signals are designed to capture all necessary details for each use case. However, some fields may not be available or applicable to your business:
-
No pricing information - If your business doesn't display prices (insurance quotes, B2B requests), use placeholder values for required price fields in signals.
-
Third-party checkout - If users complete checkout on a third-party platform where you cannot install the Connect library, collect order data on your confirmation page or via backend integration. Typical examples include payment processors and ticket-selling platforms.
-
Identification timing - Ensure user identifiers (email, customer ID) are accessible when a signal fires. Consider surfacing identifiers in your data layer once users log in.
Understanding Pro configuration
To implement behavior signals, you must first add the Connect library to your web application. Connect Pro uses two components working together:
1. The Lite library file
Connect Pro clients should use the Lite version of the library (acoconnectLite.min.js), which is optimized for behavioral signal tracking:
- Smaller file size for faster page loads
- Excludes compression, gesture and Ajax monitoring libraries not needed for Pro features
- Contains all functionality required for Pro-tier behavioral signals
2. The initPro() initialization function
The TLT.initPro() function, added in January 2026, simplifies library configuration by automatically applying Pro-optimized settings:
overstat.enabled = false- Disables advanced DOM event capturedomCapture.enabled = false- Disables full DOM snapshots for session replaymousemove.enabled = false- Disables mouse movement tracking
Together, these ensure your implementation focuses exclusively on the behavioral signals available with Connect Pro: identification, add-to-cart, remove-from-cart and order.
Missing an option?
If you ever need to customize settings beyond the automatic Pro configuration, use
TLT.initLibAdv()instead. See the Connect Web SDK public API reference for details.
Prerequisites
During the onboarding process, our provisioning team registers your application with Connect and sends your team an application key and collector URL. You'll need these values when installing the Connect library.
If you haven't received your application key and collector URL, contact your Acoustic representative or support team.
Instructions
Step A: install the Connect library
- In your webpage template, add the following code snippets anywhere within the
<head>tag. This ensures they execute as early as possible on page load.
<script src="https://cdn.goacoustic.com/connect/latest/acoconnectLite.min.js"></script>
<script>
(function () {
    if (window.TLT) {
        TLT.initPro({
            appKey: "APP_KEY",        // Replace with your application key
            postUrl: "COLLECTOR_URL", // Replace with your collector URL
            callback: initLogSignal
        });

        function initLogSignal() {
            // Connect library is ready
            // Add your signal implementation code here
            console.log("Connect Pro SDK initialized");
        }
    } else {
        console.error("Connect library failed to load");
    }
}());
</script>
- Replace
APP_KEYandCOLLECTOR_URLwith the values provided by our provisioning team. - Push the changes to the server.
Important notes:
- Script order matters: The Connect library file must load before the initialization code. Do not change the order of the two
<script>tags. - Callback timing: The
initLogSignalcallback function executes only when the Connect library is fully initialized and ready. All signal implementation code must be placed inside this callback to ensure the library is ready before signals are sent. - Error handling: The code checks if
TLTexists before calling to prevent errors if the library fails to load. - Version pinning: You can replace
latestin the CDN URL with a specific version number) for production deployments to ensure consistency. For the list of versions, see Connect Web SDK release notes. TheTLT.initProfunction is available in version6.4.189and later.
Optional parameters:
The initPro() function accepts additional optional parameters for advanced use cases:
TLT.initPro({
    appKey: "APP_KEY",
    postUrl: "COLLECTOR_URL",
    addPako: true,                // Enable compression (default: true)
    addAjaxListener: false,       // Track AJAX calls (default: false)
    addRestartTLTforSPA: true,    // SPA support (default: true)
    remoteConfigUrl: undefined,   // Remote config URL (optional)
    callback: initLogSignal
});
Most implementations only need appKey, postUrl and callback.
Step B: enable behavior signals
Now that the library is installed and initialized, you can configure the behavior signals. All signal implementation code must be placed inside the initLogSignal callback function to ensure the library is ready.
See the following pages for detailed implementation instructions:
Each signal page provides required and optional fields, code examples and implementation guidance.
function initLogSignal() {
    console.log("Connect Pro SDK initialized");

    // Example: Track add-to-cart button clicks
    document.querySelectorAll('.add-to-cart-button').forEach(function(button) {
        button.addEventListener('click', function(e) {
            // Extract product data and log signal
            TLT.logSignal({
                signalType: "addToCart",
                // ... additional signal data
            });
        });
    });
}
Migrating from Acoustic Campaign?
You must replace the Silverpop Web Tracking pixel with the new, flexible logSignal-based tracking method in Acoustic Connect.
Step C: verify signal capture
To confirm that signals are implemented correctly and data is flowing:
- Click around on your website to trigger the signals you have activated. The identification signal is required because it maps users to behaviors.
- Log in to your Acoustic Connect subscription.
- Go to Data management > Audience.
- On the All contacts tab, select the contact you used for testing the signal.
- In the activity feed, view the activity associated with the selected contact.
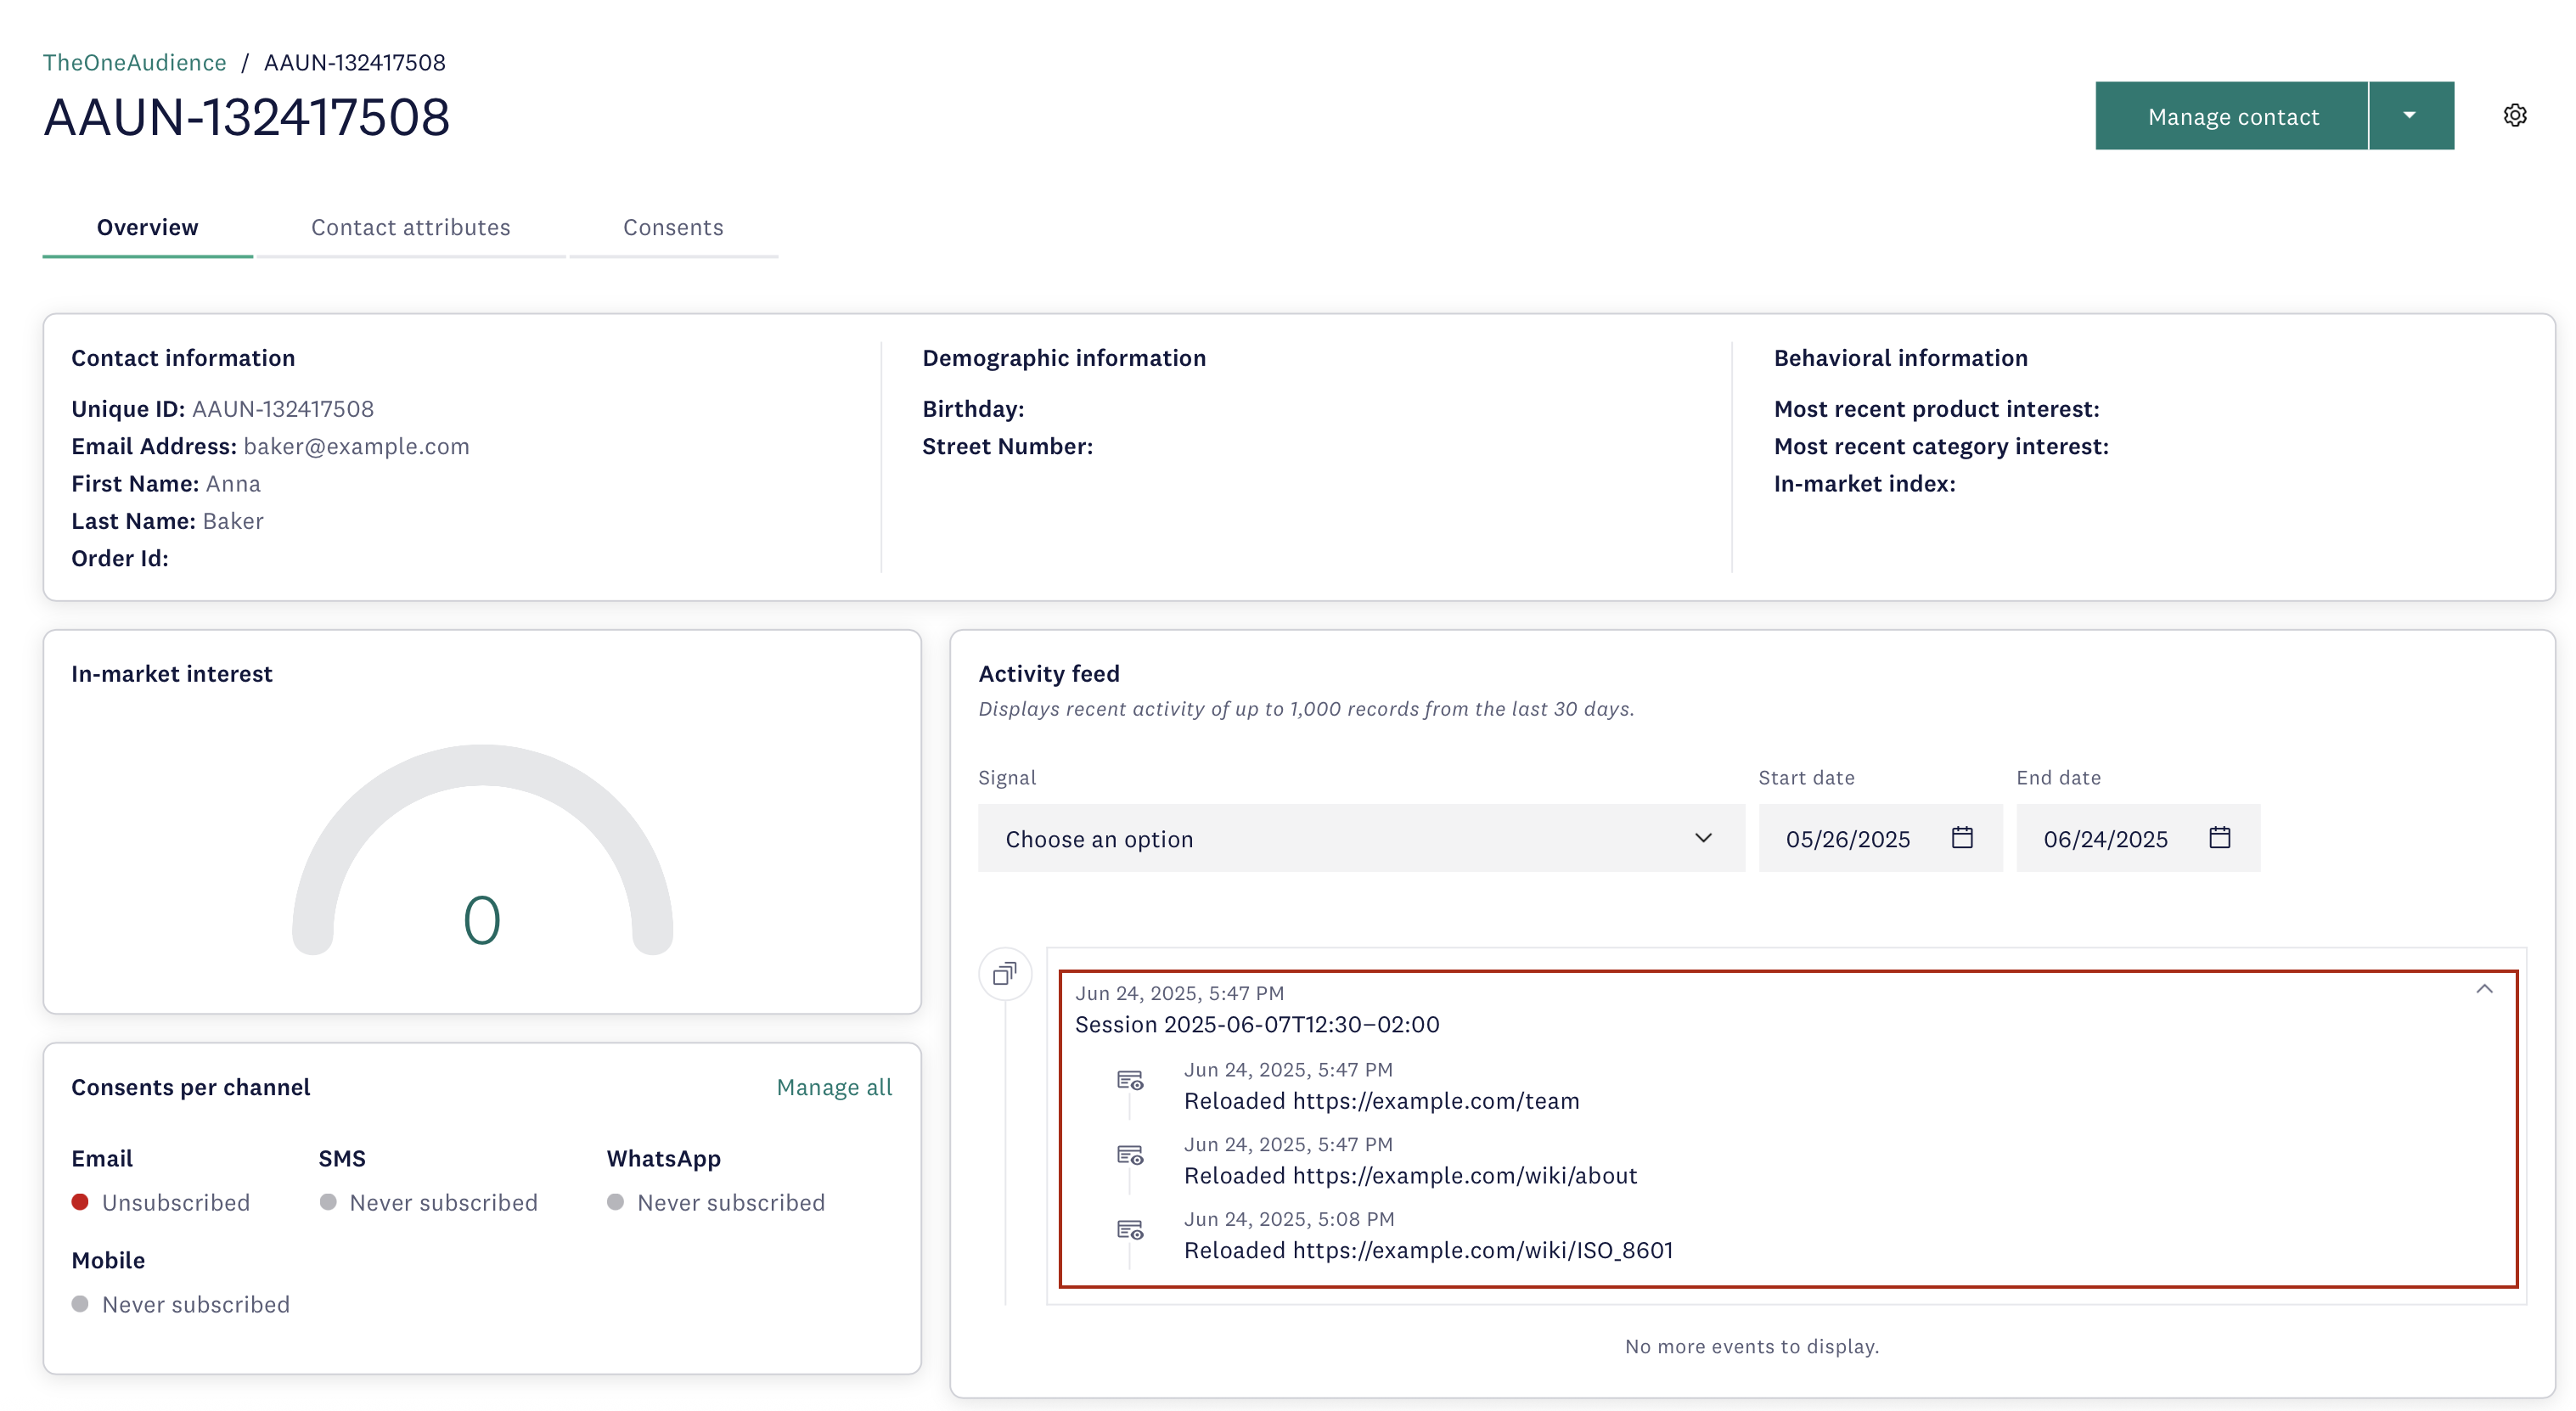
What to look for:
As you expand a user session, you can see the 5 most recent signals of each type associated with it. You should see:
- Add-to-cart events showing product details
- Remove-from-cart events showing removed products
- Order events showing order totals
- Session groupings (identification signals link these together but aren't displayed separately)
Note
The activity feed displays the last 1000 signals or signals from the last 30 days. In some cases, newly added signals may not be immediately visible.
Alternative verification method:
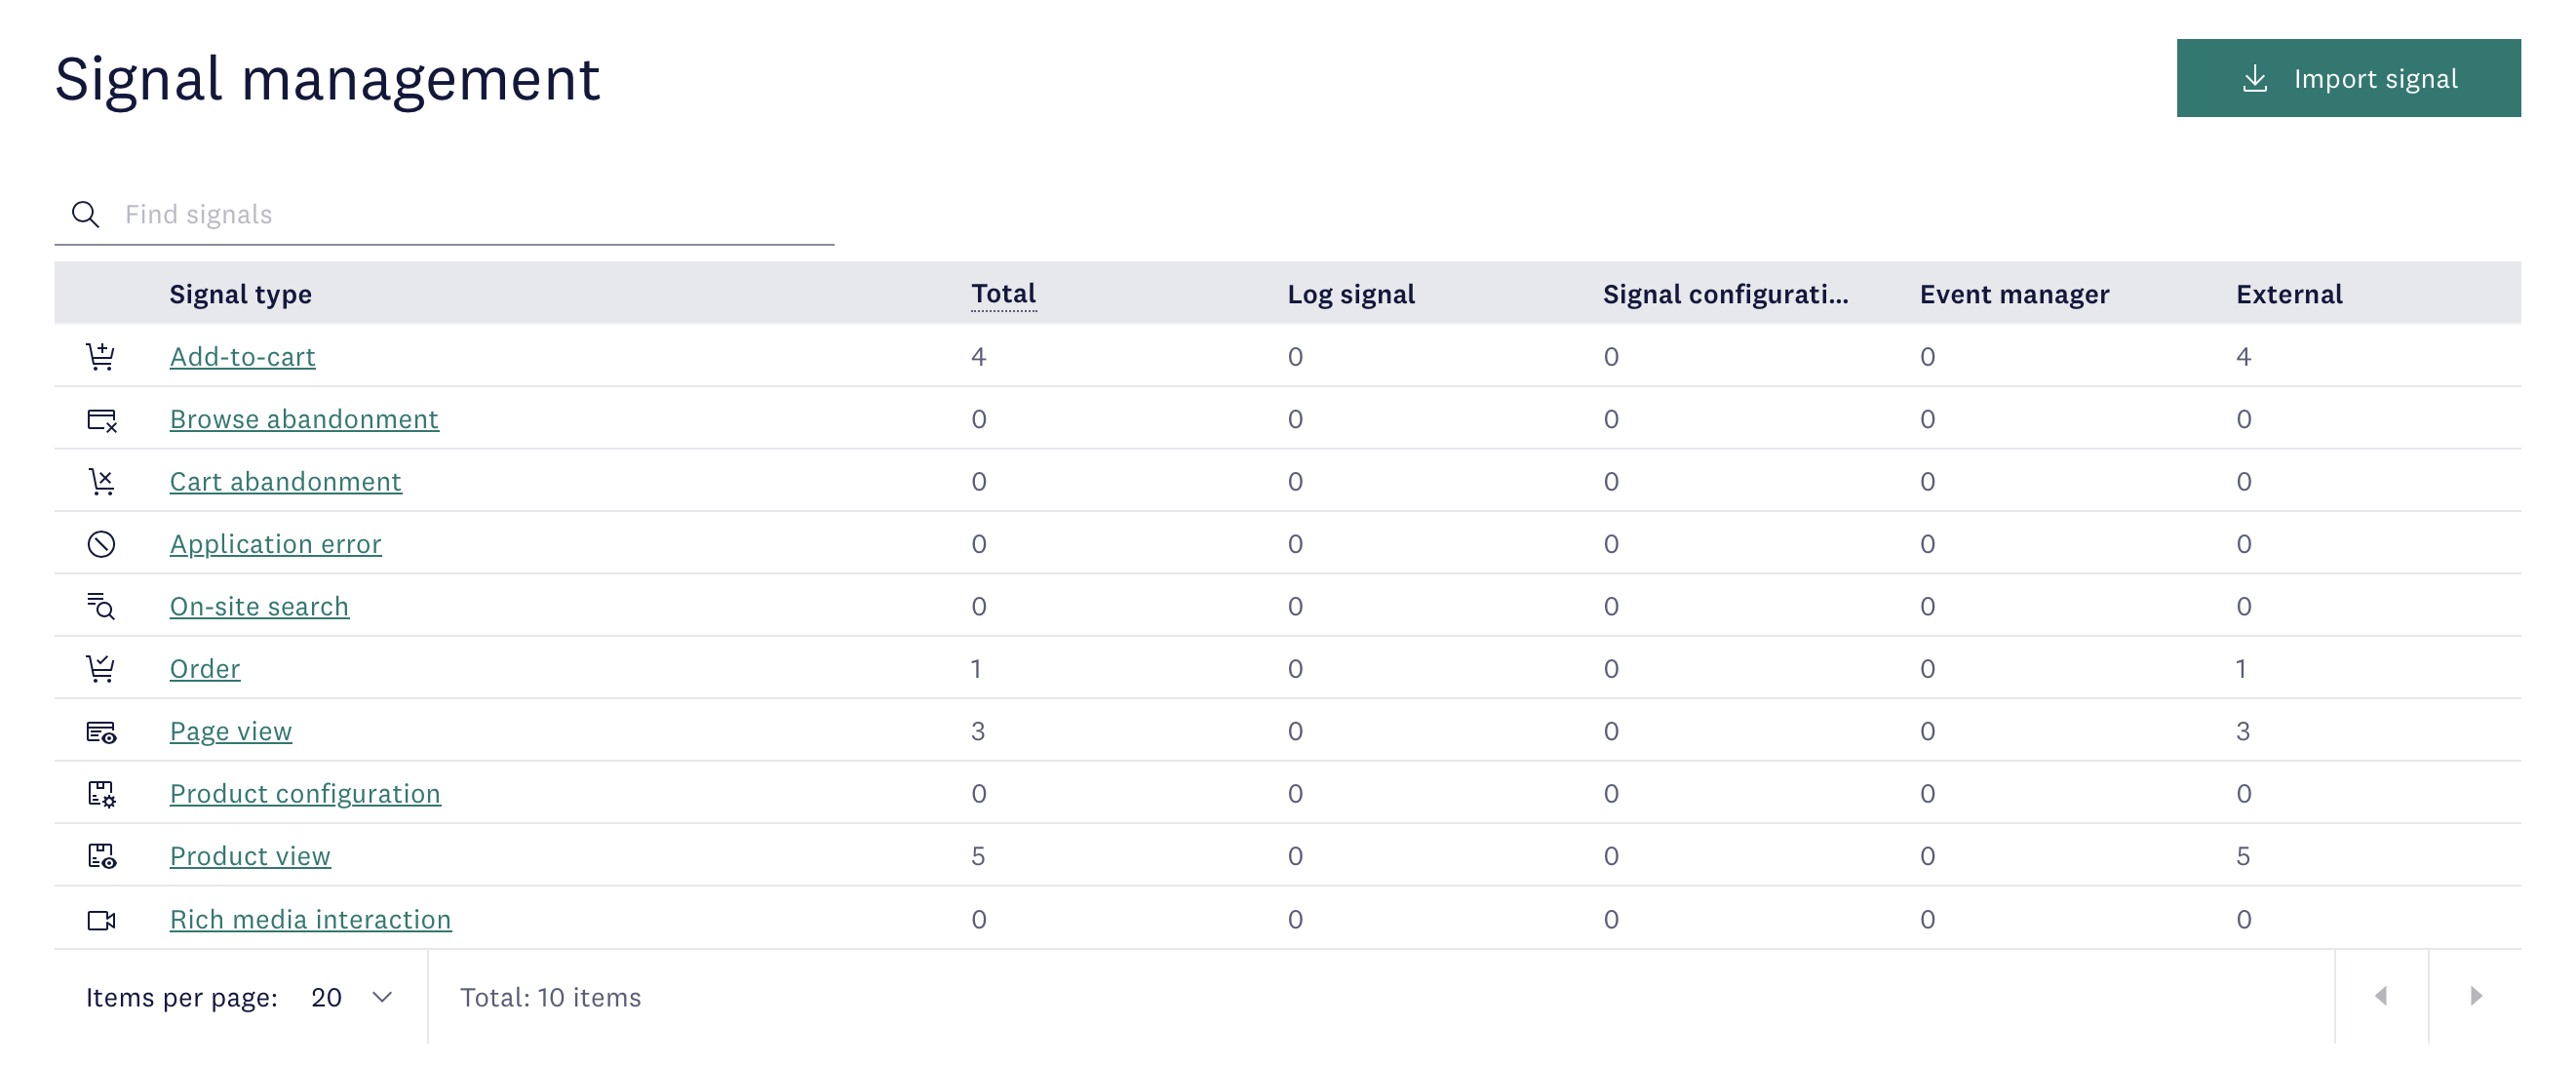
To view all signals without limitations, navigate to Behavioral management > Signal management and click on a signal type.
Troubleshooting
Signals not appearing in Connect?
- Verify all required fields are populated (see individual signal documentation)
- Check browser console for JavaScript errors
- Confirm application key and collector URL are correct
- Ensure identification signal fired before other behavioral signals
- Verify signals are being sent inside the callback function - signals sent before initialization completes will fail silently
Callback function not executing?
- Verify the Connect library loaded successfully (check browser Network tab)
- Check for JavaScript errors before the
initPro()call - Confirm callback function is defined before being passed to
initPro() - Check the browser console for the "Connect library failed to load" error message
"initPro is not a function" error?
- Verify you're using version 6.4.189 or later of the Connect library
- Check that the library file loaded successfully (no 404 errors on Network tab)
- Confirm the script URL is correct:
https://cdn.goacoustic.com/connect/latest/acoconnect.min.js
Signals appearing with missing data?
- Review required vs optional fields for each signal type
- Check that data extraction logic matches your site's DOM structure
- Verify timing - some data may not be available when signal fires
- Use
console.log()to debug extracted values before sending signals
Library file not loading?
- Check that the CDN URL is accessible from your network
- Verify there are no content security policy (CSP) restrictions blocking the script
- Confirm the script tag is in the
<head>section and loads before the initialization code - Try accessing the CDN URL directly in your browser to confirm it's reachable
Maintenance note
As your website receives updates or gets redesigned, these changes may affect signal configuration. Include signal verification in your regular quality assurance routine to ensure:
- Selectors still match updated DOM structure
- Data extraction logic captures correct values
- Required fields remain populated
- Signals fire at appropriate times in user flows
Next steps
Now that your signals are capturing data, consider the following steps:
- Create segments based on cart and order behavior
- Set up abandoned cart campaigns
- Monitor signal volume in Signal management
- Review the activity feed regularly to understand customer behavior patterns
Updated 27 days ago