
Enable privacy protection in Android Compose apps
When capturing user behavior data, you must take measures to exclude personally identifiable information (PII) such as credit card numbers or home addresses. In the Connect library, you can create rules for certain UI elements or screens.
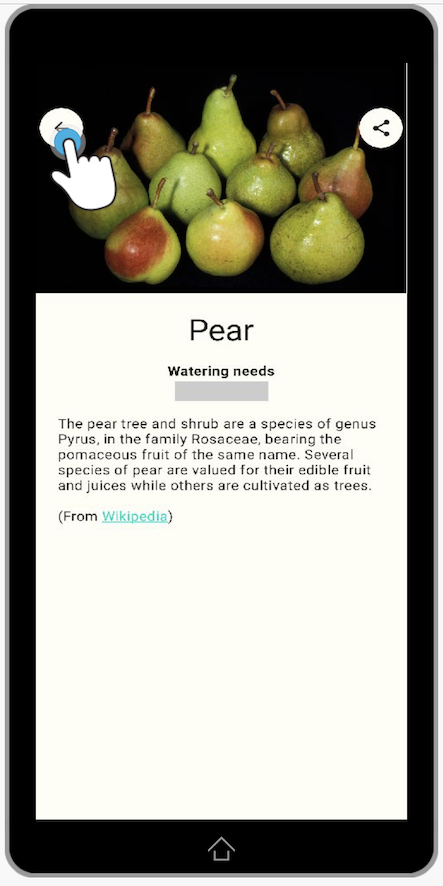
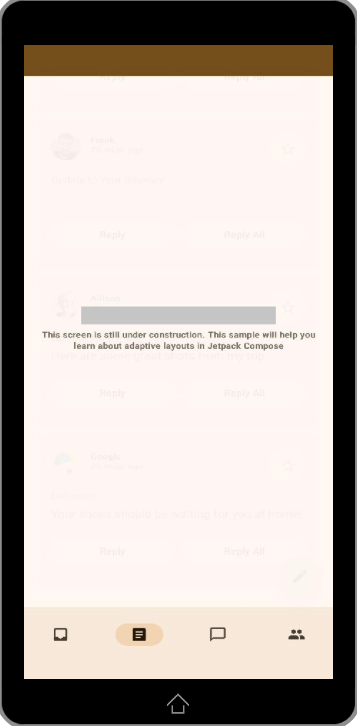
If a UI element is excluded from capturing, its content is replaced with a grey background in session replay. Here is an example from Sunflower (Google's open-source app).
If you exclude a screen, no parts of it will be captured. You won't see its name in session replay.
Note on the frameworkThe current instruction deals with Jetpack Compose apps. If your app uses the View system, see Enable privacy protection in Android apps using the View system.
Privacy protection for UI elements
We offer two privacy protection methods for Jetpack Compose apps:
- One-step method. It relies on assigning the same custom modifier to the UI elements that mustn't be captured. We recommend this method because it's simple and works for all UI elements, both text or graphic. Keep in mind that it requires the latest version of the Connect library for Android (10.4.48).
- Two-step method. You must assign custom labels to the UI elements to exclude from recording and then add these labels to the library configuration file. This method is more time-consuming, but it gives you more granular control over the masking rules. You can use this method for the following composable elements: Text, TextField and OutlinedTextField.
Note on combining the methodsIt isn't possible to use both methods on the same UI element. So if you've applied a custom label to a Compose element, do not add the custom modifier to the same element.
Enabling PII protection using the one-step method
- Open the file with the UI element that requires privacy protection.
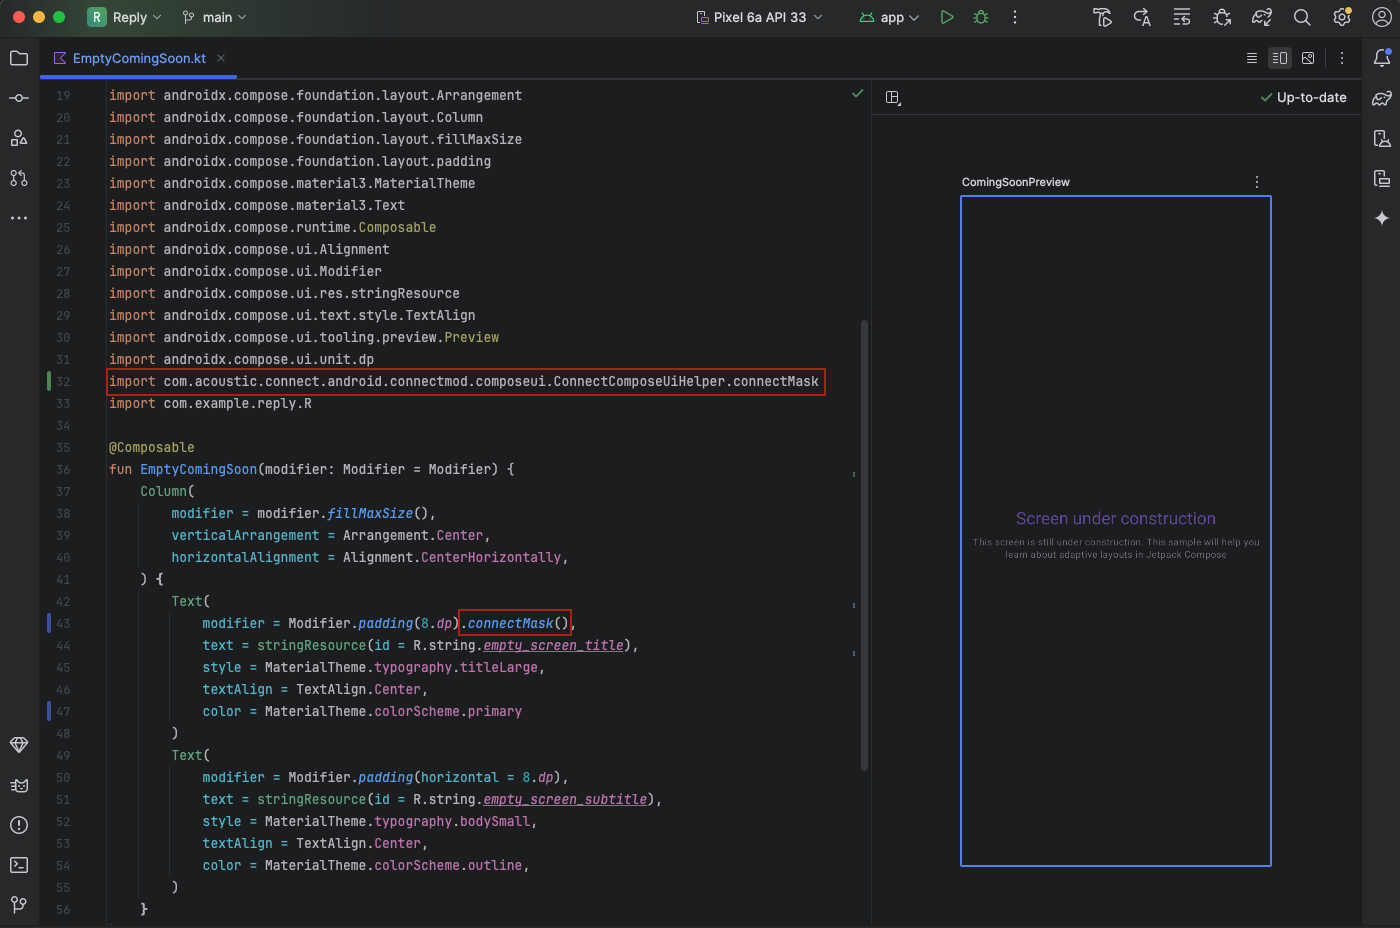
- Add an import statement for the custom Compose modifier.
import com.acoustic.connect.android.connectmod.composeui.ConnectComposeUiHelper.connectMask- Add the
connectMask()modifier to the element that requires privacy protection.
Button(
    onClick = {
        // Log click event
    },
    modifier = Modifier.connectMask()
) {
    Text("My Button Masked", color = Color.White)
}
Text(
text = "This is some text",
modifier = Modifier.connectMask()
)- If applicable, repeat the steps for other elements.
Here is an example from Google's open source app (Reply) where we've added the custom modifier to the screen status message.
Enabling PII protection using the two-step method
Step A: tag text fields with PII
- Open the UI file that has the text field you want to exclude from capturing.
- Add an import statement for the text field depending on its type. See the cheat sheet below for quick reference.
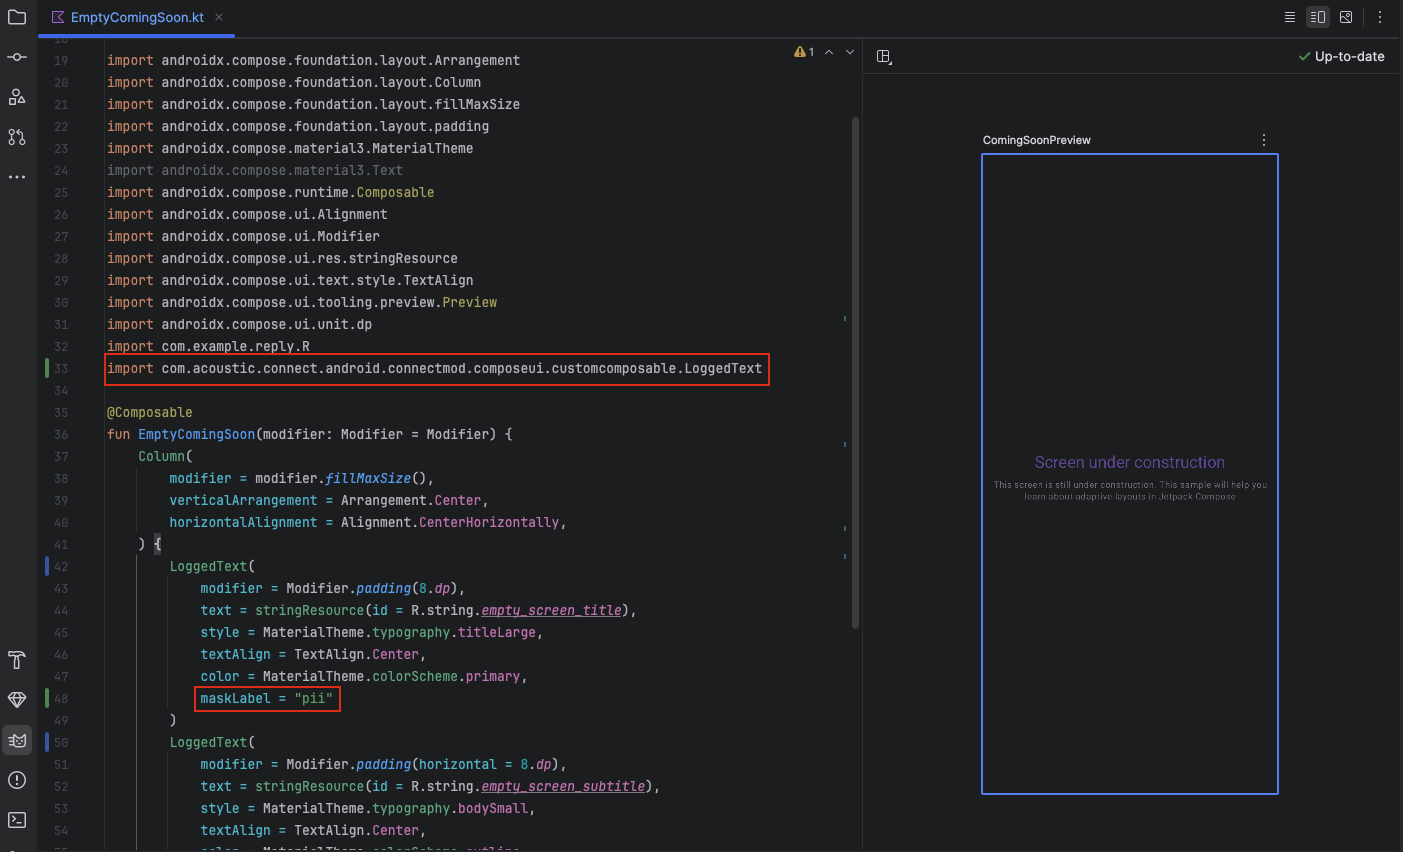
- Rename the text field (
Text->LoggedText,TextField->LoggedTextField,OutlinedTextField->LoggedOutlinedTextField). - Add the
maskLabelparameter to the text field you have renamed.
import com.acoustic.connect.android.connectmod.composeui.customcomposable.LoggedText

LoggedText(
    text = "This is some text",
    maskLabel = "pii"  // Required for masking
)
import com.acoustic.connect.android.connectmod.composeui.customcomposable.LoggedTextField
LoggedTextField(
value = text,
maskLabel = "pii" // Required for masking
)import com.acoustic.connect.android.connectmod.composeui.customcomposable.LoggedOutlinedTextField
LoggedOutlinedTextField(
value = "Outlined Text",
maskLabel = "pii" // Required for masking
)- If needed, repeat the steps for more text fields. You can reuse the same label for all of them.
Here is an example from Google's open-source Reply app. We have added the pii tag to the screen status message. This tag will only be used by the Connect library.
Step B: create privacy rules
- Create the ConnectLayoutConfig.json file in the Assets Folder (if you don't have it yet).
- Populate it with the content from our template file.
- In the
maskingobject, setHasMaskingtotrue. - In the
MaskAccessibilityLabelListproperty, enter themaskLabeltags you have assigned to the text fields.
{
  "AutoLayout": {
    "GlobalScreenSettings": {
      "ScreenChange": true,
      "Masking": {
        "HasMasking": true,
        "HasCustomMask": false,
        "MaskAccessibilityLabelList": [
          "pii",
          "password"
        ]
      }
    }
  }
}- (recommended) Run the file through a JSON validator.
Here is an overview of the privacy protection settings in the configuration file.
| Property | Values | Description |
|---|---|---|
HasCustomMask | Boolean. Valid value - false. | In the current version, the default mask isn't customizable. Protected text is always replaced with a grey background. |
HasMasking | Boolean. Default value - false. | Set the value to true to allow masking. |
MaskAccessibilityLabelList | Array of string | The maskLabel properties of the elements that require privacy protection |
Auto instrumentation
If there are many text fields that require privacy protection, you can use our auto instrumentation script that will wrap them for you. Their names will change in the following way: Text -> LoggedText, TextField -> LoggedTextField, OutlinedTextField -> LoggedOutlinedTextField.
- In the root project directory, create a new file (connect-composables.gradle) with the following content.
/*
 * Copyright 2025 Google LLC
 *
 * Licensed under the Apache License, Version 2.0 (the "License");
 * you may not use this file except in compliance with the License.
 * You may obtain a copy of the License at
 *
 *     https://www.apache.org/licenses/LICENSE-2.0
 *
 * Unless required by applicable law or agreed to in writing, software
 * distributed under the License is distributed on an "AS IS" BASIS,
 * WITHOUT WARRANTIES OR CONDITIONS OF ANY KIND, either express or implied.
 * See the License for the specific language governing permissions and
 * limitations under the License.
 */

/**
 * Gradle task: replaceWithConnectComposeWrapper
 *
 * Scans Kotlin source files (excluding tests) and replaces:
 *   Text(...)              → LoggedText(...)
 *   TextField(...)         → LoggedTextField(...)
 *   OutlinedTextField(...) → LoggedOutlinedTextField(...)
 *
 * Skip nested calls if preceded by '{ ' (e.g., inside lambda blocks).
 * Ensure import statements for any used Logged composables.
 *
 * Regex pattern summary:
 *   (?<!\{ )   Negative lookbehind: not preceded by "{ ".
 *   \bKEY\b    Word boundary: match whole composable name.
 *   \s*\(      Optional whitespace + '('.
 *   ([^)]*)      Capture all args (simple, no nested parentheses).
 *   \)          Closing parenthesis.
 *
 * Usage:
 *   Create/Copy connect-composables.gradle file under project's root folder
 *   apply from: '../connect-composables.gradle'
 *   ./gradlew replaceWithConnectComposeWrapper
 */
tasks.register("replaceWithConnectComposeWrapper") {
    group = 'custom'
    description = 'Replace Compose calls with Connect SDK wrappers, skip nested, and add imports.'

    // Opt‑out of config‑cache (task mutates sources in‑place)
    notCompatibleWithConfigurationCache("Mutates Kotlin sources; simpler than implementing a cacheable task type.")

    def composables = [
            Text             : 'LoggedText',
            TextField        : 'LoggedTextField',
            OutlinedTextField: 'LoggedOutlinedTextField'
    ]

    println "\n----- Starting replaceWithConnectComposeWrapper -----\n"
    println "Mapping: $composables"

    def ktFiles = fileTree(dir: project.projectDir,
            includes: ['**/*.kt'],
            excludes: ['**/{test,androidTest}/**']
    )
    println "Scanning ${ktFiles.files.size()} Kotlin files..."

    int count = 0
    ktFiles.each { File file ->
        String original = file.getText('UTF-8')
        String result = original

        // Perform replacements
        composables.each { key, wrapper ->
            def pattern = java.util.regex.Pattern.compile("(?<!\\{ )\\b${key}\\b\\s*\\(([^)]*)\\)")
            def matcher = pattern.matcher(result)
            result = matcher.replaceAll(wrapper + '($1)')
        }

        // Compute which wrappers are present in result
        def neededImports = composables.values().findAll { wrapper ->
            result =~ java.util.regex.Pattern.compile("\\b${wrapper}\\b\\s*\\(")
        }.toSet()

        // Insert missing imports
        if (neededImports) {
            def lines = result.readLines()
            int idx = lines.findLastIndexOf { it.startsWith('import ') }
            if (idx < 0) idx = lines.findIndexOf { it.startsWith('package ') }
            neededImports.each { wrapper ->
                def importLine = "import com.acoustic.connect.android.connectmod.composeui.customcomposable.${wrapper}"
                if (!result.contains(importLine)) {
                    lines.add(idx + 1, importLine)
                    idx++
                }
            }
            result = lines.join('\n')
        }

        if (original != result) {
            file.write(result, 'UTF-8')
            println "✓ Updated: ${file.path}"
            count++
        }
    }

    println "\nDone. $count file(s) updated."
    println "----- Completed replaceWithConnectComposeWrapper -----\n"
}- Add the script to the app-level build configuration file.
apply from: '../connect-composables.gradle'apply(from = "../connect-composables.gradle")
- Open a Terminal window in Android Studio and run the following task from the root project directory.
./gradlew replaceWithConnectComposeWrapper- Synchronize the project.
Now you can start assigning the maskLabel parameter to the UI elements that require privacy protection. See Step A: tag text fields with PII, point 4.
Testing the settings (Connect Ultimate)
If your company has an Ultimate subscription for Connect, you can check how your new rule is working.
- Run the app and view the text field you have masked - for example, the screen status in Google's Reply app. If the field is interactive, enter some text into it.
- In your Connect account, navigate to Insights > Sessions > Session search.
- Play back the session and make sure the text field hasn't been captured.
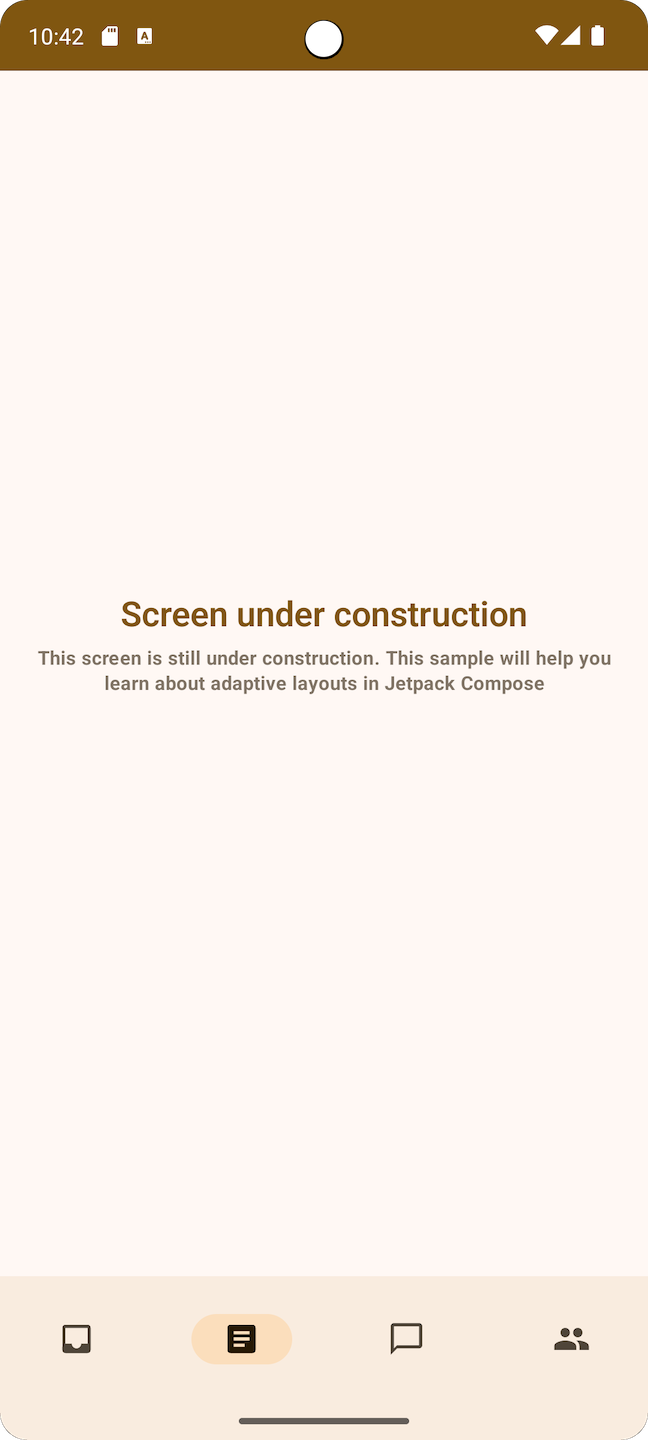
The protected text field in session replay
Privacy protection for screens
Here is how to disable the recording of a whole screen containing sensitive data:
- Open ConnectLayoutConfig.json.
- Add the
AutoLayout.ScreenNameobject whereScreenNameis the name of the screen. - Set the
ScreenChangeproperty for that screen tofalse.
{
  "AutoLayout": {
    "GlobalScreenSettings": {
      "ScreenChange": true,
      "Masking": {
        "HasMasking": true,
        "HasCustomMask": false,
        "MaskAccessibilityLabelList": [
          "pii",
          "password"
        ]
      }
    },
    "com.example.reply.ui.navigation.Route.Articles": {
      "ScreenChange": false
    }
  }
}
Updated 3 months ago