
Enable privacy protection in Android apps using the View system
If your app handles sensitive data — payment details, account information, or personal records — you can configure the Connect SDK to mask or exclude that data before it leaves the device.
Languages: Kotlin and Java
Availability: Ultimate
Prepare your Views for masking
Before you configure masking rules, identify the sensitive data your app displays or collects, and make sure each corresponding View has a stable identifier the SDK can target.
What to protect
Three categories of data typically require protection.
User input is data entered by the user into interactive fields. Common examples include:
- Payment form fields (card number, CVV, expiry date)
- OTP entry fields
- Security question answers
Displayed content is PII rendered on screen — values your app retrieves from a backend and presents to the user. This category has two subcategories:
- Patterned — the value follows a predictable format, such as a credit card number or a US phone number. You can match these using a regular expression.
- Unpatterned — the value has no reliable format. Examples include:
- Billing and delivery addresses
- Beneficiary name and bank
- Security question text shown on screen
- Passport number
- Booking reference combined with personal details
- Saved payment method labels (for example, "Visa ending in 4242")
Entire screens — some screens contain so much sensitive data that masking individual Views isn't practical. In these cases, you can exclude the screen from capture entirely. See Excluding an entire screen for examples.
IP addresses — the SDK can strip the device's IP address from all data sent to the collector before it leaves the device. This is configured separately in ConnectAdvancedConfig.json via the RemoveIp property. See ConnectAdvancedConfig.json — Privacy.
Tag your Views
For each View that contains sensitive data, assign an android:id before you write masking rules. This works for all View types — editable fields such as EditText, graphical Views such as ImageView, and display-only TextView.
android:id resource names are not exposed to end users through accessibility tools such as TalkBack — they are compile-time identifiers visible only to developers via tools like Layout Inspector.
Do not use android:tag — the SDK does not read it for masking. The android:tag attribute is an app-level convention only.
If you use Material Design's TextInputLayout, assign the android:id to the inner TextInputEditText, not the outer TextInputLayout wrapper. The SDK targets the View that holds the value — masking the wrapper ID has no effect.
<!-- Correct: id on the inner TextInputEditText -->
<com.google.android.material.textfield.TextInputLayout
    app:passwordToggleEnabled="true">
    <com.google.android.material.textfield.TextInputEditText
        android:id="@+id/passwordField"
        android:inputType="textPassword" />
</com.google.android.material.textfield.TextInputLayout>
If a View has no android:id, the SDK falls back to its XPath, which is fragile and requires conversion to a regular expression. Assign identifiers proactively to avoid this.
If your app has many sensitive Views, consider a naming convention such as et_card_number_pii and use a single regex entry in MaskIdList to match them all:
"MaskIdList": [
  "com.example.app:id/.*_pii$"
]
For unpatterned displayed content specifically: the value cannot be matched by pattern, so the View itself must be identifiable. Assign an android:id to any View that renders unpatterned PII — for example, a TextView that displays a security question or a delivery address.
MaskIdList format
Entries in MaskIdList must use the full resource ID format: applicationId:id/viewId. For example:
com.example.app:id/cardNumberFieldThe applicationId is defined in your build.gradle file. If your build uses an applicationIdSuffix (for example, .debug for debug builds), include the suffix in the ID. You can confirm the runtime package name in the logcat output at startup — the SDK logs it as part of the configuration dump.
Do not use the XML syntax @+id/viewId — that notation is only valid in layout files and is not recognised by the SDK configuration parser.
Instructions
- Create the ConnectLayoutConfig.json file at
app/src/main/assets/ConnectLayoutConfig.json. See the configuration reference for the full list of supported settings. - Populate it using the template below. The
GlobalScreenSettingsproperties are all required — omitting any of them causes the SDK to throw aJSONExceptionat runtime.
{
  "AutoLayout": {
    "GlobalScreenSettings": {
      "ScreenChange": true,
      "DisplayName": "",
      "CaptureLayoutDelay": 500,
      "ScreenShot": true,
      "NumberOfWebViews": 0,
      "CaptureUserEvents": true,
      "CaptureScreenVisits": true,
      "CaptureLayoutOn": 2,
      "CaptureScreenshotOn": 2,
      "Masking": {
        "HasMasking": true,
        "HasCustomMask": false,
        "Sensitive": {
          "capitalCaseAlphabet": "X",
          "number": "9",
          "smallCaseAlphabet": "x",
          "symbol": "#"
        },
        "MaskIdList": [],
        "MaskValueList": [],
        "MaskAccessibilityLabelList": []
      }
    }
  }
}- Add the Views that require privacy protection to one or more of the matching lists — by
android:id(MaskIdList), or by the displayed value itself (MaskValueList). - Run the file through a JSON validator.
{
  "AutoLayout": {
    "GlobalScreenSettings": {
      "ScreenChange": true,
      "DisplayName": "",
      "CaptureLayoutDelay": 500,
      "ScreenShot": true,
      "NumberOfWebViews": 0,
      "CaptureUserEvents": true,
      "CaptureScreenVisits": true,
      "CaptureLayoutOn": 2,
      "CaptureScreenshotOn": 2,
      "Masking": {
        "HasMasking": true,
        "HasCustomMask": false,
        "Sensitive": {
          "capitalCaseAlphabet": "X",
          "number": "9",
          "smallCaseAlphabet": "x",
          "symbol": "#"
        },
        "MaskIdList": [
          "com.example.app:id/et_card_number"
        ],
        "MaskValueList": [
          "^4[0-9]{12}(?:[0-9]{3})?$"
        ],
        "MaskAccessibilityLabelList": []
      }
    }
  }
}
How it works
Set HasMasking to true to activate masking rules for this scope. Masked Views appear as a grey block in session replay. No value is transmitted.
The Masking object supports the following properties:
| Property | Values | Description |
|---|---|---|
HasMasking | Boolean | Master toggle for the Masking object. Set to true to apply the rules below; false disables all masking for this scope. |
HasCustomMask | Boolean | Controls the visual appearance of masked Views in session replay. false — the View appears as a plain grey block. true — a fixed string is displayed on the grey block. No value is transmitted. ⚠️ In the current version, the fixed string cannot be customized. |
MaskIdList | Array of strings | Resource IDs (android:id) of Views to mask. Use the full format applicationId:id/viewId — for example, co.heron.app:id/cardNumberField. Also accepts regular expressions matched against the View's ID — useful when you control the naming convention and want to mask multiple Views at once, for example co.heron.app:id/.*_pii$. |
MaskValueList | Array of strings | Regular expressions matched against the value displayed in any captured View, regardless of its ID. Useful for catching patterned PII such as credit card numbers (^4[0-9]{12}(?:[0-9]{3})?$ for Visa). ⚠️ Use sparingly — every captured value is checked against every pattern, which can affect performance on busy screens. |
You can create a general privacy rule that applies to all screens of your app. In that case, use the AutoLayout.GlobalScreenSettings object. To create a rule for a particular screen, add the AutoLayout.ScreenName object where ScreenName is the name of the screen. Feel free to combine general and screen-specific rules within the same configuration file.
{
  "AutoLayout": {
    "GlobalScreenSettings": {
      "ScreenChange": true,
      "DisplayName": "",
      "CaptureLayoutDelay": 500,
      "ScreenShot": true,
      "NumberOfWebViews": 0,
      "CaptureUserEvents": true,
      "CaptureScreenVisits": true,
      "CaptureLayoutOn": 2,
      "CaptureScreenshotOn": 2,
      "Masking": {
        "HasMasking": true,
        "HasCustomMask": false,
        "Sensitive": {
          "capitalCaseAlphabet": "X",
          "number": "9",
          "smallCaseAlphabet": "x",
          "symbol": "#"
        },
        "MaskIdList": [
          "^9[0-9][0-9][0-9]$"
        ],
        "MaskValueList": [
          "^3[47][0-9]{13}$",
          "^4[0-9]{12}(?:[0-9]{3})?$"
        ],
        "MaskAccessibilityLabelList": []
      }
    },
    "PaymentActivity": {
      "Masking": {
        "HasMasking": true,
        "HasCustomMask": false,
        "Sensitive": {
          "capitalCaseAlphabet": "X",
          "number": "9",
          "smallCaseAlphabet": "x",
          "symbol": "#"
        },
        "MaskIdList": [
          "com.example.app:id/et_card_number",
          "com.example.app:id/et_billing_address"
        ],
        "MaskValueList": [],
        "MaskAccessibilityLabelList": []
      }
    }
  }
}
Examples
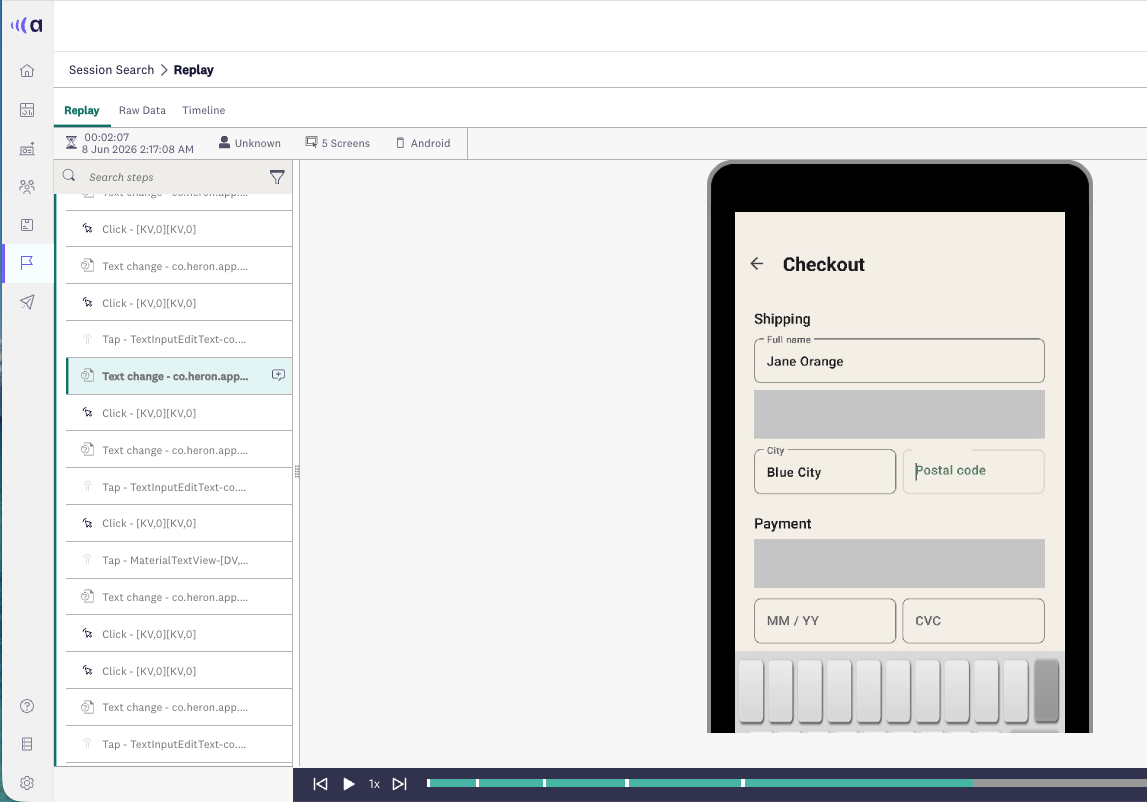
Checkout form
A checkout screen collects shipping details and payment information. Shipping address fields are masked by ID. The card number is also masked by ID, but a MaskValueList pattern provides a fallback in case the field is rendered without a stable ID elsewhere in the app.
{
  "AutoLayout": {
    "CheckoutActivity": {
      "Masking": {
        "HasMasking": true,
        "HasCustomMask": false,
        "Sensitive": {
          "capitalCaseAlphabet": "X",
          "number": "9",
          "smallCaseAlphabet": "x",
          "symbol": "#"
        },
        "MaskIdList": [
          "com.example.app:id/streetField",
          "com.example.app:id/cityField",
          "com.example.app:id/postalField",
          "com.example.app:id/cardNumberField",
          "com.example.app:id/expiryField",
          "com.example.app:id/cvcField"
        ],
        "MaskValueList": [
          "^3[47][0-9]{13}$",
          "^4[0-9]{12}(?:[0-9]{3})?$"
        ],
        "MaskAccessibilityLabelList": []
      }
    }
  }
}
Saved addresses screen
A saved addresses screen displays full street addresses in a TextView. These don't follow a predictable pattern, so they can't be matched by value. The View is masked by its resource ID.
{
  "AutoLayout": {
    "SavedAddressesActivity": {
      "Masking": {
        "HasMasking": true,
        "HasCustomMask": false,
        "Sensitive": {
          "capitalCaseAlphabet": "X",
          "number": "9",
          "smallCaseAlphabet": "x",
          "symbol": "#"
        },
        "MaskIdList": [
          "com.example.app:id/detailText"
        ],
        "MaskValueList": [],
        "MaskAccessibilityLabelList": []
      }
    }
  }
}
Excluding an entire screen
Some screens contain so much sensitive data that masking individual Views isn't practical. Use ScreenChange: false for screens that are always sensitive:
{
  "AutoLayout": {
    "SensitiveActivity": {
      "ScreenChange": false,
      "CaptureLayoutOn": 0,
      "CaptureScreenshotOn": 0
    }
  }
}
For screens that are only conditionally sensitive — for example, when a user navigates to a specific step in a flow — pause and resume capture in code instead:
// Pause before entering the sensitive state
Connect.pauseTealeaf()

// Resume when leaving it
Connect.resumeConnect()
// Pause before entering the sensitive state
Connect.pauseTealeaf();
// Resume when leaving it
Connect.resumeConnect();For the full API reference, see Pause and resume screen capture and Configure data capture settings.
Verify the configuration
To verify that your masking rules are working as expected:
- Run the app and interact with the Views you have masked — enter values into input fields and navigate to screens that display sensitive content.
- In your Connect account, navigate to Behavior studio > Sessions > Session replay.
- Find the session and check how the input is displayed.
Protected text input in session replay
Updated about 1 month ago