Enabling traditional replay in the Tealeaf iOS SDK
When using Tealeaf to capture a mobile session, images from the mobile application are sent to the Tealeaf server. If the images from the mobile application are already stored on the replay server, the mobile application does not upload the images during an active session. Uploading the images to the replay server reduces the amount of data sent from the mobile device and can display the images when you replay a native mobile session.
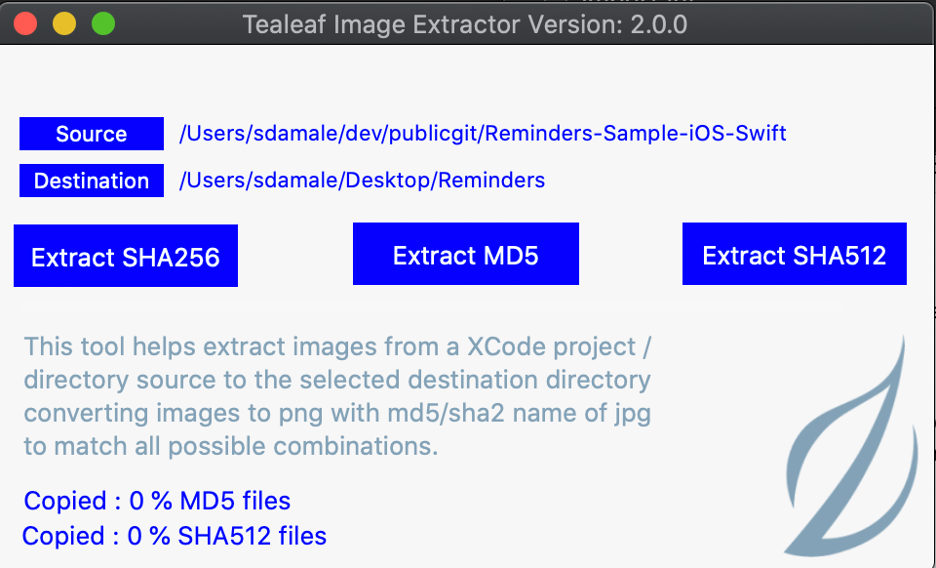
The Acoustic Tealeaf Image Tool is included with the Tealeaf iOS SDK and can be used to extract images from your mobile application.
Running the image capture tool extracts the images from your project source, hashes the image names from your project source, and replaces the image names in your project source with the new hashed names. After the image capture tool finishes processing, you can copy the hashed images to the replay server.
To run the image capture tool:
- Open TLFImageTool.app.
- Select Source and enter or select the path for the project source you are using to create your mobile application; then, select Choose.
- Select Destination and enter the path to store the hashed images extracted from your project; then, select Choose.
- Click one of the following depending on the type of the hash library you are using: Extract MD5, Extract SHA256 or Extract SHA512.

The image tool crawls your application code subfolders, looks for the corresponding image files, and copies the image files to the destination folder by computing each image file's hash. When all files are copied, a confirmation message Copied: 100% files displays.
Note
If you select SHA512 or SHA256 and you used the image tool before with MD5, you must generate MD5 images in addition to the SHA512 or SHA256 files. This step is required because some iOS application users will not update your iOS application to the latest version. If you can force your iOS users to update their apps to the latest version, you can skip regenerating the MD5 library when selecting SHA512 or SHA256.
Wait for the image tool to finish copying files to the Destination folder before copying any other libraries.
Extracting PDF Vector Images in an iOS project
You can set a PDF image to UIImageView through storyboard or programmatically.
Programmatic
If the PDF image is set to UIImageView programmatically, no additional steps are needed to extract the images.
Storyboard
If the PDF image is set to UIImageView through storyboard, additional steps are needed to extract that image:
- Set a user-defined runtime attribute for the
UIImageViewwith the keytlfFileReferenceand the name of the PDF image as the value. - Now run the image capture tool. You should see the PDF images along with other images in your designated folder.
You can define any User-defined runtime attributes for any NSKeyValueCoding protocol compliant object using either of the following ways:
- Select the desired element (
UIImageViewinstance in this case) in the storyboard and open Identity Inspector. Go to the User Defined Runtime Attributes section and add a new property. - Set programmatically by calling setValue:forkeypath: method of the object (
UIImageViewinstance in this case) in the viewDidLoad: method of the object's UIViewController.
Note
You must use the iOS image Capture tool as the primary tool to capture images in your application. However, if the iOS Image Capture tool cannot support your image replay experience, you can use the target simulator tool.
Upload to replay server
For application replay, the images that you added to your application should be copied to the replay server. When the images are on the replay server, the images do not need to be sent in the payload which could cause performance issues. Instead, replay uses a unique identifier for each image to retrieve the needed images from the replay server.
- Create the images.zip file. Go to your destination folder and create a zip file called images.zip. The .zip file should contain the contents of the destination folder. Do not create any other folder hierarchies while creating the zip.
- To ensure the format is correct, unzip the images.zip file somewhere on your computer and check to see that all images are extracted to a folder named images.
Note
The zip file must be named images.zip. Tealeaf server requires one imagez.zip file for all your applications across all the native mMobile platforms. For this reason, if you have multiple applications on multiple nNative mMobile pPlatforms, such as iOS, iPadOS, Android, run the respective image tool for each application on the iOS and on Android platforms. After you copy all images from all applications, create one images.zip folder with the flat folder hierarchy.
- Copy the images.zip file to the replay server.
Further steps
- If you are using Tealeaf SaaS, upload the zip file to Admin > Company settings > Native replay files > Image package Upload file. For more information, see Copy native and hybrid application images to the replay server.
- If you are using Tealeaf On-Premise, add the images.zip file under Replay Server. For more information, see Replay mobile app sessions as screen captures.
Updated over 1 year ago
