Add the iOS SDK to your project

Overview

Use the iOS SDK to instrument your native and hybrid iOS applications for logging and analysis. The iOS SDK implementation is simple. It uses standard iOS classes and user interface controls to track user interface events.

Before you begin

Install the following:

Download and add the SDK to your project

The iOS SDK package contains the following three folders:

  • EOCore – Contains static debug and release of the base library that Tealeaf needs to communicate with the server.
  • Tealeaf – Contains static debug and release of the library that collects Tealeaf data passed to EOCore.
  • TLFImageTool - The TLFImageTool extracts local image resources and generates .png assets for the replay server.

You can also find the following sample codes, implementations, tools, and templates that may be helpful when using the Tealeaf iOS SDK in the SDK_Tools-master folder.

  • KillSwitch folder - Contains a basic kill switch implementation for JSP, ASP.Net, and PHP servers.
  • TealeafTargetSimulator folder - Contains the tool used to convert sessions into images that are used for Native Replay.
  • NativeTemplates folder - Contains the latest native templates compatible with the library.

You can add the iOS SDK to your app by using the CocoaPods dependency manager.

  1. Create a Podfile in your Xcode project directory if you have not already.
  2. Open the Podfile in a text editor and make the following changes:
    1. Uncomment and set the platform as iOS 12 platform :ios, '12.0'.
    2. Uncomment use_frameworks!
    3. In the respective targets add the SDK as follows:
      • pod 'Tealeaf' – If you want to use Tealeaf SDK's release version in your production version of your application.
      • pod 'TealeafDebug' – If you want to use Tealeaf SDK's release version with version number. Otherwise you will get the beta version that might have new features or fixes which have not been full tested or approved.

      📘

      Note:

      You can only use pod 'Tealeaf' or pod 'TealeafDebug'. Do not use both at the same time.

  3. Run the command pod install to install the SDK in your project.

Add the required iOS dependency frameworks

The iOS logging framework requires these frameworks:

  • CFNetwork.framework
  • CoreGraphics.framework
  • CoreLocation.framework
  • CoreTelephony.framework
  • Foundation.framework
  • libz.tdb
  • SystemConfiguration.framework
  • UIKit.framework
  • WebKit.framework

When you add the SDK to your project using Cocoapods, these dependency frameworks are added by default. Check if all the dependencies were added to your project.

You can add the iOS SDK to your app by using the Carthage dependency manager.

  1. Create a Cartfile in your Xcode project directory if you have not already.
  2. Open the Cartfile in a text editor and add the following:
    • If you want to use Tealeaf SDK's release version -
      binary "https://raw.githubusercontent.com/acoustic-analytics/Tealeaf/master/Tealeaf.json"
      binary "https://raw.githubusercontent.com/acoustic-analytics/EOCore/master/EOCore.json"
    • If you want to use Tealeaf SDK's debug version -
      binary "https://raw.githubusercontent.com/acoustic-analytics/Tealeaf/master/TealeafDebug.json"
      binary "https://raw.githubusercontent.com/acoustic-analytics/EOCore/master/EOCoreDebug.json"

    By default, the sample application uses debug version of libraries.

    📘

    Note:

    You can only use the release version or debug version. Do not use both at the same time.

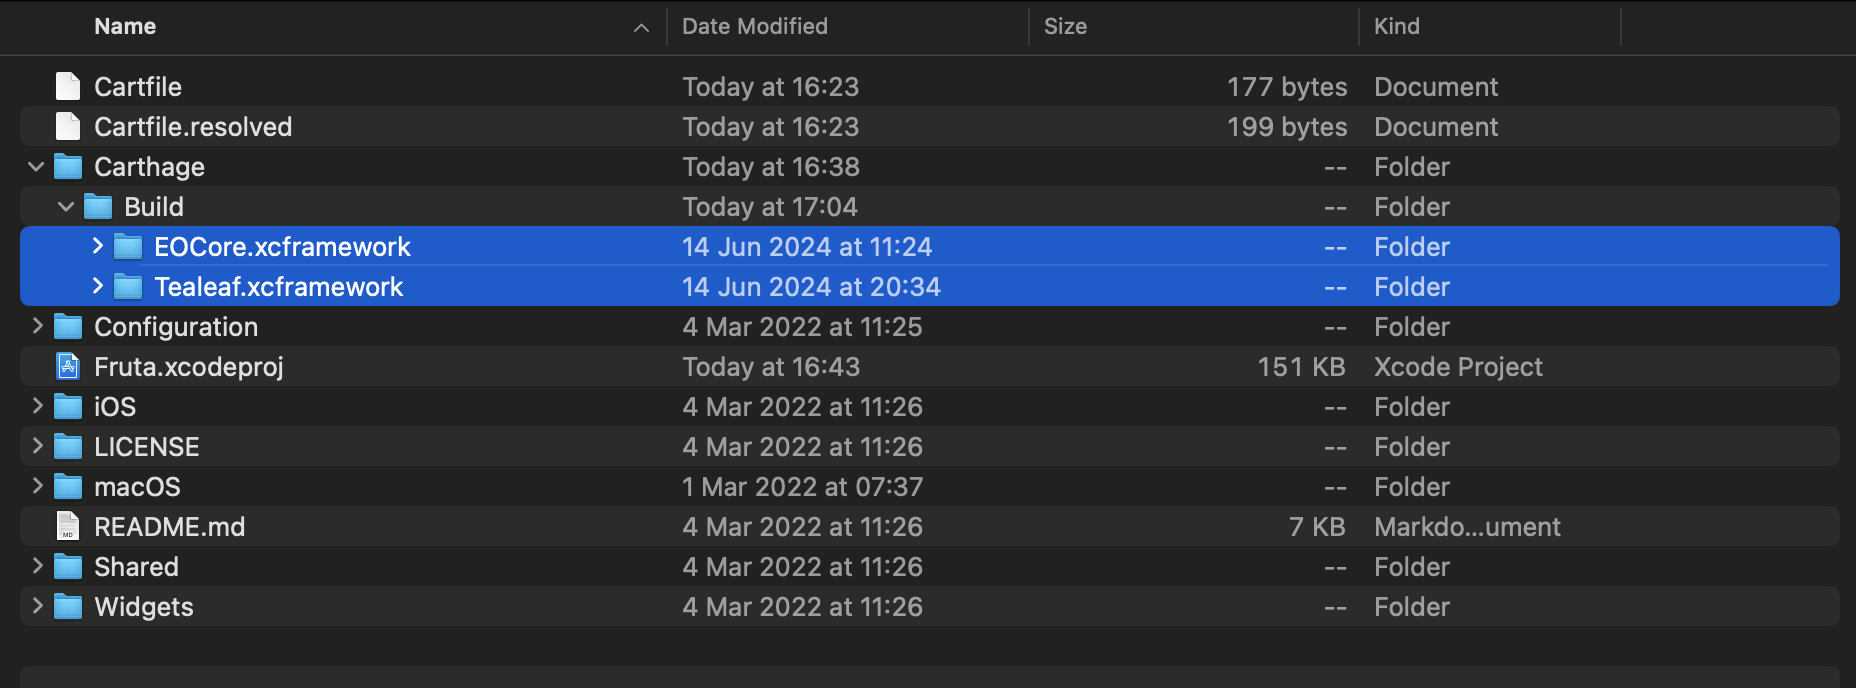
  3. Run the command carthage update --platform iOS. The Carthage command should complete without errors , and the Carthage build folder is created in your directory with all the SDK files.
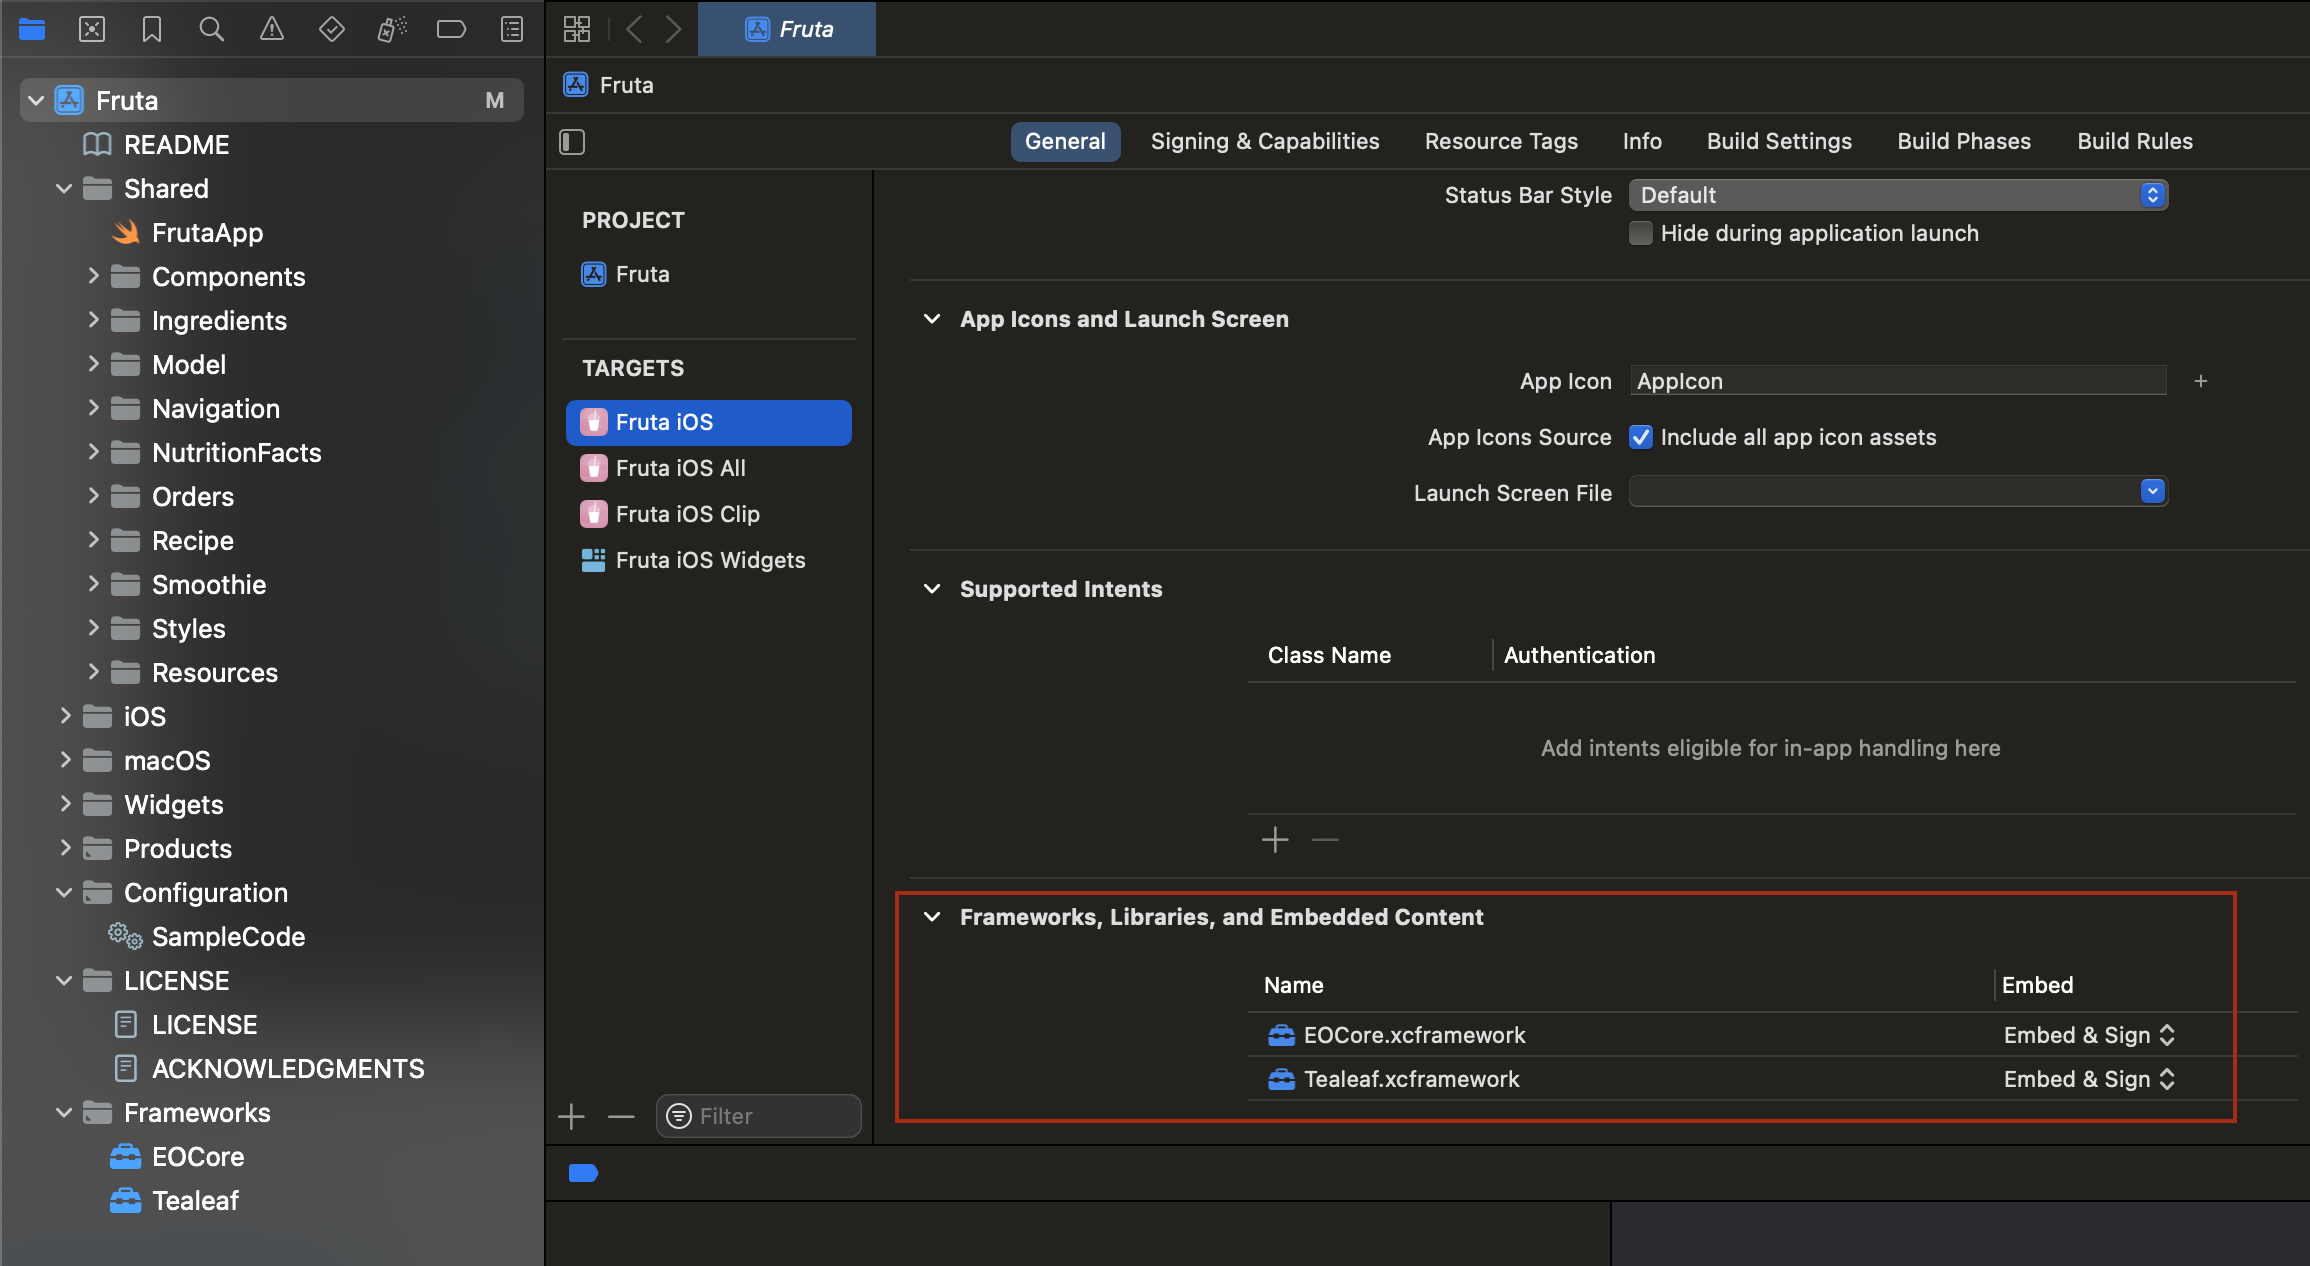
  4. Add Carthage to your XCode target> General tab > Frameworks, Libraries, and Embedded Content section.
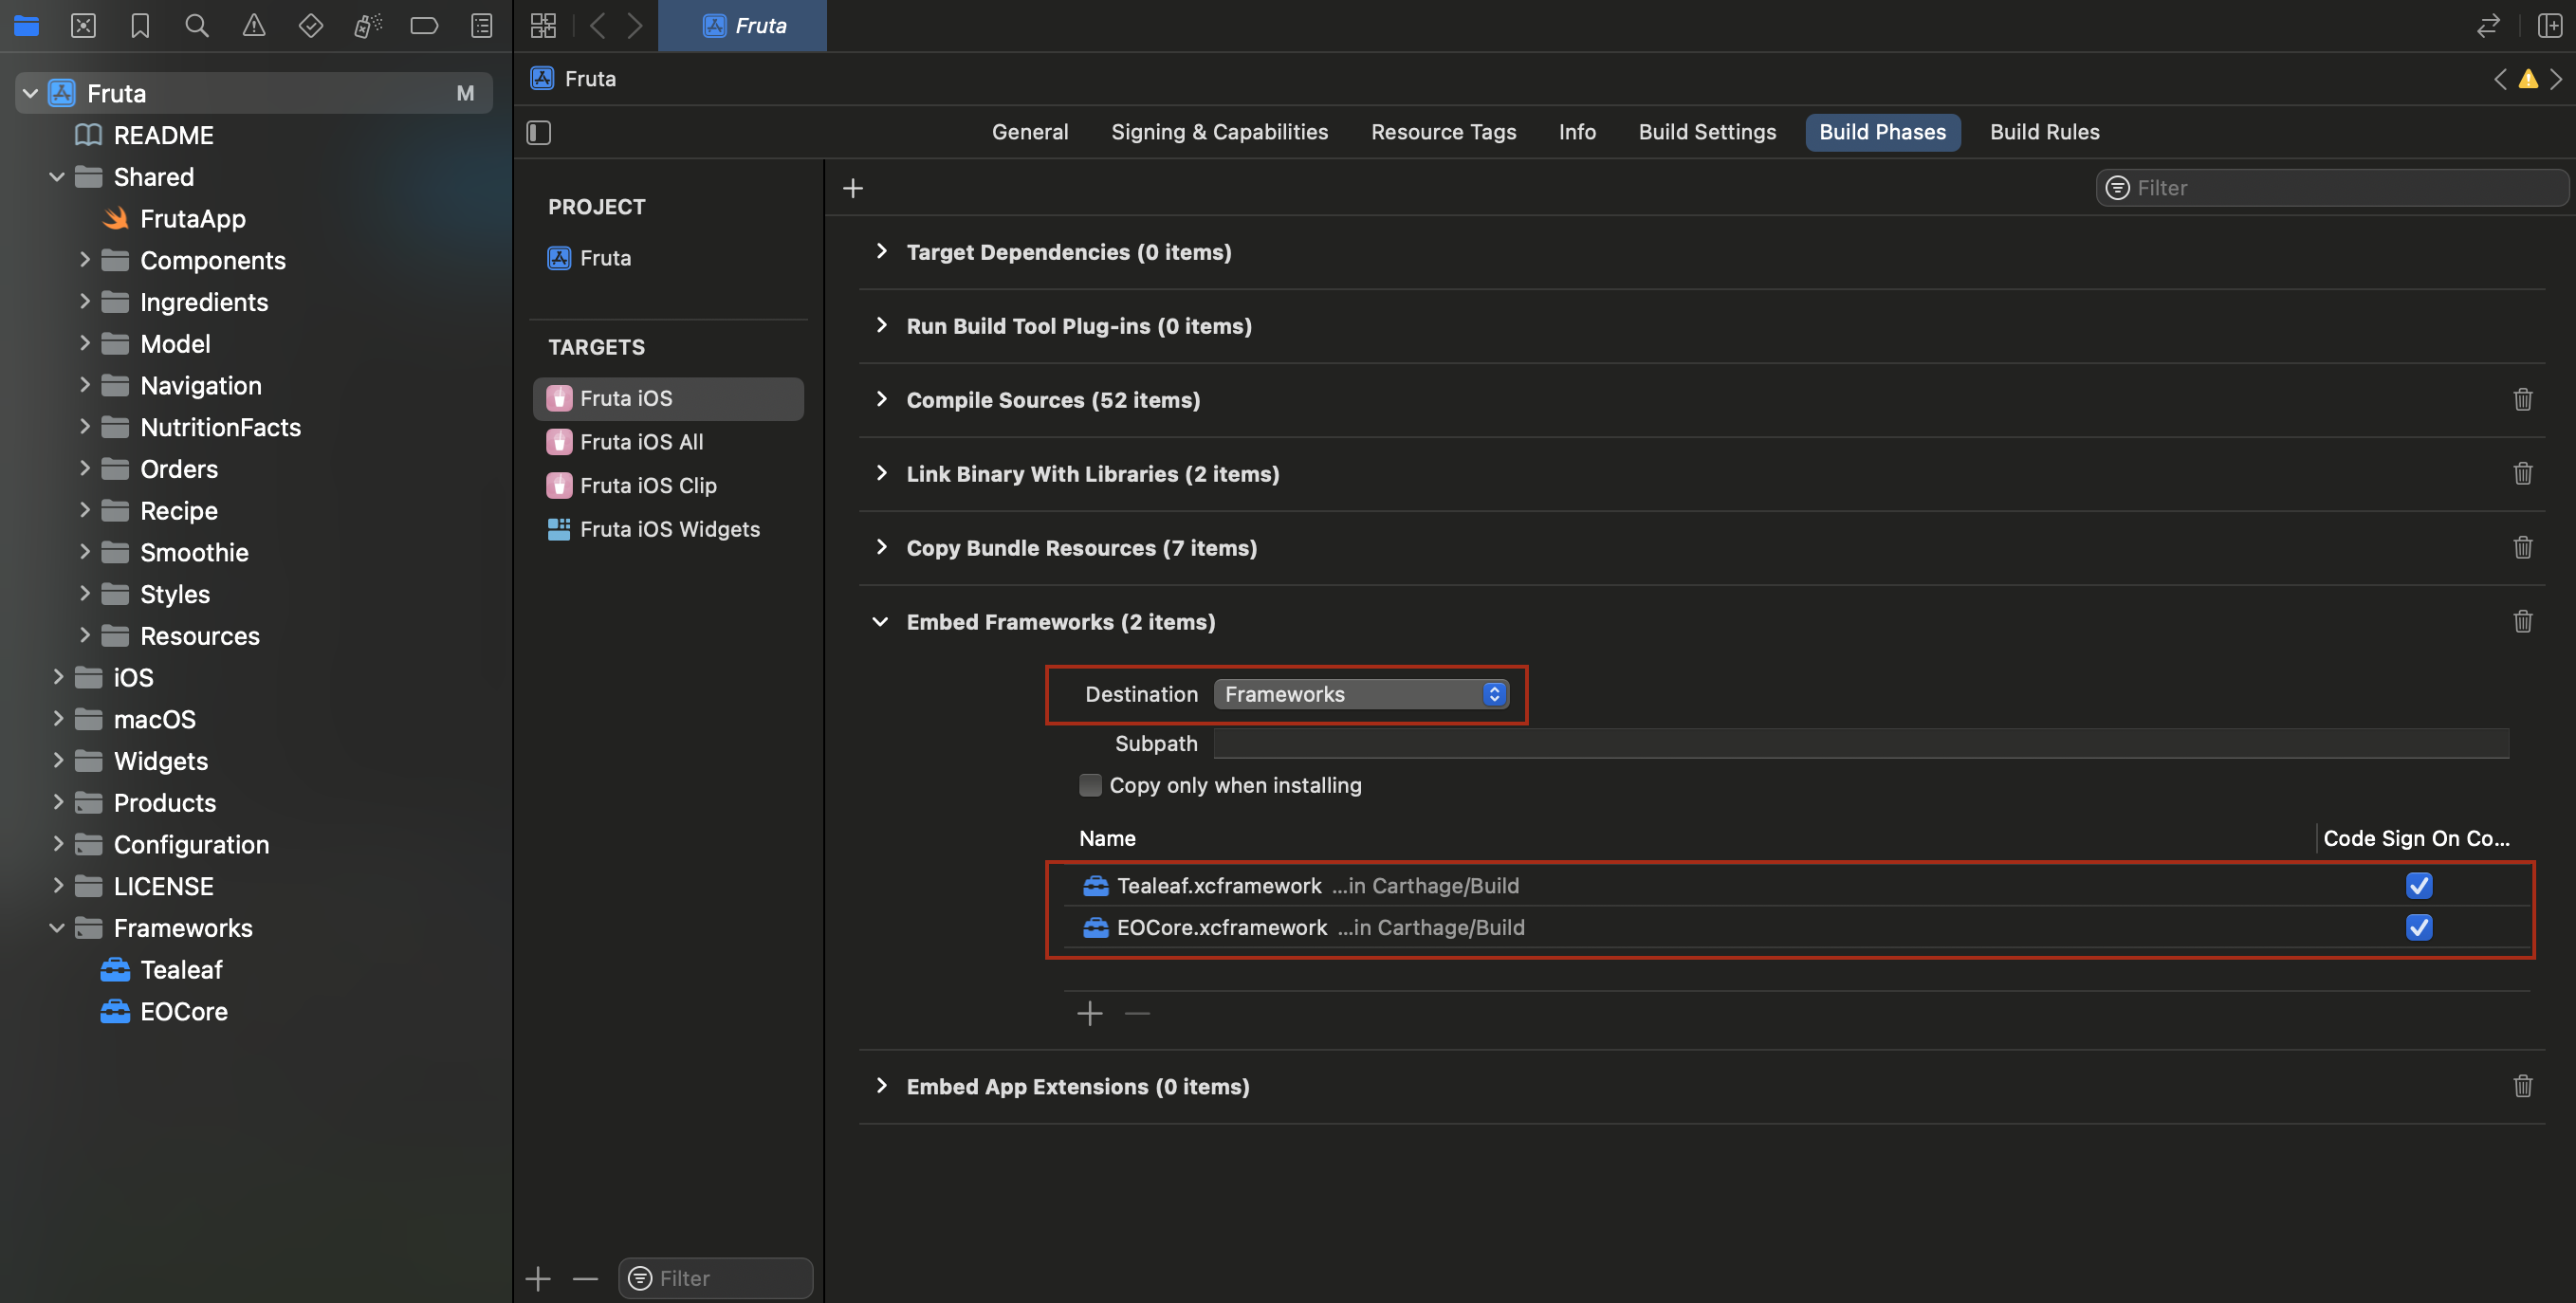
  5. Then update the New Run Script Phase from the Build Phases tab of your target to copy the frameworks.

Add the required iOS dependency frameworks

The iOS logging framework requires these frameworks:

  • CFNetwork.framework
  • CoreGraphics.framework
  • CoreLocation.framework
  • CoreTelephony.framework
  • Foundation.framework
  • libz.tdb (For use with iOS version 9 and later)
  • libz.dylib (For use with iOS version 8)
  • SystemConfiguration.framework
  • UIKit.framework
  • WebKit.framework (for iOS version 8 and later)

These dependency frameworks are added when you add the Carthage to your Xcode project and Update the New Run Script Phase. Check if all the dependencies were added to your project.

You can add the iOS SDK as a Switch package dependency to your Xcode project.

📘

Note:

You must have Xcode 12.x that supports Swift Packages.

Complete the following steps to add the Tealeaf-SP swift package.

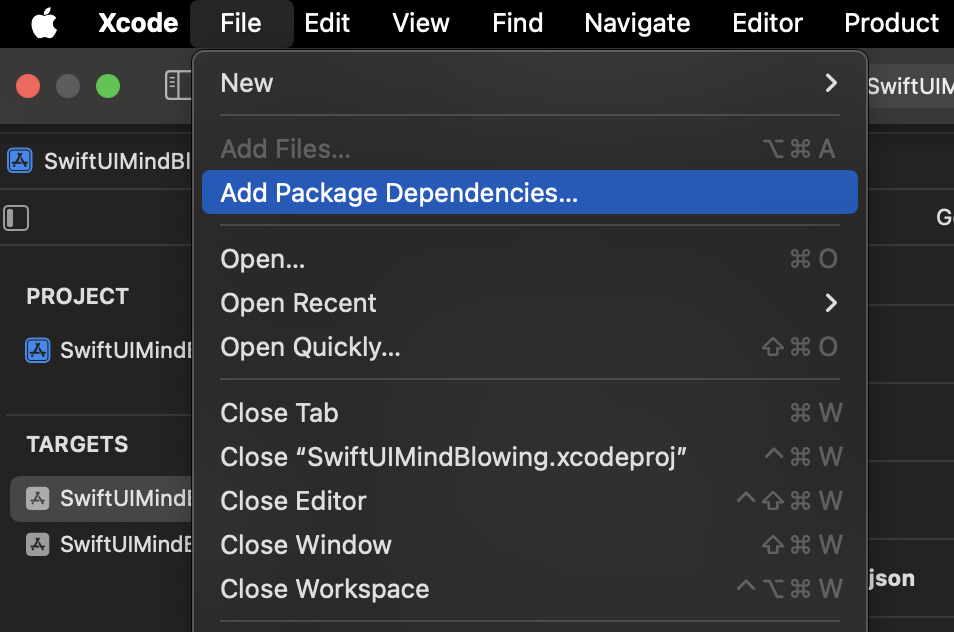
  1. In your Xcode project, click File > Swift Packages > Add Package Dependency.
  2. In the Choose Project screen, select the project where you want to add the package and click Next.
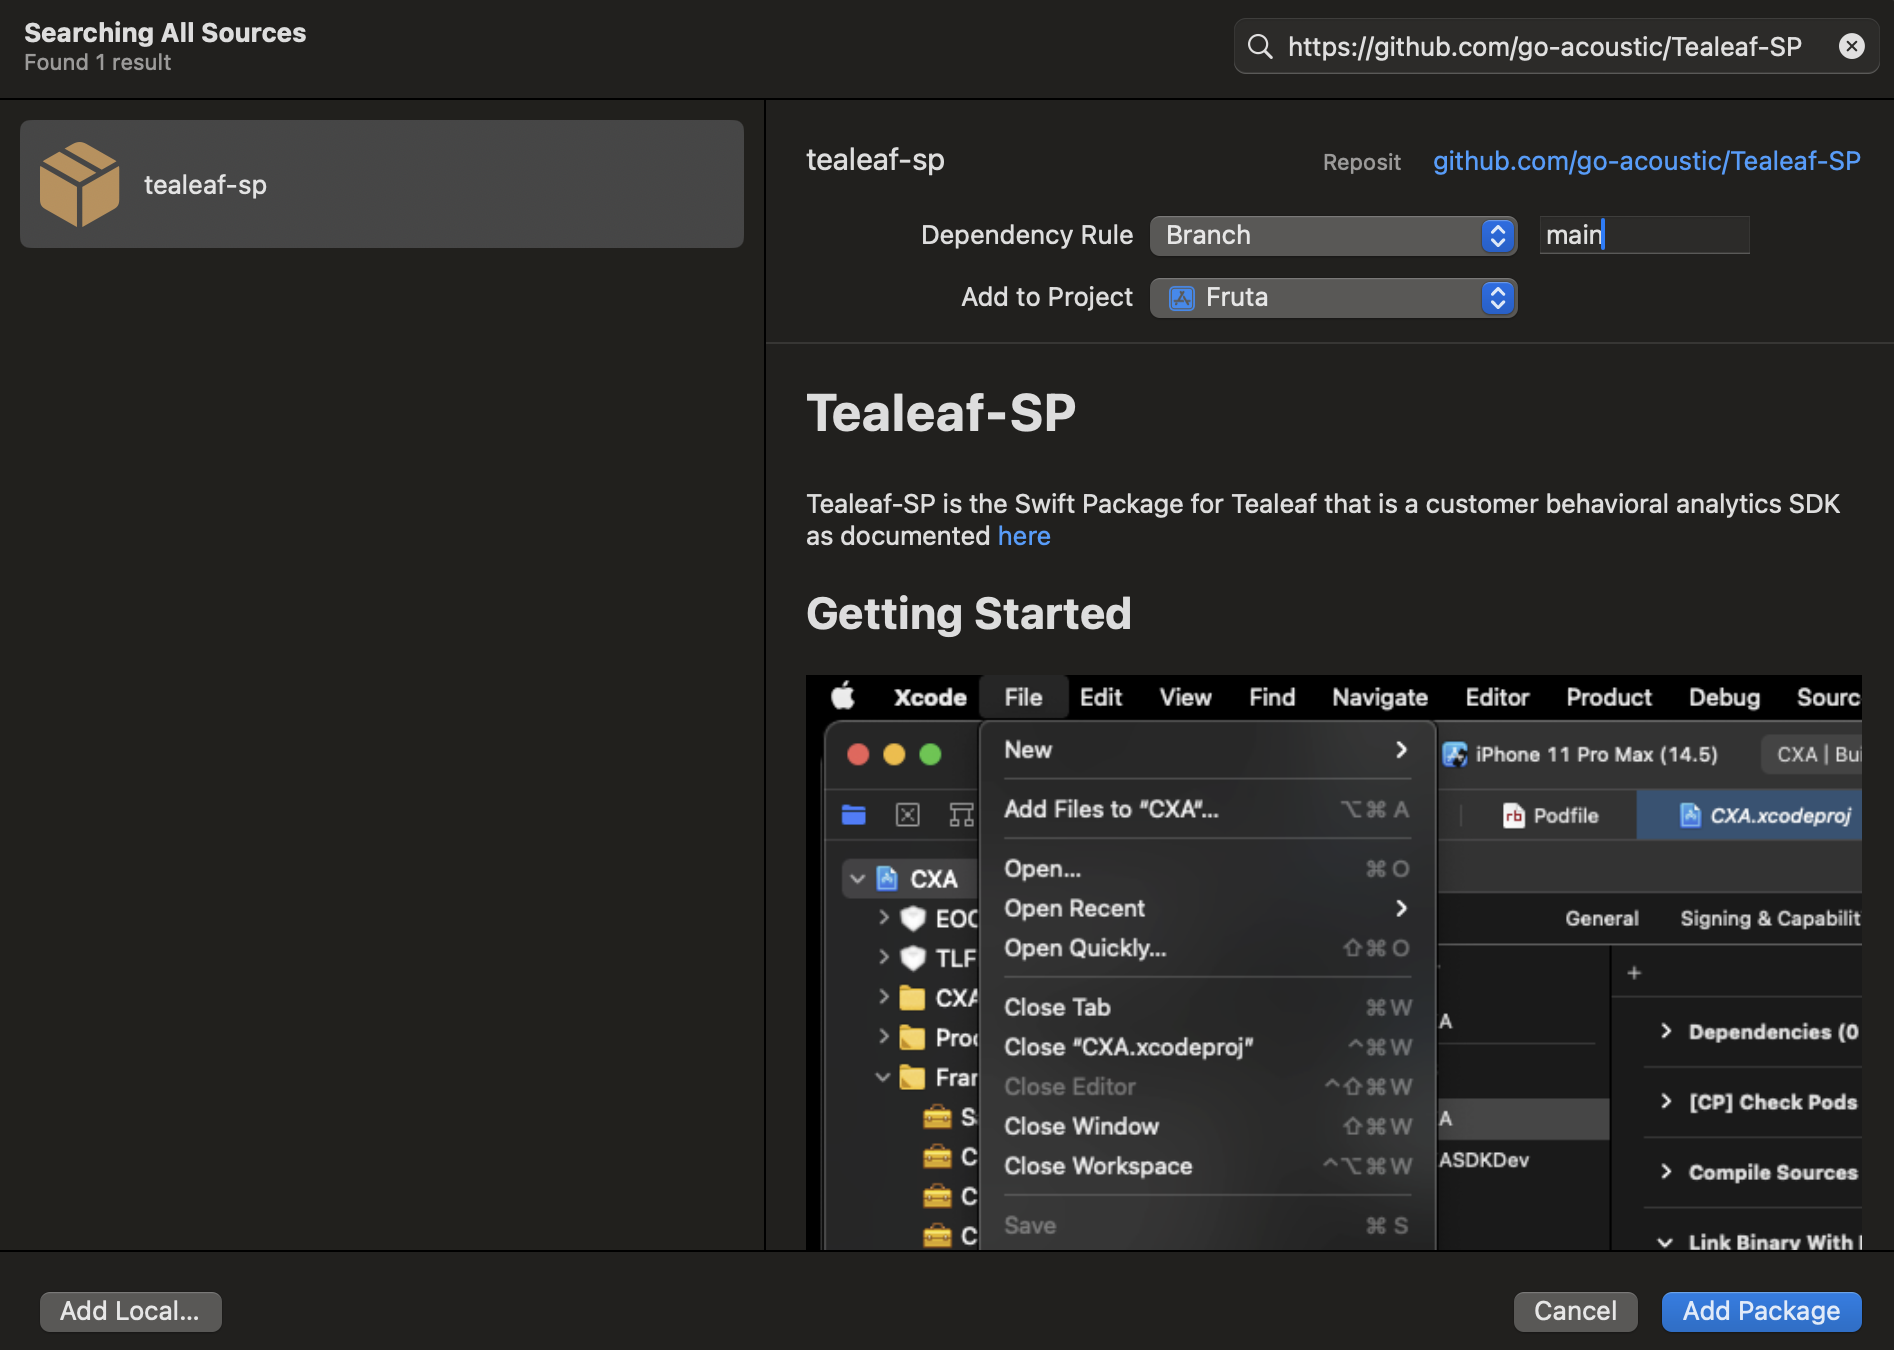
  3. Add the following Swift package URL in the Choose Package repository screen and click Next.

    📘

    Note:

    You can only use the release version or debug version. Do not use both at the same time.

  4. Choose the corresponding version. For example, select Branch: main and click Next.
  5. In the Choose package products and targets screen, select the target in the Add to Target column and click Finish.

📘

Note:

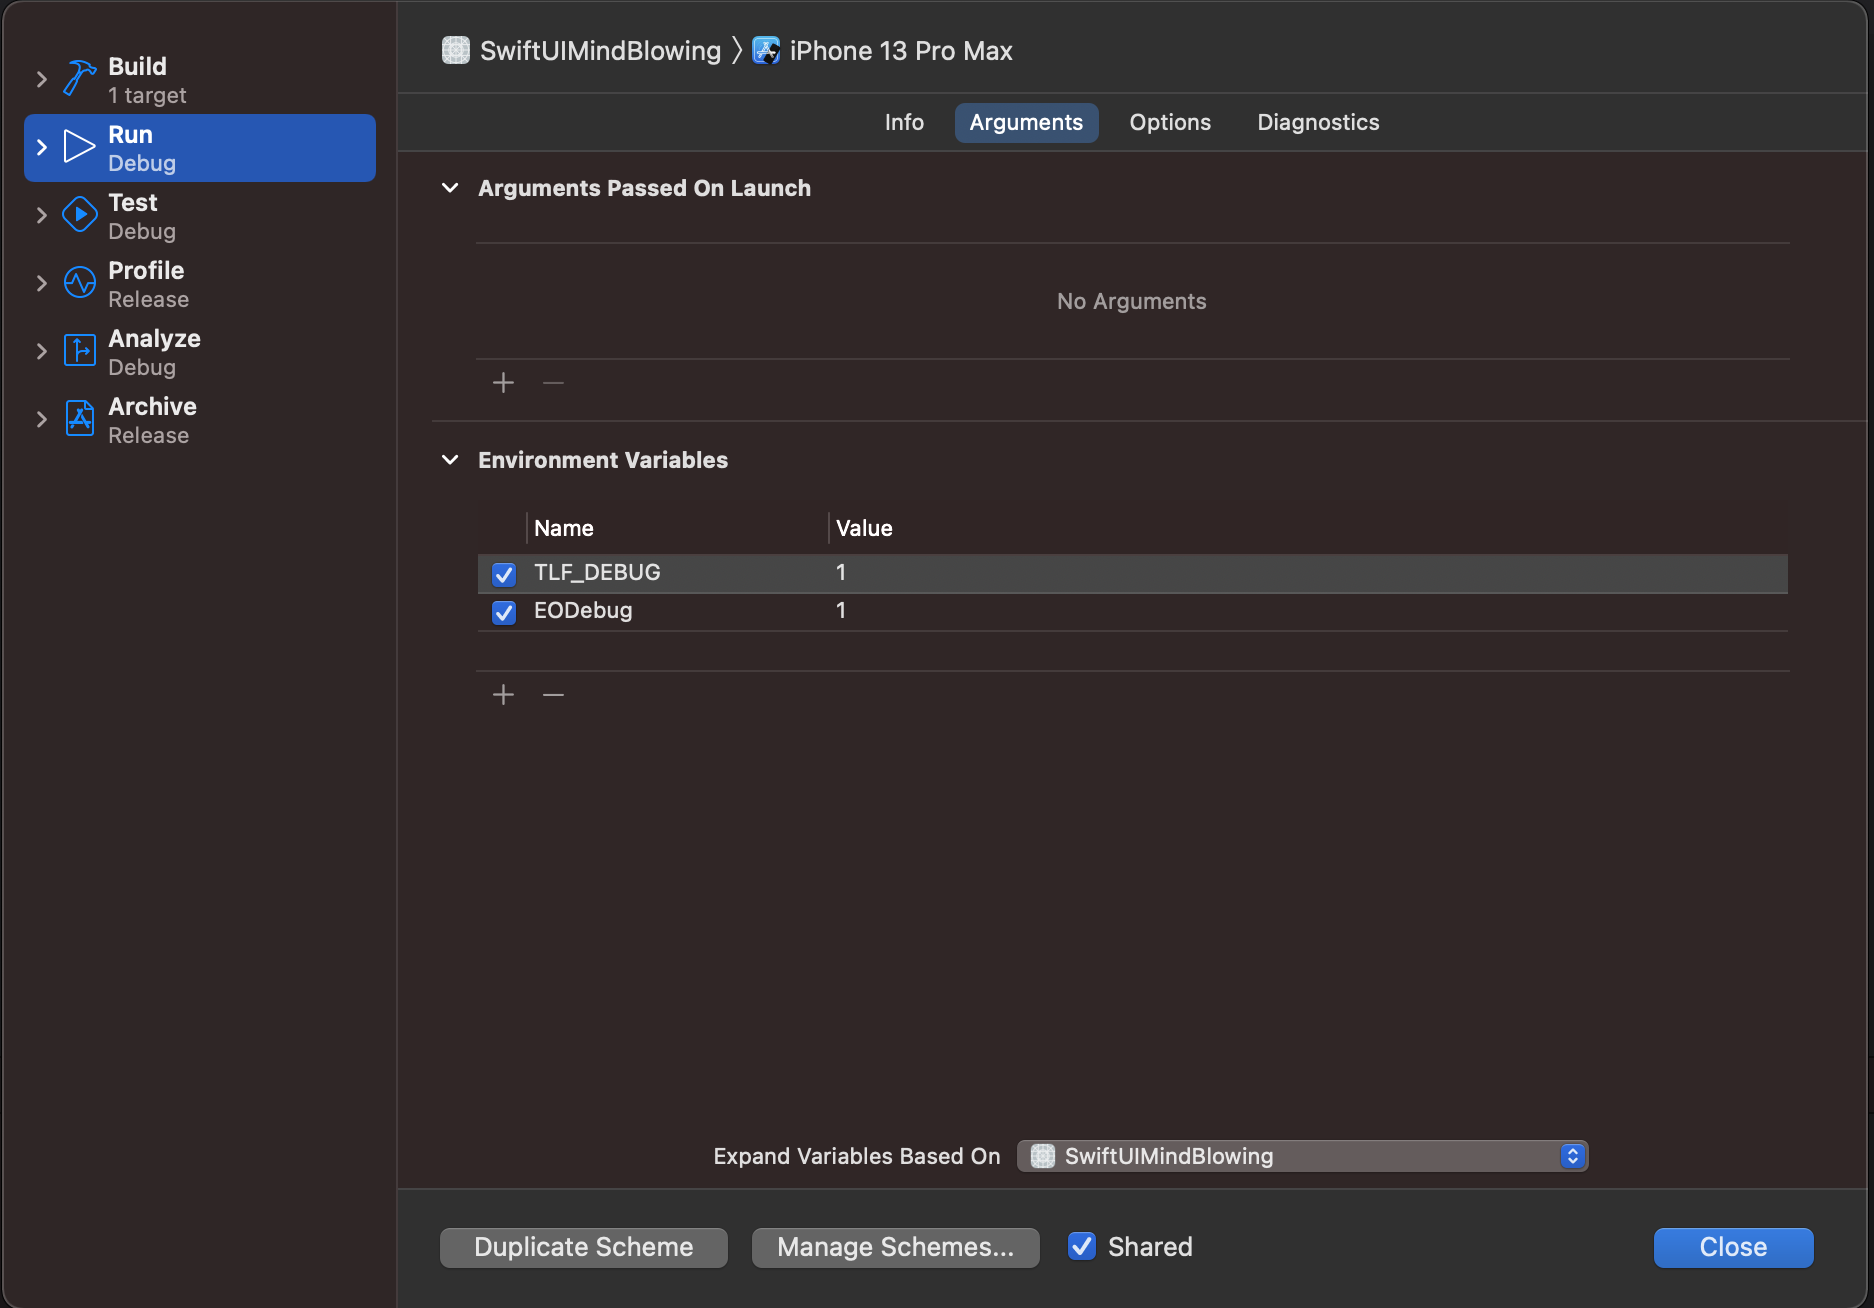
If you are using the debug version, then you can edit your project's scheme in XCode and add the following environmental variables:
EODebug and set its value to 1; TLF_DEBUG and set its value to 1.

When these variables are set, the SDK will write debug logs to your Xcode console window. If and when you want to report issues, the Tealeaf support engineers will ask you for these logs.

Add the required iOS dependency frameworks

The iOS logging framework requires these frameworks:

  • CFNetwork.framework
  • CoreGraphics.framework
  • CoreLocation.framework
  • CoreTelephony.framework
  • Foundation.framework
  • libz.tdb (For use with iOS version 9 and later)
  • libz.dylib (For use with iOS version 8)
  • SystemConfiguration.framework
  • UIKit.framework
  • WebKit.framework (for iOS version 8 and later)

When you add the SDK to your project using the Swift package, these dependency frameworks are added by default. Check if all the dependencies were added to your project.

  1. Download the latest version of the iOS SDK.
  2. Unzip the downloaded SDK_Tools-master.zip file and go to SDK_Tools-master/SDKPackages/Tealeaf/ios folder.
  3. Drag and drop the SDK files to your Xcode project:
    • If you want to use the release version:
      • From the SDK_Tools-master/SDKPackages/Tealeaf/ios/EOCore/Release folder, drag and drop the EOCore.framework folder. Then, in the Choose options for adding these files screen, select the target to add the files and click Finish.
      • From the SDK_Tools-master/SDKPackages/Tealeaf/ios/Tealeaf/Release folder, drag and drop the Tealeaf.framework folder. Then, in the Choose options for adding these files screen, select the target to add the files and click Finish.
    • If you want to use the debug version:
      • From the SDK_Tools-master/SDKPackages/Tealeaf/ios/EOCore/Debug folder, drag and drop the EOCore.framework folder. Then, in the Choose options for adding these files screen, select the target to add the files and click Finish.
      • From the SDK_Tools-master/SDKPackages/Tealeaf/ios/Tealeaf/Debug folder, drag and drop the Tealeaf.framework folder. Then, in the Choose options for adding these files screen, select the target to add the files and click Finish.

    By default, the sample application uses debug version of libraries.

    📘

    Note:

    You can only use the release version or debug version. Do not use both at the same time.

  4. From the SDK_Tools-master/SDKPackages/Tealeaf/ios folder, drag and drop the TealeafSHA512Hash.framework or the TealeafMD5Hash.framework folder.

📘

Note:

You must only add either TealeafSHA512Hash.framework or TealeafMD5Hash.framework. You can also choose not to add both of them, but you can never add both. For information about these libraries, see (https://developer.goacoustic.com/acoustic-exp-analytics/docs/hashing-libraries-for-computing-unique-ids-md5-sha256-and-sha512)[Hashing libraries for computing unique ids: MD5, SHA256, and SHA512]

  1. From the SDK_Tools-master/SDKPackages/tealeaf/ios/EOCore/Debug/EOCore.framework folder, drag and drop the EOCoreSettings.bundle. This bundle will also be added in the Target > Build Phases > Copy Bundle Resources section. If it is not added there, you can add them.
  2. From the SDK_Tools-master/SDKPackages/tealeaf/ios/Tealeaf/Debug/Tealeaf.framework folder, drag and drop the TLFResources.bundle. This bundle will also be added in the Target > Build Phases > Copy Bundle Resources section. If it is not added there, you can add them.

Add the required iOS dependency frameworks

The iOS logging framework requires these frameworks:

  • CFNetwork.framework
  • CoreGraphics.framework
  • CoreLocation.framework
  • CoreTelephony.framework
  • Foundation.framework
  • libz.tdb (For use with iOS version 9 and later)
  • libz.dylib (For use with iOS version 8)
  • SystemConfiguration.framework
  • UIKit.framework
  • WebKit.framework (for iOS version 8 and later)

To add these dependency frameworks to your project, complete the following steps:

  1. In your Xcode project, select the project node in the project navigation.
  2. Select your desired target under the targets list and open the General tab.
  3. In the Frameworks, Libraries and Embedded Content section, click + icon.
  4. Then in the Choose frameworks and libraries to add screen, search and select the frameworks and click Add.
  5. Continue till you have added all the required frameworks.
  6. Go to Build Phases tab and in the Link Binary With Libraries, you will see the frameworks that you just added.
  7. From your Xcode project naviagtion, drag and drop the following files to the Link Binary With Libraries section.
    • EOCore.framework
    • Tealeaf.framework
    • TealeafSHA512Hash.framework or TealeafMD5Hash.framework

📘

Note:

These libraries should be listed before any Apple libraries, for example, the SystemConfiguration.framework and UIKit.framework libraries. If the libraries are listed after the Apple libraries, your application might not pass the App Store approval process. You can rearrange the ordder of the libraries listed in the Link Binary With Libraries section.

Set up the iOS SDK with your project

  1. Add import statements to your bridging header file

Any class that is listed in the bridging header file can be accessed from your Swift classes.

  1. Create a bridging header file if your project does not have one. To create a bridging header, go to File > New > File.
  2. From the iOS template options, go to Source and select the Header File.
  3. Name your file as <ProjectName>/<ProjectName>-Bridging-Header.h and click Create. If Xcode offers to create an Objective-C bridging header file, accept it.
  4. Navigate to your project Build Settings > Swift Compiler - General section. Next to Objective-C Bridging Header, add the name/path of your header file. If your file resides in your project's root folder, put the name of the header file there.
    For example: <ProjectName>/<ProjectName>/-Bridging-Header.h or <ProjectName>-Bridging-Header.h.
  5. Open the bridging header file and add the following import statements:

📘

Note:

ASIdentifierManager.h is required if you want your application to capture Apple identifier for advertisers (IDFA) data using the Tealeaf AdvertisingId property.


#import <Tealeaf/TLFApplicationHelper.h> #import <Tealeaf/TLFCustomEvent.h> #import <Tealeaf/TLFPublicDefinitions.h> #import <AdSupport/ASIdentifierManager.h>

Any class that is listed in the bridging header file can be accessed from your Objective-C classes.

  1. Create a bridging header file if your project does not have one. To create a bridging header, go to File > New > File.
  2. From the iOS template options, go to Other and select the PCH File.
  3. Name your file as <ProjectName>-Prefix.pch and click Create.
  4. Navigate to your project Build Settings and select All. Find the Prefix Header field and add the name/path of your header file.
    For example: <ProjectName>/<ProjectName>/-Prefix.pch.
  5. Open the <ProjectName>-Prefix.pch file and add the following import statements:

📘

Note:

ASIdentifierManager.h is required if you want your application to capture Apple identifier for advertisers (IDFA) data using the Tealeaf AdvertisingId property.


#import <Tealeaf/TLFApplicationHelper.h> #import <Tealeaf/TLFCustomEvent.h> #import <Tealeaf/TLFPublicDefinitions.h> #import <AdSupport/ASIdentifierManager.h>
  1. Set the Objective-C linker flag.
    a. Go to the Build Settings for your project.
    b. In the search box, enter Other Linker Flags.
    c. If the -ObjC flag is not listed as an Other Linker Flags entry, double-click the row and select the +, then enter -ObjC.
  2. Configure your properties file to point to your target server
    Go to Tealeaf.framework/TLFResources.bundle/TealeafBasicConfig.plist file and edit the PostMessageUrl to point to your target server.

Instrument the SDK

By default, the iOS SDK automatically instruments your application for a set of predefined events. In addition to these predefined events, you can programmatically apply advanced custom instrumentation for elements in your application or opt to manually instrument the SDK. For more information about custom instrumentation, see Custom instrumentation for more information.

Integrate the iOS SDK

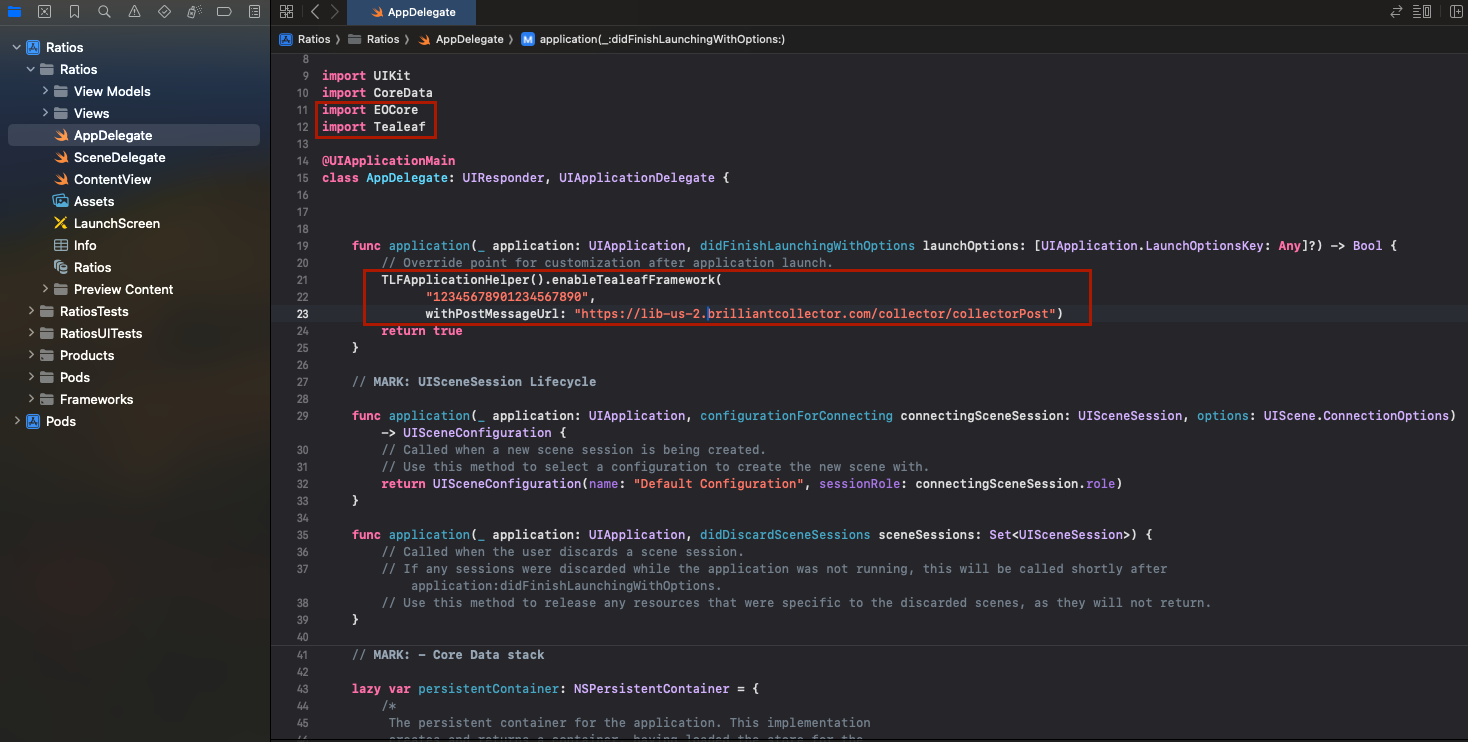
  1. Enable the Tealeaf framework.

    📘

    Note:

    If DynamicConfigurationEnabled in EOCoreBasicConfig.plist is set to NO you do not have to complete this task.

    • For Swift:

      Open the AppDelegate.swift file and add one of the following code to the didFinishLaunchingWithOptions function:
      Option 1:


      //Tealeaf TLFApplicationHelper.sharedInstance().enableTealeafFramework() //Tealeaf End

      Option 2:
      If you want your application to capture Apple identifier for advertisers (IDFA) data using the Tealeaf AdvertisingId property, add the following code snippet:


      TLFApplicationHelper.sharedInstance().setCXAAdvertisingId(ASIdentifierManager.shared().advertisingIdentifier.uuidString) TLFApplicationHelper.sharedInstance().enableTealeafFramework()
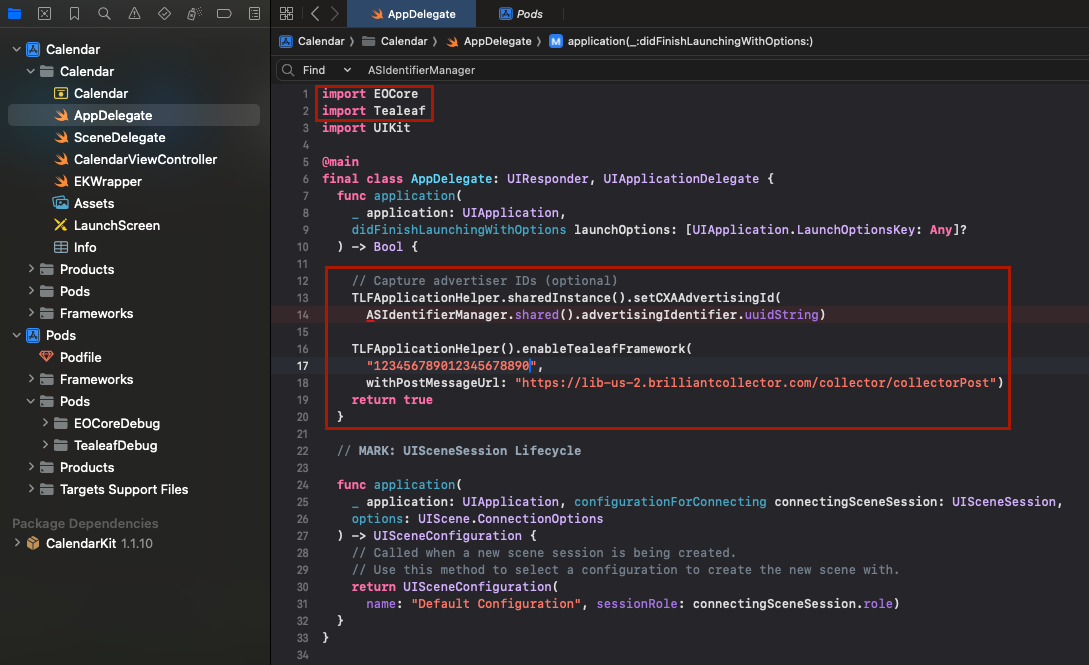
    • For Swift UI:
      1. Your application will require an UIApplicationDelegate implementation. To implement the UIApplicationDelegate for your application, you can
        • Open the swift App class file and add the following code.
        • or
        • Create a new AppDelegate file with the following code.
      2. class AppDelegate: NSObject, UIApplicationDelegate { func application(_ application: UIApplication, didFinishLaunchingWithOptions launchOptions: [UIApplication.LaunchOptionsKey: Any]?) -> Bool { // Option 1 TLFApplicationHelper.sharedInstance().enableTealeafFramework() // Option 2 - If you want to capture Apple Identifier for advertisders (IDFA) data using Tealeaf // TLFApplicationHelper.sharedInstance().setCXAAdvertisingId(ASIdentifierManager.shared().advertisingIdentifier.uuidString) // TLFApplicationHelper.sharedInstance().enableTealeafFramework() return true } // MARK: UISceneSession Lifecycle func application(_ application: UIApplication, configurationForConnecting connectingSceneSession: UISceneSession, options: UIScene.ConnectionOptions) -> UISceneConfiguration { // Called when a new scene session is being created. // Use this method to select a configuration to create the new scene with. return UISceneConfiguration(name: "Default Configuration", sessionRole: connectingSceneSession.role) } }

        📘

        Note:

        If you want your application to capture Apple identifier for advertisers (IDFA) data using the Tealeaf AdvertisingId property, you must add the following code: TLFApplicationHelper.sharedInstance().setCXAAdvertisingId(ASIdentifierManager.shared().advertisingIdentifier.uuidString)

        In the example code provided, you must comment out Option 1 and uncomment option 2 to enable the code.

      3. You must create a SceneDelegate.swift file if it doesn't already exist for your project and add the following code:
      4. import UIKit import SwiftUI class SceneDelegate: UIResponder, UIWindowSceneDelegate { var window: UIWindow? func scene(_ scene: UIScene, willConnectTo session: UISceneSession, options connectionOptions: UIScene.ConnectionOptions) { // Use this method to optionally configure and attach the UIWindow `window` to the provided UIWindowScene `scene`. // If using a storyboard, the `window` property will automatically be initialized and attached to the scene. // This delegate does not imply the connecting scene or session are new (see `application:configurationForConnectingSceneSession` instead). // Use a UIHostingController as window root view controller if let windowScene = scene as? UIWindowScene { let window = UIWindow(windowScene: windowScene) window.rootViewController = UIHostingController(rootView: HomeView()) self.window = window window.makeKeyAndVisible() } } }

        📘

        Note:

        The rootViewController may differ depending on the class names in your project.

      5. Create a Info.plist file if it doesn't already exist for your project as follows:
      6. 15481548
  2. Go to Product > Scheme > Edit scheme. Open Run > Arguments in the dialog screen, and in the Environment Variables section, add the following debug variable TLF_DEBUG, EODebug and set the variable value to 1.
  3. Compile your code and run the application.

Set the UIApplication class to track UI control events

The UIApplication class allows the UI control events to be tracked by the SDK.

  1. In your Swift application, open the AppDelegate.swift file and comment out the following:
    • For Swift: @UIApplicationMain line.
    • For Swift UI: @main
  2. Override the sendAction and sendEvent methods. Create a HelloSwiftApplication.swift file and add the following code to the file:
    import Foundation import UIKit import Tealeaf class HelloSwiftApplication: UIApplication { override func sendEvent(_ event: UIEvent) { TLFApplicationHelper.sharedInstance().send(event) super.sendEvent(event) } override func sendAction(_ action: Selector, to target: Any?, from sender: Any?, for event: UIEvent?) -> Bool { TLFApplicationHelper.sharedInstance().sendAction(action, to: target, from: sender, for: event) return super.sendAction(action, to: target, from: sender, for: event) } }
  3. Create main.swift file and add the following code:
    
    
    import Foundation import UIKit UIApplicationMain (CommandLine.argc, CommandLine.unsafeArgv, NSStringFromClass (HelloSwiftApplication.self), NSStringFromClass(AppDelegate.self))
  4. Open the Info.plist file and add the following:

    📘

    Note:

    For Swift UI, you must create the info.plist file as described in an earlier step.


    Key "Principal Class" with value: "HelloSwiftApplication".

    Auto-log Swift app crashes and exceptions

    You can log Swift app crashes and exceptions when the following debugging and testing functions included in your application are called:

    To auto-log the swift crash and exception, you must add a swift file with the following lines of code in your Swift application project. The added file will be compiled into your application and globally listen to the function in the Swift application. Then it will log information to Tealeaf and call the original Swift function.

    // // Copyright (C) 2022 Acoustic, L.P. All rights reserved. // // NOTICE: This file contains material that is confidential and proprietary to // Acoustic, L.P. and/or other developers. No license is granted under any intellectual or // industrial property rights of Acoustic, L.P. except as may be provided in an agreement with // Acoustic, L.P. Any unauthorized copying or distribution of content from this file is // prohibited. // // TLFatalErrorUtil.swift // SwiftUIMindBlowing // // Created by Omar Hernandez on 11/17/22. // import Foundation import Tealeaf // overrides Swift global `assert` public func assert(_ condition: @autoclosure () -> Bool, _ message: @autoclosure () -> String = String(), file: StaticString = #file, line: UInt = #line) { TLFCustomEvent.sharedInstance().logAssertErrorEvent(nil, condition: condition(), message: message(), file: String(describing: file), line: UInt32(line)) Swift.assert(condition(), message(), file: file, line: line) } // overrides Swift global `assertionFailure` public func precondition(_ condition: @autoclosure () -> Bool, _ message: @autoclosure () -> String = String(), file: StaticString = #file, line: UInt = #line) { TLFCustomEvent.sharedInstance().logPreconditionErrorEvent(nil, condition: condition(), message: message(), file: String(describing: file), line: UInt32(line)) Swift.precondition(condition(), message(), file: file, line: line) } // overrides Swift global `assertionFailure` @inlinable public func assertionFailure(_ message: @autoclosure () -> String = String(), file: StaticString = #file, line: UInt = #line) { TLFCustomEvent.sharedInstance().logAssertionFailureErrorEvent(nil, message: message(), file: String(describing: file), line: UInt32(line)) Swift.assertionFailure(message(), file: file, line: line) } // overrides Swift global `preconditionFailure` public func preconditionFailure(_ message: @autoclosure () -> String = String(), file: StaticString = #file, line: UInt = #line) -> Never { TLFCustomEvent.sharedInstance().logPreconditionFailureErrorEvent(nil, message: message(), file: String(describing: file), line: UInt32(line)) Swift.preconditionFailure(message(), file: file, line: line) } // overrides Swift global `fatalError` public func fatalError(_ message: @autoclosure () -> String = String(), file: StaticString = #file, line: UInt = #line) -> Never { TLFCustomEvent.sharedInstance().logFatalErrorEvent(nil, message: message(), file: String(describing: file), line: UInt32(line)) Swift.fatalError(message(), file: file, line: line) }

    For more information, check out the Sample appwith the Swift file added.

  1. In the main.m file, add the following code to initialize TLFApplication, and pass the reference to UIApplicationMain.
    
    
    NSString *tealeafSDK = NSStringFromClass([TLFApplication class]); return UIApplicationMain(argc, argv, tealeafSDK, NSStringFromClass([AppDelegate class]));
  2. Enable the Tealeaf framework.

    📘

    Note:

    If DynamicConfigurationEnabled in EOCoreBasicConfig.plist is set to False you can skip this step.

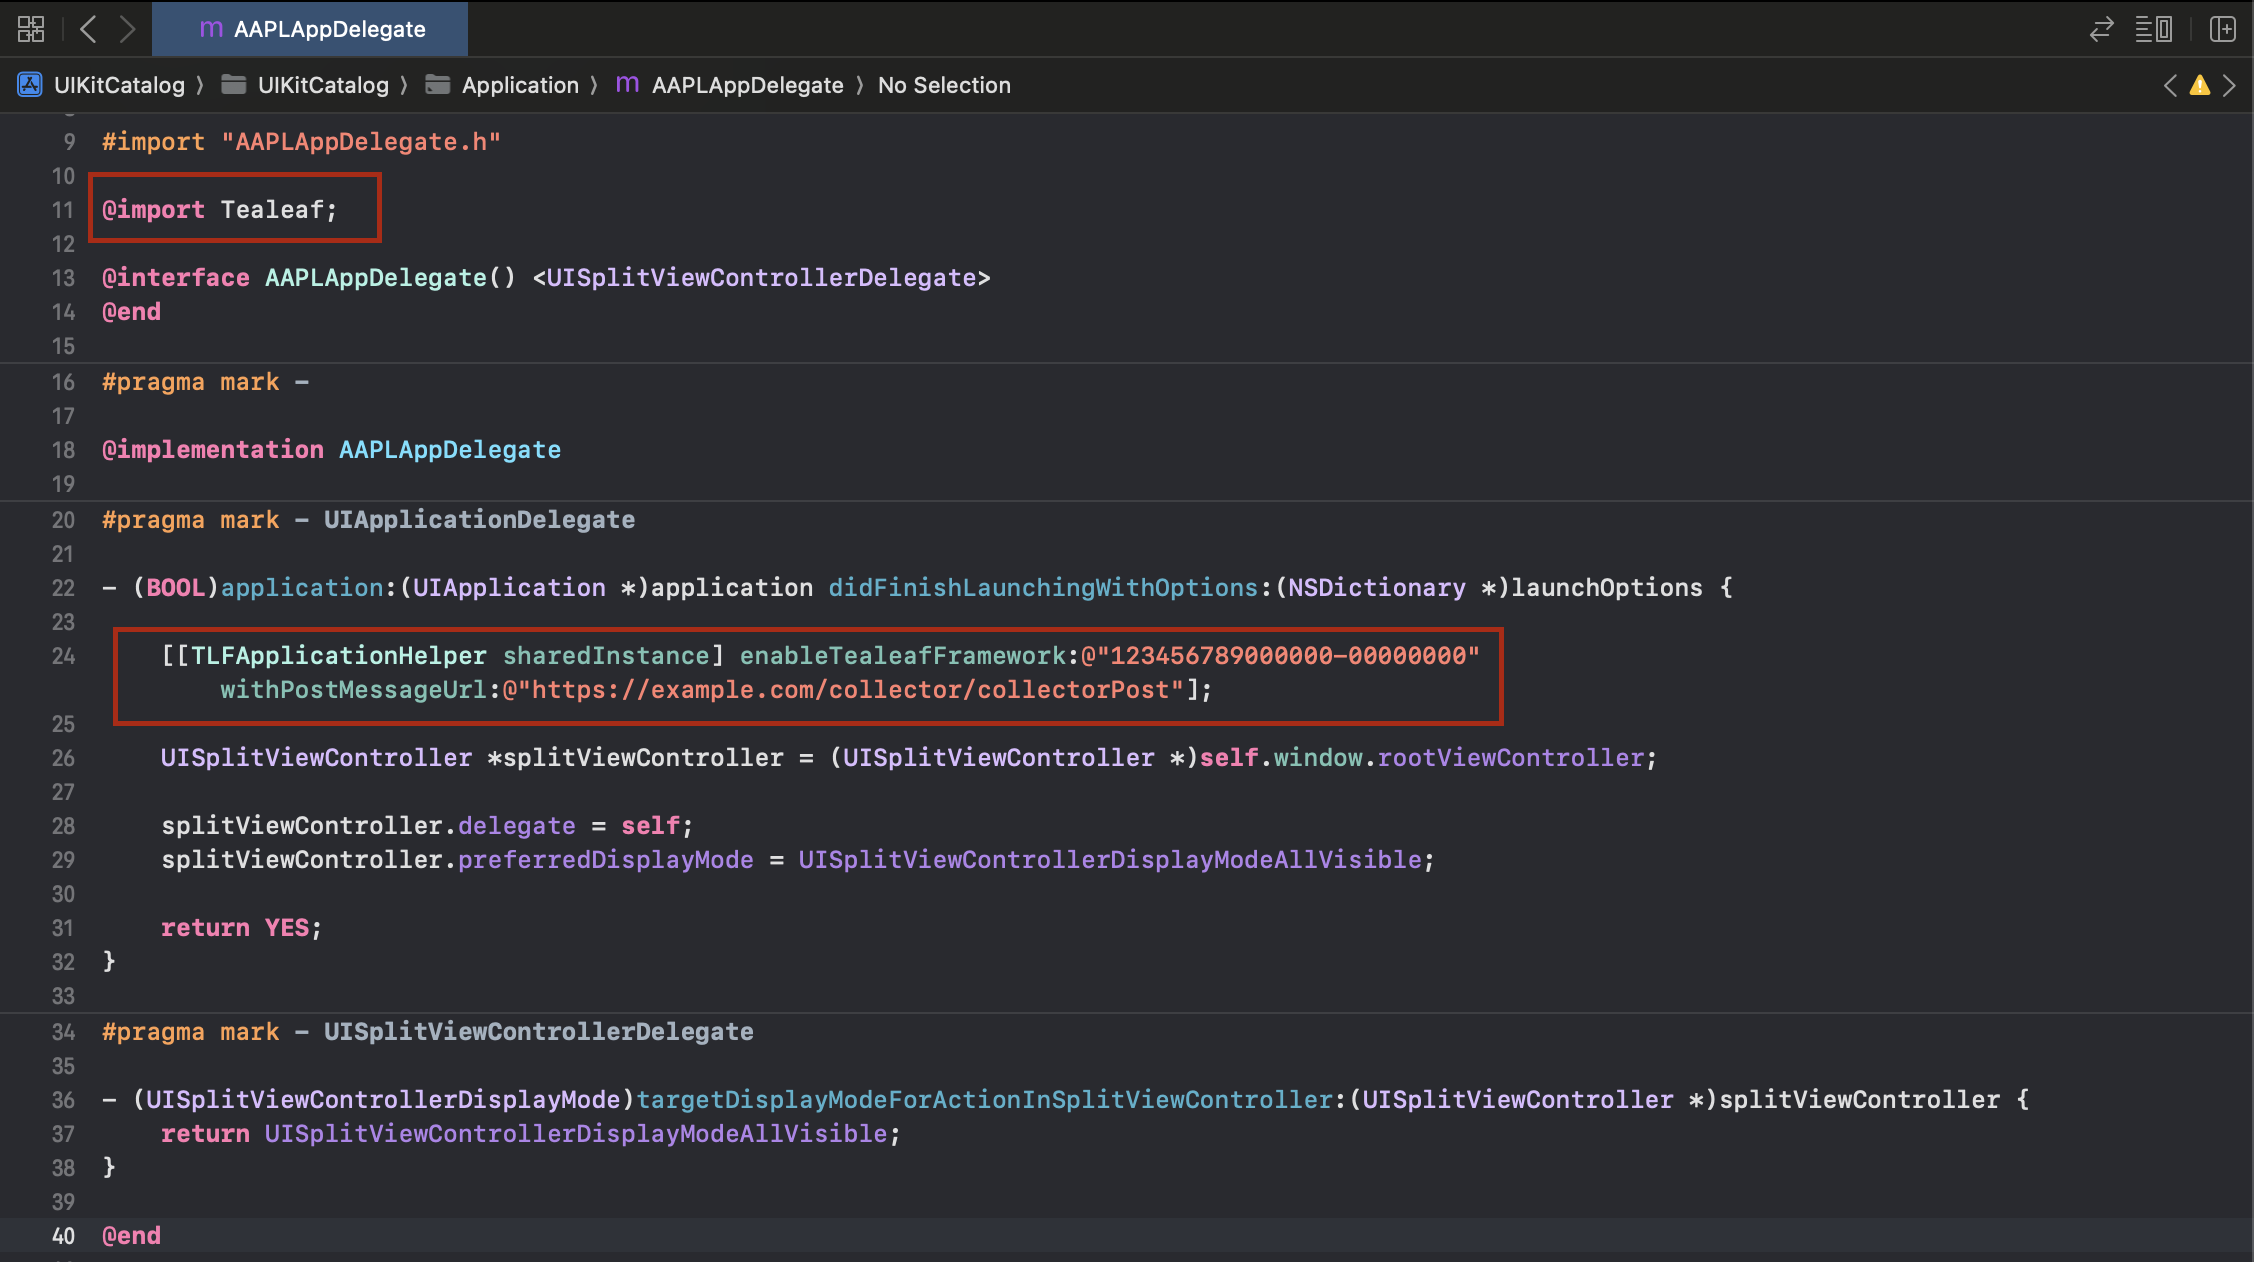
    Open the AppDelegate.m file and add one of the following code to the didFinishLaunchingWithOptions function:
    Option 1:


    [[TLFApplicationHelper sharedInstance] enableTealeafFramework];

    Option 2:
    If you want your application to capture Apple identifier for advertisers (IDFA) data using the Tealeaf AdvertisingId property, add the following code snippet:


    [[TLFApplicationHelper sharedInstance] setCXAAdvertisingId:[[[ ASIdentifierManager sharedManager]advertisingIdentifier] UUIDString]];

Set the UIApplication class to track UI control events

The UIApplication class allows the UI control events to be tracked by the SDK. Depending on whether your project implements a custom UIApplication class or not, complete the following:

No custom UIApplication class

If your application does not have its own custom UIApplication class, set the UIApplication class to use the Tealeaf Application class TLFApplication.

  1. In your main.m file, find
    
    
    return UIApplicationMain(argc, argv, nil, NSStringFromClass);
  2. Replace the third argument, nil, with the name of the TLFApplication class. The code should now look like this:
    
    
    return UIApplicationMain(argc, argv, NSStringFromClass ([TLFApplication class]), NSStringFromClass([AppDelegate class]));
Custom UIApplication class

If your project implements a custom UIApplication class (for example, named CustomerUIApplication), modify your custom UIApplication class as follows:

  • If there are no sendAction and sendEvent methods, add the sendAction and sendEvent methods to your custom UIApplication class. The Tealeaf methods have logging built into them.
    
    
    @implementation CustomerUIApplication - (void)sendEvent:(UIEvent *)event { [[TLFApplicationHelper sharedInstance] sendEvent:event]; [super sendEvent:event]; } - (BOOL)sendAction:(SEL)action to:(id)target from:(id)sender forEvent: (UIEvent *)event { [[TLFApplicationHelper sharedInstance] sendAction:action to:target from:sender forEvent:event]; return [super sendAction:action to:target from:sender forEvent:event]; }
  • If there are sendAction and sendEvent methods, you can modify them to point to the Tealeaf sendAction and sendEvent methods.
    For example,
    • Add the following line to the sendEvent method:
      
      
      [[TLFApplicationHelper sharedInstance] sendEvent:event];
    • Add the following line to the sendAction method:
      
      
      [[TLFApplicationHelper sharedInstance] sendAction:action to:target from:sender forEvent:event];

Update the SDK configuration

Configure target-page location, kill-switch location, and whether gestures are logged. For more information, see Configuring the Tealeaf SDK for iOS.

Push image files to the replay server

When using Tealeaf to capture a mobile session, images from the mobile application are sent to the Tealeaf server. If the images from the mobile application are already stored on the replay server, the mobile application does not upload the images during an active session. Uploading the images to the replay server reduces the amount of data sent from the mobile device and can display the images when you replay a native mobile session.

The Tealeaf SDK does screenshots of your app and the screenshots are used for replay.
To enable enhanced replay, go to the Tealeaf.framework/TLFResources.bundle/TealeafLayoutConfig.json file and configure the Autolayout settings as follows:

  • Set the screenshot to true
  • Set CaptureScreenshotOn value. For example, 2.

The Acoustic Tealeaf Image Tool is included with the Tealeaf iOS SDK and can be used to extract images from your mobile application.

Running the image capture tool extracts the images from your project source, hashes the image names from your project source, and replaces the image names in your project source with the new hashed names. After the image capture tool finishes processing, you can copy the hashed images to the replay server.

To run the image capture tool:

  1. Open TLFImageTool.app.
  2. Select Source and enter or select the path for the project source you are using to create your mobile application; then, select Choose.
  3. Select Destination and enter the path to store the hashed images extracted from your project; then, select Choose.
  4. Click one of the following depending on the type of the hash library you are using:
    • Extract MD5 if you are using MD5 hashing libraries.
    • Extract SHA256 if you are not using either the MD5 or SHA512 hashing libraries.
    • Extract SHA512 if you are using SHA512 hasing libraries.

The image tool crawls your application code subfolders, looks for the corresponding image files, and copies the image files to the destination folder by computing each image file's hash. When all files are copied, a confirmation message Copied: 100% files displays.

📘

Note:

If you select SHA512 or SHA256 and you used the image tool before with MD5, you must generate MD5 images in addition to the SHA512 or SHA256 files. This step is required because some iOS application users will not update your iOS application to the latest version. If you can force your iOS users to update their apps to the latest version, you can skip regenerating the MD5 library when selecting SHA512 or SHA256.

Wait for the image tool to finish copying files to the Destination folder before copying any other libraries.

Extracting PDF Vector Images in an iOS project

You can set a PDF image to UIImageView through storyboard or programmatically.

  • Programmatic
    If the PDF image is set to UIImageView programmatically, no additional steps are needed to extract the images.
  • Storyboard
    If the PDF image is set to UIImageView through storyboard, additional steps are needed to extract that image:
    • Set a user-defined runtime attribute for the UIImageView with the key tlfFileReference and the name of the PDF image as the value.
    • Now run the image capture tool. You should see the PDF images along with other images in your designated folder.

You can define any User-defined runtime attributes for any NSKeyValueCoding protocol compliant object using either of the following ways:

  • Select the desired element ( UIImageView instance in this case) in the storyboard and open Identity Inspector. Go to the User Defined Runtime Attributes section and add a new property.
  • Set programmatically by calling setValue:forkeypath: method of the object ( UIImageView instance in this case) in the viewDidLoad: method of the object's UIViewController.

📘

Note:

You must use the iOS image Capture tool as the primary tool to capture images in your application. However, if the iOS Image Capture tool cannot support your image replay experience, you can use the target simulator tool.

Upload to replay server

For application replay, the images that you added to your application should be copied to the replay server. When the images are on the replay server, the images do not need to be sent in the payload which could cause performance issues. Instead, replay uses a unique identifier for each image to retrieve the needed images from the replay server.

  1. Create the images.zip file. Go to your destination folder and create a zip file called images.zip. The .zip file should contain the contents of the destination folder. Do not create any other folder hierarchies while creating the zip.
  2. To ensure the format is correct, unzip the images.zip file somewhere on your computer and check to see that all images are extracted to a folder named images.

    📘

    Note:

    The zip file must be named images.zip. Tealeaf server requires one imagez.zip file for all your applications across all the native mMobile platforms. For this reason, if you have multiple applications on multiple nNative mMobile pPlatforms, such as iOS, iPadOS, Android, run the respective image tool for each application on the iOS and on Android platforms. After you copy all images from all applications, create one images.zip folder with the flat folder hierarchy.

  3. Copy the images.zip file to the replay server.

    Tealeaf SAAS
    If you are using Tealeaf SaaS, upload the zip file to Admin > Company settings > Native replay files > Image package Upload file. For more information, see Copy native and hybrid application images to the replay server

    Tealeaf On Premises
    If you are using Tealeaf OnPrem, add the images.zip file under Replay Server. For more information, see Replay mobile app sessions as screen captures