
Server configuration for SDKs
Overview
Configure the Tealeaf and Windows-based servers to capture and process data submitted from the iOS or Android SDK.
Before you begin
- Install and configure the iOS SDK
- Install and configure the Android SDK
Configure sampling function
The kill switch setting is used to control logging. When you enable the kill switch setting, you must provide the URL for the application. The kill switch settings verify if the URL is reachable or not and if the URL page is:
- Reachable – the Tealeaf framework initializes for logging.
- Not reachable – due to network problems or being disabled on your server, the Tealeaf framework is not initialized.
Note:
If the logging framework is disabled, the session is not captured and excluded from the sampled data.
You can set a percent for Data sampling in the Tealeaf UI. The percentage you set here determines what percent of data collected will come in. For example, if you set the data sampling rate percent as 50, out of all the data collected, you will get 50% throughput.
To enable the Data sampling rate in your Telaeaf UI:
- Open the dropdown menu next to your profile name and click Admin.
- On the Admin page open the Applications tab.
- Then select the application for which you want to set the Data sampling rate. The application details open in the left panel.
- Edit and set the Data sampling rate percent for that application.
Note:
You will need Admin permissions to edit the application settings. For more information see, Add applications to be monitored by Tealeaf
Configure sessionization
A session is a single user interaction from start-to-finish within the mobile application. In Tealeaf, sessions are used as the basis for evaluating the visitor's experience. The captured sessions can be watched in a replay in Tealeaf.
A single session contains all the metadata of the user activity, such as screenviews and events. Cookies are used to lump all the collected metadata together and present it as a single session. Tealeaf uses session identifiers in cookies to determine the session information. TLTSID is the default cookie identifier used in Tealeaf. If you use a supercookie to collect the data in your application, you can specify that cookie ID in the Tealeaf SDK as JsessionID. When the native mobile SDKs call KillSwitch, it calls the cookie name you provided.
The iOS SDK uses a tiered approach to generate identifiers for mobile native application sessions.
Use TLTSID identifier that is provided by the webserver
The session ID provided by your web server environment is used. This approach forces the mobile native application to use identifiers that are consistent with your non-mobile sessions. Ideally, this identifier is provided as a TLTSID value – the default session identifier value within Tealeaf.
IMPORTANT:
If possible, use this method of generating the session identifier.
To enable this method of generating session identifiers, the first hit of your mobile native application session must be forced to be a web hit that touches the server or servers that generate session identifiers.
Ideally, the session ID generated by your web server is provided by the Tealeaf Cookie Injector, which generates unique session IDs within Tealeaf.
Use another identifier that is provided by the webserver
In some environments, the TLTSID value is not used as the session ID. In these cases, you must generate a session ID by forcing the first hit of your mobile native application session to be a web hit that touches the webserver.
If you are using a session ID other than TLTSID, you must include the sessioning session agent in your pipeline to identify your session ID for Tealeaf. If you already deployed Tealeaf to capture non-mobile sessions and your web server already defined the session ID, this configuration was probably already completed. Verify that it is present and functioning in the Windows pipeline.
IMPORTANT:
This method is not validated in a customer environment and is not officially supported. For more information, contact Tealeaf technical support.
Configure the TLTSID by changing the string value of SessionizationCookieName
Change the string value of the SessionizationCookieName from TealeafBasicConfig.plist. SessionTimeout should be set together with SessionizationCookieName. When the time out happens, iOS SDK auto generates a new session ID and assigns it to the variable of SessionizationCookieName. This customized session ID is a hashed value submitted as a cookie in the first hit and all subsequent hits.
To get the generated session ID, implement the following:
@protocol TLFLibDelegate <NSObject>
@optional /** After set a delegate to your TLFApplication implement this
callback to generate your custom Session ID */
- (NSString*)sessionIdGeneration; @end
If you do not configure SessionizationCookieName, by default, it will use TLTSID, which is generated by the sessioning session agent in your pipeline.
Configure sessionization for Android applications on the client. The Android SDK auto-generates a session ID if one is not provided. This session ID is used to identify the session on the Tealeaf server. Tealeaf injects cookies to create a session in the Tealeaf system.
Note:
When an Android native or hybrid application is placed into the background, the library flushes the collected data and sleeps instead of disabling it. The library would go into sleep mode unless the session expired due to the session timeout property. The timeout property is indicated with SessionTimeout in TealeafBasicConfig.properties. The default value for this property is 30 minutes. After a 30-minute timeout, a new session identifier is created.
There are two ways to configure sessionization:
- through TLTSID provided by Tealeaf or
- through JSESSIONID provided by customer session ID.
Both methods function as a unique session identifier within the Android SDK environment for Tealeaf to track customer sessions. CookieParam can be set to use TLTSID or JSESSIONID.
The following is a typical setting in TealeafBasicConfig.properties using the JSESSIONID:
#Sessionization settings on customer cookies
CookieUrl = http:
//www.sample.com
    CookieDomain = .sample.com
CookiePath =
/
CookieParam = JSESSIONID
CookieExpires = false
SessionTimeout = 30
SessoinTimeoutKillSwitch = false
In this example:
- The cookie expires 30 minutes from the current time. When the session timeout occurs, the Android SDK retrieves the new cookie from your application server and posts the rest of the request to the application server using this newly acquired cookie in the request header. The Passive capture application (PCA) groups all the used JSESSIONIDs into a single session even though the JSESSIONID was consistently changing.
- When using cookies generated from the customer application server, SessoinTimeoutKillSwitch can be set to true or false. Setting the SessoinTimeoutKillSwitch to false means the session timeout user does not recheck on KillSwitchUrl to see if it is responding.
The Android SDK uses cookies to add the following values to the TealeafBasicConfig.properties file.
- CookieUrl – is for the URL of the posted site and for getting cookies to sessionize on.
- CookieParam – is the parameter that has a session ID.
- CookiePath – is the path of the cookie.
- CookieDomain – is the domain to which the cookie belongs.
- CookieSecure – add a secure cookie. The cookie can only be posted to an HTTPS URL with a valid certificate.
- CookieExpiresFormat – can have the date format of ASCTIME, RFC1036, or RFC1123, which will have an expiration date of current time + session timeout indicated in the SessionTimeout variable.
- SessionTimeout – the session timeout is in minutes. When this value expires, a new session id is created.
Example
#Sessionization settings
CookieUrl = http:
//m.ibm.com
CookieParam = TLTSID
CookiePath = /
CookieDomain = .ibm.com
#Whether you want to create a secure cookie which can only be sent using a
https url in PostMessageUrl.
CookieSecure = false
#Valid date formats: ASCTIME, RFC1036, RFC1123
CookieExpiresFormat = ASCTIME
#When post is sent, expiration of cookie will be current time + session timeout# Session timeout is in minutes
SessionTimeout =30/
Note:
It is essential first to call your server to get the first cookie to sessionize on, which is automatically obtained when you enable the kill switch URL on the application. This cookie is used to aggregate all the data on capture.
Configure Tealeaf to put session identifiers in cookies
Network traffic used in the application contains requests only. Tealeaf needs all the requests to have the session ID placed in the cookies of the request. Placing the session ID in the request enables the Tealeaf CX PCA to collect all the resources together in a single captured session.
Add the following cookie into the GET and POST requests to enable the PCA to listen to requests and responses.
httpClient.setRequestProperty("Cookie", Tealeaf.getTLCookie(Tealeaf.getCurrentSessionId()));
Add a target page to your web server environment
Tealeaf is designed to capture traffic between a client and a web server. The Tealeaf SDK captures and submits posts to a target page in your web server.
To facilitate the capture, you must complete the following:
- Add a target page to your web server environment.
- Enable the appropriate access permissions.
- Configure the URL for the target page.
- For iOS – in the TLFConfigurableItems.plist page.
- For Android – in the TLFConfigurableItems.properties page
- Test the basic functionality of the target page by triggering GET and POST actions on the URL where you installed the target page.
Note:
If needed, you can configure the client framework to submit by HTTPS by adding the protocol identifier to the POST URL. For more information, see Configure: Post settings.
Configure sampling function
The kill switch setting is used to control logging. When you enable the kill switch setting, you must provide the URL for the application. The kill switch settings verify if the URL is reachable or not and if the URL page is:
- Reachable – the Tealeaf framework initializes for logging.
- Not reachable – due to network problems or being disabled on your server, the Tealeaf framework is not initialized.
Note:
If the logging framework is disabled, the session is not captured and excluded from the sampled data.
You can add a sampling function to work with the SDK kill switch. You can use this sampling function to throttle the sampling rate and thus the volume of traffic forwarded for capture.
You can configure the kill switch sampling functions for Active Server Pages Extended (ASPX), Jakarta Server Pages(JSP), or PHP applications. Example sampling functions for each of these are included with Tealeaf SDK. You can download the examples from SDK_Tools–killswitch. Each kill switch function has a corresponding web.config configuration file.
In the following example sample functions, the kill switch URL returns 1 to enable the framework and 0 to disable the SDK.
You can find the following example in the killswitch.aspx file in the SDK_Tools–killswitch folder.
<% Page Language="C#" AutoEventWireup="true"%>
<script runat="server">
public int Sampler()
{
Random rand = new Random();
int nextRandom = rand.Next(1,100);
int samplepercent = Convert.ToInt32(ConfigurationManager.AppSettings["rate"]);
if(nextRandom <= samplepercent){
return 1;
}
else{
return 0;
}
}
</script>
<%
if (ConfigurationManager.AppSettings["killswitchtype"].Equals("percentagesample")) {
%>
<%= Sampler() %>
<% } else{ } %>
You can find the following example configuration for ASPX in the web.config file.
<!--
For more information on how to configure your ASP.NET application, please visit
http://go.microsoft.com/fwlink/?LinkId=169433
-->
<configuration>
<appSettings>
<add key="killswitchtype" value="percentagesample"/>
<add key="rate" value="50"/>
</appSettings>
</configuration>
You can find the following example in the killswitch.jsp file in the SDK_Tools–killswitch folder.
For JSP, if:
- The request does not have parameters; then, the client framework is always disabled.
- The ID request parameter exists; it is used to check the whitelist.
- The
randomsampleparameter exists; then, the percentage rate from the config.properties file is used to determine how the server responds. - The
debugproperty is set totrue, then the debug logs are generated.
<% page language="java" contentType="text/html; charset=ISO-8859-1"
pageEncoding="ISO-8859-1"%>
<% import="java.util.Properties"%>
<% import="java.util.Date" %>
<% page import="java.net.*"%>
<% page import="java.io.*" errorPage=""%>
<%
InputStream stream = application
.getResourceAsStream("/config.properties");
Properties props = new Properties();
props.load(stream);
Boolean DEBUG = false;
DEBUG = ("true").equals(props.getProperty("debug"));
String id = request.getParameter("id");
String randomsample = request.getParameter("randomsample");
String killSwitchResponse = "";
String debugstr = "";
// white list
if (id != null && !id.isEmpty()) {
InputStream whitestream = application.getResourceAsStream(props
.getProperty("WhiteListFile"));
BufferedReader input = new BufferedReader(
new InputStreamReader(whitestream));
String line = "";
Boolean match = false;
while ((line = input.readLine()) != null) {
line = line.trim();
if (line.equals(id)) {
killSwitchResponse = "1";
match = true;
break;
}
}
input.close();
if (!match) {
killSwitchResponse = "0";
}
}
// If kill switch is by sample rate
else if (randomsample != null) {
int rand = (int) (Math.random() * 100);
int sampleRate = Integer.parseInt(props
.getProperty("samplerate"));
if (rand <= sampleRate) {
killSwitchResponse = "1";
} else {
killSwitchResponse = "0";
}
} else {
killSwitchResponse = "0";
}
out.print(killSwitchResponse);
//always give the path from root. This way it almost always works.
String nameOfTextFile = props.getProperty("logfile");
PrintWriter pw;
if (DEBUG) {
try {
pw = new PrintWriter(new FileOutputStream(nameOfTextFile,
true));
Date date = new java.util.Date();
debugstr = date.toString() + "\t";
if (request.getQueryString() != null) {
debugstr += request.getQueryString();
}
if("0".equals(killSwitchResponse))
pw.println(debugstr + "\tDisable");
else
pw.println(debugstr + "\tEnable");
//clean up
pw.close();
} catch (IOException e) {
out.println(e.getMessage());
}
}
%>
You can find the following example configuration for JSP in the config.properties file.
WhiteListFile=whitelist.txt
samplerate =50
debug=true
logfile=/killswitchlog.txt
You can find the following example in the killswitch.php file in the SDK_Tools–killswitch folder.
 <?php
	$ini_array = parse_ini_file("config.ini", true);
	//print_r($ini_array);

	// if sample by percent
	if($ini_array['configtype']['killswitchtype'] === 'percentagesample'){
		$sampleRate = intval($ini_array['percentagesample']['rate']);
		killbysamplerate($sampleRate);
	}
	// if sample by whitelist
	else {

	}


	function killbysamplerate($sampleRate){
		$randomnumber = rand(1,100);
		if($randomnumber <= $sampleRate){
			echo '1';
		}
		else {
			echo '0';
		}
	}

	function killbywhitelist($whitelistpath){

	}
?>
You can find the following example configuration for PHP in the config.inifile.
; This is a sample configuration file
; Comments start with ';', as in php.ini

[configtype]
killswitchtype=percentagesample

[percentagesample]
rate = 50

[whitelist]
x
y
z
Configure and verify traffic capture on Passive Capture Application
You must verify that your Tealeaf environment is configured to capture and process the data submitted from the logging frameworks.
Data is submitted from the SDK to the Passive Capture Application (PCA) by using specific content types. The PCA is typically configured to capture these content types by default. You can verify that these content types are enabled for capture through the PCA web console.
Verify PCA capture type configuration
You use the PCA web console to verify that the PCA captures the content types submitted by the SDK. The SDK submits messages by using the text/json application/json content type.
Note:
Depending on the version of the PCA you installed, the required content types may already be configured for capture.
Tip:
Each Tealeaf Logging Framework can use a different content type for submitting events for capture to Tealeaf. Be sure to review and verify the content type for each deployed client framework.
- Log in to the PCA web console: <PCAServer>:8080, where <PCAServer> is the hostname of the PCA server.
- Click the Pipeline tab and click Edit Type Lists.
- In the Capture All POST Types box, verify that the following values are included:
- text/json
- text/x-json
- application/json
- application/x-json
- Click Add and Save your changes.
The PCA is now configured to capture the required content types. All subsequent hits of this type are captured.
Configure PCA for screen capture (optional)
You can set up the SDK to do a screen capture during the initial load of each view or screen of your web application.
When the screen capture option is enabled, you must configure the PCA to capture the screens. By default, the PCA captures binary or static content, so you must configure it to capture images submitted as binary POSTs to the target page.
These screen captures are forwarded to the Tealeaf Target Page in PNG and JPG format and used during session display.
PNG files are not compressed, while JPG files are compressed. A PNG file is approximately 20 KB to 35 KB in size; a JPG file is 6 KB to 15 KB.
- Log in to the PCA web console. <PCAServer>:8080 Where <PCAServer>is the hostname of the PCA server.
- Click the Pipeline tab and click Edit Type Lists.
- In the Excluded File Extensions list, verify that png or jpg is listed.
- In the Included File Extensions list, verify that png or jpg is not listed.
Note:
If a file extension is included in this list, then all instances sent as responses are captured, which significantly expands the volume of data that the PCA captures. Capture in this manner is not required.
- In the Binary POST Types box, enter the value:
image/pngand click Add and Save your changes.
The image/png POST type is added and enabled for capture. This setting allows the PNG posts to be captured by the PCA.
Enable automated extraction of compressed POSTs
The SDK automatically compresses POST data. You must configure the PCA to extract them.
- In the PCA web console, click the Pipeline tab.
- Select Inflate compressed requests and responses.
- Save your changes.
The compressed POSTs are now automatically extracted and processed by the PCA.
Monitor captures and processing
You can use different tools for testing your configuration and monitoring captures on an ongoing basis.
- At target page –You can test the basic functionality of the target page by triggering GET and POST actions on the URL where you installed the target page.
- In Windows pipeline –You can monitor the capture and processing of hits in the Windows pipeline in real-time through the Tealeaf Management System.
Configure sessionization
Tealeaf provides multiple mechanisms for identifying and tracking individual visitor sessions. For the Native Mobile SDKs, more configuration can be required.
Enable sessionization
To enable sessionization of hits captured through the Native Mobile SDKs, you must deploy the Sessioning session agent.
- Log in to the Portal as an administrator.
- From the Portal menu, select Tealeaf > TMS. The Tealeaf Management System opens.
- Click the WorldView tab, and for the View, select Servers.
- Click the Transport Service node.
- Select Transport Service configuration. Then, click View/Edit.
- The Pipeline Editor opens.
Note:
Verify that the sessioning session agent was installed. If it was not installed, drag it from the Available SessionAgents window to the pipeline.
- Select the Sessioning session agent and click Edit.
- In the Sessioning session agent configuration, modify the PrimarySessField value as follows:PrimarySessField=AppEnv:SessionID,env:HTTP_X_TEALEAF
- Save the configuration file.
- Push the change to all servers. A restart is needed for the new sessionization keys to take effect.
Add view name as URL during replay
You can resolve the errors during session replay by using the view name as the URL during replay. When you attempt to replay a session captured by the Native Mobile SDK, an error message can indicate that viewable pages are not there in the session. This error is related to how pages on the devices are mapped.
Instead of displaying the URL during replay, you can configure Tealeaf replay clients to show the view name instead, eliminating this cosmetic error message.
To use the view name as the URL to replay the session, complete the following steps to configure the appropriate replay profile rule.
Note:
You must configure the rule through the replay profile that is stored on the Replay Server.
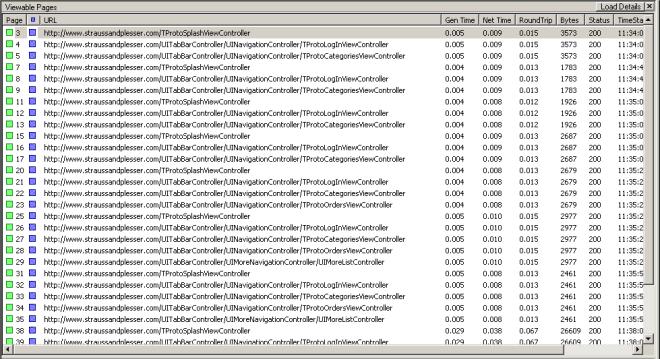
When this change is applied, the Navigable Pages list in Replay view in Browser-Based Replay and RealiTea Viewer is populated with the view name as the URL, instead of the generic Tealeaf Target page URL.
- Browser-Based Replay or BBRThis web-based replay client is accessible through the Tealeaf Portal and retrieves its sessions through the Replay Server in your Tealeaf environment.
- Tealeaf RealiTea Viewer or RTVThis replay client is a stand-alone Windows application you must install separately on your desktop. Through RealiTea Viewer, you can search for and replay sessions that are stored in your Tealeaf environment.
To change the replay profile, you can use the following options:
- Apply the view name change locally
Complete the following steps in RealiTea Viewer to make changes locally and test the use of the view name during replay.
- Start the RealiTea Viewer application on your local desktop. Note: RealiTea Viewer must be installed locally on your Windows desktop.
- Load a session that is captured from the Native Mobile SDK.
- From the RealiTea Viewer menu, select Tools > Options.
- Click the Profiles tab.
- If you did not do so already, enter the name of the Replay Server that controls the replay profile in the Server check box.
- Click Check for Updates Now. If a server version of the profile is available, your local version is synchronized to it.
- Click Edit Raw Profile. Note: You are editing the raw XML file that is stored on your local desktop.
- Locate the RequestMapping section, which should be near the top of the file, and add a Request Mapping URL element entry.
- Locate the following header: <RequestEntry name="URL">. Add the following key name as a new entry to the list of entries:`<Key name="HTTP_X_TEALEAF_VIEW_CLASS" enabled="1"/>
- Save the file.
- After editing the profile as required, click Save Changes > Exit and click OK.
- Click Replay in the toolbar to replay the session.
- In the Navigable Pages list, the listed URLs reflect the view name for the screen.
- If the Navigable Pages list is being populated accurately, you can send your changes back to the Replay Server for deployment to other replay users.
- From the RTV menu, select Tools > Options.
- Click the Profiles tab.
- Click Upload Settings to Server.
- Apply the view name change to the Replay Server
You must apply the change to the Replay Server by accessing the server and editing the appropriate file. This change is then available to all users of the Replay Server's profile, including all Browser-Based Replay users.
Complete the following steps on the Replay Server so that all Browser-Based Replay users see the view name during replay.
- Log in to the server hosting the Replay Server as an administrator.
- Edit the following file:<Tealeaf_install_directory>\system\ReplayServerProfile.xml
- Locate the RequestMapping section, which should be near the top of the file. Add a Request Mapping, URL element entry.
- Locate the following header:<RequestEntry name="URL">
- Add the following key name as a new entry to the list of entries:`<Key name="HTTP_X_TEALEAF_VIEW_CLASS" enabled="1"/>
- Save the file.
Updated 4 months ago