
Add the iOS SDK to your app
Overview
The Campaign SDK for iOS lets you deliver personalized, interactive push notifications and messages to your iOS app. You can integrate the iOS SDK with your iOS apps developed with Swift and Objective-C.
Requirements
Mobile app compatibility
- Supported versions: iOS 15.1 to 26.0
Development environment
- Xcode 26
Before you begin
Before you begin, make sure the following conditions are met.
Acoustic Campaign
- Your company has an active Acoustic Campaign subscription.
- You have a developer account for Acoustic Campaign.
- In Acoustic Campaign, mobile push notifications are enabled for your mobile app. For more information, see Get started with mobile campaign.
Set up your developer environment
- Create a Certificate Signing Request (CSR). For more information, see Create certificate.
- Register your app with Apple Push Notification service (APNs). You can use either of the following authentication methods to secure connection to APNs: token-based (p8) (recommended by Apple) or certificate-based (p12).
| Authentication type | Credentials to submit to Acoustic Campaign |
|---|---|
| Token-based (p8) |
|
| Certificated-based (p12) |
|
-
Add your iOS app to Acoustic Campaign. For more information, see Add and configure mobile developer apps.
-
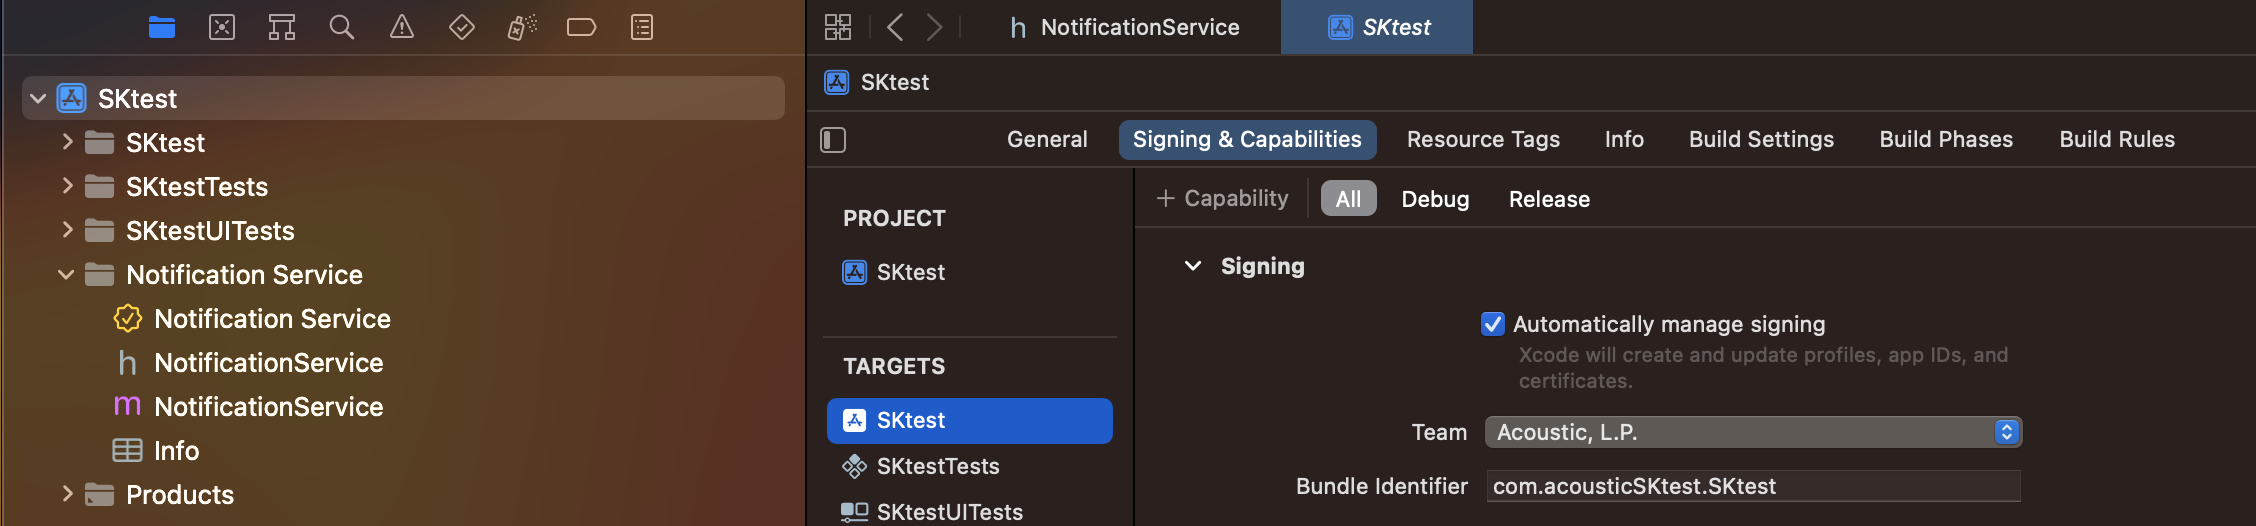
Configure App capabilities and settings.
-
In Xcode, select your project in the Project Navigator.
-
Click on the project name at the top of the Project Navigator.
-
In the middle panel, select your app's target.
-
Navigate to the Signing & Capabilities tab.
-
Ensure your team is selected under Signing and that Automatically manage signing is checked. This will create and manage necessary certificates, identifiers, and provisioning profiles.
-
Add the iOS SDK to your app
You can integrate the iOS SDK with your iOS apps developed with Swift and Objective-C. There are three main steps for you to have the mobile SDK up and running with the primary features in your app:
Install the SDK
The Acoustic Mobile Push SDK contains three distinct frameworks that you may implement:
AcousticMobilePush.xcframework – The core mobile push SDK that supports Acoustic mobile push service.
AcousticMobilePushNotification.xcframework – This framework supports dynamic multi-action pushes and media attachments. You must implement this framework if you need support for sending images, sound, and video attachments with your pushes. For more information, see Add the iOS Notification Service Framework to your project.
You can add the iOS SDK to your app using the CocoaPods dependency manager. You can use CocoaPods to integrate the iOS SDK and the Notification Service.
Configure your project to use CocoaPods
To set up and configure your project to use CocoaPods, create a Podfile in your Xcode project directory if you have not already.
Download and install the SDK
To integrate the iOS AcousticMobilePush SDK into your Xcode project using CocoaPods, specify it in your Podfile.
- If you want to use AcousticMobilePush SDK's release version:
target 'Application Target Name' do
 pod 'AcousticMobilePush', :git => '<https://github.com/Acoustic-Mobile-Push/ios.git'>
 pod 'AcousticMobilePushNotification', :git => '<https://github.com/Acoustic-Mobile-Push/ios.git'>

end
- If you want to use AcousticMobilePush SDK's debug version:
target 'Application Target Name' do
 pod 'AcousticMobilePushDebug', :git => '<https://github.com/Acoustic-Mobile-Push/ios.git'>
 pod 'AcousticMobilePushNotificationDebug', :git => '<https://github.com/Acoustic-Mobile-Push/ios.git'>

end
Note:
You can only use the release version or debug version. Do not use both at the same time.
After that, run the command pod install. To update the SDK, run pod update. The command must complete without errors. Run the same command with the --verbose option if errors occur and share the error log with Acoustic support.
Finally, open the project in Xcode. For the pod and app targets, go to the Build Settings tab and set Build Active Architectures Only to No. You must set it to No for both Debug and Release.
You can add the iOS SDK to your app using the Carthage dependency manager.
-
Create a Cartfile in your Xcode project directory if you have not already.
-
Open the Cartfile in a text editor and add the following:
-
If you want to use AcousticMobilePush SDK's release version -
binary " <https://raw.githubusercontent.com/go-acoustic/Acoustic-Mobile-Push-iOS/master/AcousticMobilePush.json>" >= 3.8.18 binary " <https://raw.githubusercontent.com/go-acoustic/Acoustic-Mobile-Push-iOS/master/AcousticMobilePushNotification.json>" >= 3.8.18 binary " <https://raw.githubusercontent.com/go-acoustic/Acoustic-Mobile-Push-iOS/master/AcousticMobilePushWatch.json>" >= 3.8.18 -
If you want to use Tealeaf SDK's debug version -
binary " <https://raw.githubusercontent.com/go-acoustic/Acoustic-Mobile-Push-iOS/master/AcousticMobilePushDebug.json>" >= 3.8.18

binary " <https://raw.githubusercontent.com/go-acoustic/Acoustic-Mobile-Push-iOS/master/AcousticMobilePushNotificationDebug.json>" >= 3.8.18

binary " <https://raw.githubusercontent.com/go-acoustic/Acoustic-Mobile-Push-iOS/master/AcousticMobilePushWatchDebug.json>" >= 3.8.18
By default, the sample application uses a debug version of libraries.
Note:
You can only use the release version or debug version. Do not use both at the same time.
-
-
Install Carthage by running the following command:
carthage update --use-xcframeworksThe Carthage command should complete without errors, and the Carthage build folder is created in your directory with all the SDK files.
- Add Carthage to your XCode target> General tab > Frameworks, Libraries, and Embedded Content section.
- Then, update the New Run Script Phase from the Build Phases tab of your target to copy the frameworks.
You can add the iOS SDK as a Switch package dependency to your Xcode project.
Complete the following steps to add the AcousticMobilePush_iOS swift package.
-
In your Xcode project, click File >Add Packages.
-
Add the following Swift package URL in the Swift Packages repository screen and click Add Package.
-
If you want to use the release version -
<https://github.com/go-acoustic/AcousticMobilePush-SP> <https://github.com/go-acoustic/AcousticMobilePushNotification-SP> <https://github.com/go-acoustic/AcousticMobilePushWatch-SP> -
if you want to use the debug version -
<https://github.com/go-acoustic/AcousticMobilePushDebug-SP> <https://github.com/go-acoustic/AcousticMobilePushNotificationDebug-SP> <https://github.com/go-acoustic/AcousticMobilePushWatchDebug-SP>Note:
You can only use the release version or debug version. Do not use both at the same time.
-
-
In the Project > Package Dependencies, the AcousticMobilePush_iOS swift packages will be available.
- Download the latest version of the iOS SDK.
- Add the AcousticMobilePush.xcframework to your project:
- Navigate to main application target’s Frameworks, Libraries, and Embedded Content section of the General tab inside your project's configuration.
- Click the + to add a new framework.
- Choose Add Other and find the AcousticMobilePush.xcframework from the downloaded iOS SDK folder.
Add capabilities
-
Select your project in the Project Navigator.
-
Select your app target.
-
Go to the Signing & Capabilities tab.
-
Click the + button to add a new capability.
-
Set Push Notification capability in Target Capabilities
Select Push Notifications from the list. Xcode will automatically update your provisioning profile to include push notification permissions. -
Add App Group capability to your main application target
Select App groups from the list. Once the App Group is added, you should see it listed under the App Groups section. Check the checkmark for the App Group. -
Add the Keychain Sharing capability to your main application target.
Select Keychain Sharing from the list. Add a Keychain Group value to the list. -
(Optional) Turn on location updates if you want to use locations or beacons with your app.
- Go to the Capabilities tab for your target > Background Modes section.
- Select Location updates. For more information, see Device Location Awareness (DLA).
-
Integrate the SDK with your app
You can integrate the iOS SDK into your app through automated integration or manual integration. Choose one of the following two integration types:
Integrating the SDK with your app using automated integration is easy and allows for easy upgrades. The SDK is integrated with your app by replacing the AppDelegate. This method simplifies communication between the OS and required integration points. The AppDelegate object is replaced with an object that processes incoming message data. That object then forwards all calls back to your AppDelegate.
Objective-C
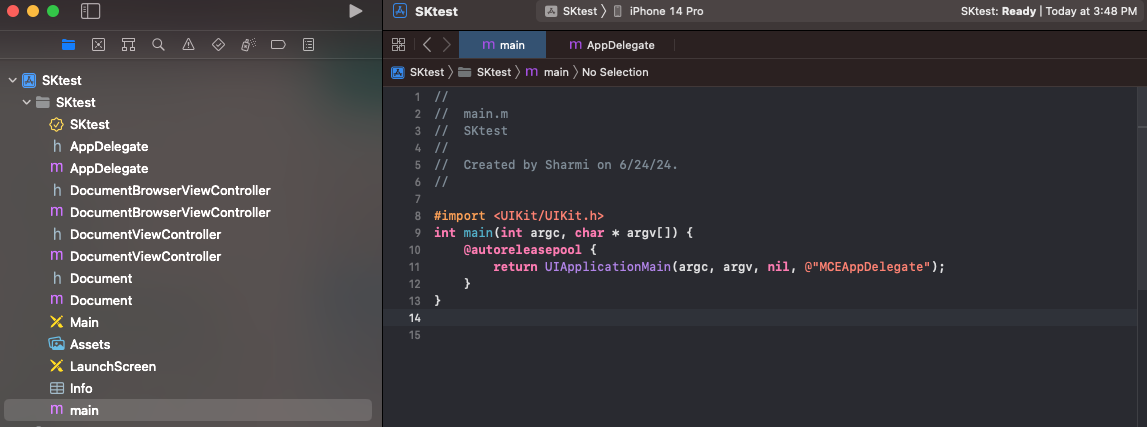
- Replace the contents of main.m with the following:
#import <UIKit/UIKit.h>
int main(int argc, char * argv[]) {
    @autoreleasepool {
        return UIApplicationMain(argc, argv, nil, @"MCEAppDelegate");
    }
}
-
Add the following to the
didFinishLaunchingWithOptionsmethod found in yourAppDelegateclass. This code sets the notification type to badge, sound, and alert. You can remove the unwanted notification types from each OS support level declaration.@import UserNotifications; - (BOOL)application:(UIApplication *)application didFinishLaunchingWithOptions:(NSDictionary *)launchOptions { // Override point for customization after application launch. [application registerForRemoteNotifications]; NSUInteger authOptions = UNAuthorizationOptionAlert|UNAuthorizationOptionSound|UNAuthorizationOptionBadge|UNAuthorizationOptionCarPlay|UNAuthorizationOptionProvidesAppNotificationSettings; UNUserNotificationCenter * center = [UNUserNotificationCenter currentNotificationCenter]; [center requestAuthorizationWithOptions: authOptions completionHandler:^(BOOL granted, NSError * _Nullable error) { }]; return YES; }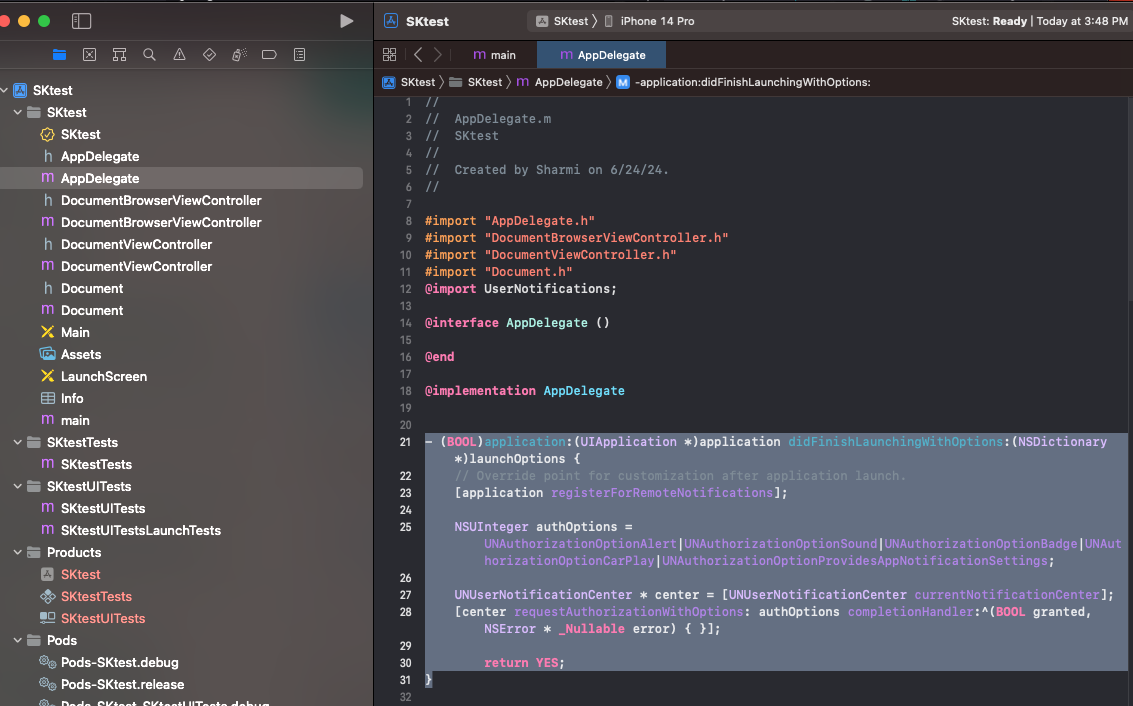
Swift
-
Create a main.swift file and add the following:
import UIKit import AcousticMobilePush let argv = UnsafeMutableRawPointer(CommandLine.unsafeArgv).bindMemory(to: UnsafeMutablePointer<Int8>.self, capacity: Int(CommandLine.argc)) let _ = UIApplicationMain(CommandLine.argc, CommandLine.unsafeArgv, nil, NSStringFromClass(MCEAppDelegate.self) ) -
For Swift to use the classes in the SDK, you must import the framework at the top of the Swift files that use it.
import AcousticMobilePush -
Add the following to the
didFinishLaunchingWithOptionsmethod in yourAppDelegateclass. This code sets the notification type to badge, sound, and alert. You can remove the unwanted notification types from each OS support level declaration.func application(_ application: UIApplication, didFinishLaunchingWithOptions launchOptions: [UIApplication.LaunchOptionsKey: Any]?) -> Bool { // Request APNS registration to send push messages application.registerForRemoteNotifications() // iOS 10+ Push Message Registration, some versions of iOS have different options available let options: UNAuthorizationOptions = [.alert, .sound, .carPlay, .badge, .providesAppNotificationSettings] // Request User Authentication to show notifications UNUserNotificationCenter.current().requestAuthorization(options: options, completionHandler: { (granted, error) in if let error = error { print("Couldn't request user authentication \(error.localizedDescription)") return } if granted { print("User provided authorization to show notifications") } else { print("User did not provide authorization to show notifications") } }) return true }
Manual integration
The manual integration calls the SDK at various integration points in your AppDelegate. This method provides additional control but is recommended only in special cases. For example, perform a manual integration in the following scenarios:
- When you have another library that requires the app delegate replaced. For example, Firebase or Facebook.
- If you want to use an NSDictionary object to initialize the SDK.
Note:
Do a manual integration if you do not want to rely on the AppDelegate replacement method. Acoustic recommends that you do not perform the manual integration unless necessary. The manual integration method requires more maintenance as you must ensure that all the support code is correct and kept up to date. Our automatic integration handles all of this for you. Some examples of when the manual integration method is needed include:
- Integrating Facebook Support
- Implementing a second push provider service. See, Receive mobile app messages from outside Acoustic Campaign.
If you did not use the NSDictionary config approach, find the MceConfig.json file from the downloaded iOS SDK folder and add it to all your application's project's targets. For instructions, see the Update the SDK Configuration section. For more information about MceConfig, see Configuration (MceConfig.json).
Note:
You must set your team and provisioning profile in the Signing and Capabilities tab before the app has permission to get the APNs deviceToken.
Objective-C
-
Add
-ObjCto the Other Linker Flags build options in the Build Settings tab. -
Integrate the following code into your AppDelegate file:
#import <AcousticMobilePush/AcousticMobilePush.h>
#import <UserNotifications/UserNotifications.h>

- (BOOL)application:(UIApplication *)application didFinishLaunchingWithOptions:(NSDictionary *)launchOptions {

    [[MCESdk sharedInstance] handleApplicationLaunch];
    [application registerForRemoteNotifications];

    NSUInteger options = UNAuthorizationOptionAlert|UNAuthorizationOptionSound|UNAuthorizationOptionBadge|UNAuthorizationOptionCarPlay|UNAuthorizationOptionProvidesAppNotificationSettings;

    UNUserNotificationCenter * center = [UNUserNotificationCenter currentNotificationCenter];
    [center requestAuthorizationWithOptions: options completionHandler:^(BOOL granted, NSError * _Nullable error) {

    }];
    return YES;
}

-(void) application: (UIApplication *)application didRegisterForRemoteNotificationsWithDeviceToken: (NSData *)deviceToken {
	[[MCESdk sharedInstance] registerDeviceToken:deviceToken];
}

-(void)application:(UIApplication *)application didFailToRegisterForRemoteNotificationsWithError:(NSError *)error {
		[[MCESdk sharedInstance]deviceTokenRegistartionFailed];
}
Swift
- Add
-ObjCto the Other Linker Flags build options in the Build Settings tab. - Integrate the following code into your AppDelegate file:
-
import UIKit
import AcousticMobilePush
import UserNotifications

class AppDelegate: UIResponder, UIApplicationDelegate {

	var window: UIWindow?

	override func application(_ application: UIApplication, didFinishLaunchingWithOptions launchOptions: [UIApplication.LaunchOptionsKey : Any]? = nil) -> Bool {

        MCESdk.shared.handleApplicationLaunch()

        UNUserNotificationCenter.current().delegate = MCENotificationDelegate.shared;

        application.registerForRemoteNotifications()
        let center = UNUserNotificationCenter.current()
        center.requestAuthorization(options: [.alert, .sound, .carPlay, .badge], completionHandler: { (granted, error) in
            print("Notifiations response (granted) (error)")
        })

        return true
	}

    func application(_ application: UIApplication, didFailToRegisterForRemoteNotificationsWithError error: Error) {
        MCESdk.shared.deviceTokenRegistartionFailed()
    }

    func application(_ application: UIApplication, didRegisterForRemoteNotificationsWithDeviceToken deviceToken: Data) {
        MCESdk.shared.registerDeviceToken(deviceToken)
    }
}
Configure the SDK
You can configure the SDK using the MceConfig.json file or a custom NSDictionary object.
Note:Use the NSDictionary object to install the SDK or change the runtime configuration. The NSDictionary object initializes the SDK and replaces the MCEConfig.json file.
Before you begin
Using Xcode, add the MceConfig.json file found in the Acoustic Campaign sample project, or you can create a new file and copy the data from it.
Update your configuration
- Open the MceConfig.json file.
- Swift requires your class to be in a namespace. If you are using the Automated Integration, update the
appDelegateClassvalue toSwiftSample.BaseAppDelegate. - Add the App Keys created in the Acoustic Campaign web portal.
- Log in to Acoustic Campaign under a developer account.
- In the navigation menu, select Administration > Push developer resources > Apps.
- Copy the app key for the iOS app you added to Acoustic Campaign.
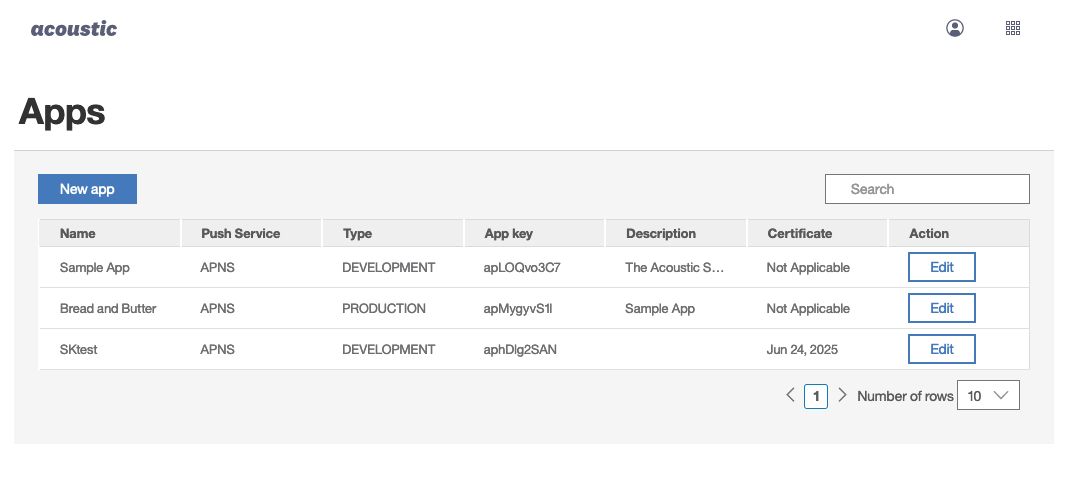
- Add the copied appkey to the dev and prod entries in the appKey section.
- The dev entry is used when you run the app from Xcode with a development provisioning profile. The prod entry is used when you run the app with an App Store, Enterprise, or AdHoc provisioning profile.
- If you do not have a production App Key, use apXXXXXXXX for the prod entry.
- Update the baseUrl entry to match the server for your App Key. The baseURL was provided when your account was provisioned for mobile app messaging.
- If you are not using Geofences or iBeacons, you can remove the location entry and all its children.
- If you are using iBeacons, update the UUID in the iBeacon section of the location entry. The UUID should match the UUID for your iBeacons.
For more information, see Configuration (MceConfig.json).
Before you begin
Manually integrate the SDK with your app. You can review the sample project that shows how to install the NSDictionary object. The sample project is included in the SDK package. Go to samples/ObjC Manual Dictionary Sample/Manual Dictionary Sample.xcodeproj.
Initialize the iOS SDK
Modify your AppDelegate where the SDK is initialized. Replace (if needed) the automatic implementation [MCESdk.sharedInstance handleApplicationLaunch]; in the application:didfinishlaunchingwithoptions: method with the following code:
NSDictionary * config = @{
    //Normal MceConfig.json keys and values here, ie:
    @"appKey": @{
        @"dev": @"INSERT DEV APPKEY HERE",
        @"prod": @"INSERT PROD APPKEY HERE"
    },
    ... add the rest of your configuration...
};

[MCESdk.sharedInstance handleApplicationLaunchWithConfig: config];
let config: [String: Any] = [
            //Normal MceConfig.json keys and values here, ie:
            "appKey": [
                "dev":  "INSERT DEV APPKEY HERE",
                "prod": "INSERT PROD APPKEY HERE"
            ]
            // ... add the rest of your configuration...
        ]

MCESdk.shared.handleApplicationLaunch(withConfig: config)
Add the Notification Service Framework to your app
The Notification Service Framework added as part of the SDK installation allows customization and handling of push notifications with the following features:
- dynamic action categories
- media attachments
- other mutable-content support
To complete the configuration of the Notification Service Extension, see Add the iOS Notification Service Framework to your project.
Test your iOS applications
Apple offers development and distribution profiles for testing and releasing iOS applications. These profiles relate to the application type set up in Mobile Push Notification. Applications built with the development profile are assigned to the development application type. Applications built with the distribution profile are assigned to the production application type.
There are two subclasses of Apple distribution profiles: Ad hoc and App Store. Before you submit your app to the App Store, you must build a version of your app with an ad hoc distribution profile. You can associate your production application with your test devices. You can test Mobile Push Notification and Apple production push facilities.
- Go to the Apple iOS provisioning portal, click Devices, and add your test device IDs. You can get your device ID through the Xcode organizer or iTunes. You can find the instructions at Apple Developer documentation.
- Click Provisioning > Distribution > New Profile.
- Select Distribution Method: Ad hoc.
- Select the appropriate app ID associated with the production push service.
- Select your test devices and Click Submit.
Note:Your ad hoc build does not work on devices that are not set up here.
- Download your new ad hoc distribution profile to your computer. Then, install it in Xcode by double-clicking it.
- Go back to your app in Xcode and go to Project Build Settings.
- Under Code Signing > Release, select your new distribution profile.
- Select your profile in Target Build Settings as well.
- Delete the development version of your app from your device. If it is not deleted, the device may not recognize the production version, and you will not receive a push.
- Verify your app is set up correctly on the Acoustic Mobile Push Notification page. The Application Key Type must be
production. - The
.p12file that you uploaded must be the production-version of the certificate. - Connect your device to your computer, build the app on your phone, and watch the Xcode console for the string. Attempt to register after your app fires up.
- Apple push services, Mobile Push Notification registration success messages, and tokens are shown.
Note:If the token is the same as your development build, then the Xcode provisioning profile is mismatched.
-
Connect your iOS device to your computer and build it. Your app and ad hoc provisioning profile are loaded onto your device. You can now begin testing.
-
Send your app to other test devices.
- You can connect other test devices to your computer and build the app for them. You must associate the test device ID to the Adhoc profile in the Apple provisioning portal.
- You can also email the compiled .app and the provisioning profile to your testers. They can drag/drop/sync in iTunes.
- You can also use the Over the Air method.
Add your app to the app store
- After you successfully test your app, edit MceConfig.json and set
xLoggingtofalse. - Go back to Apple iOS Provisioning Portal > Provisioning.
- Create an app store distribution profile.
Note:Your app may not receive the appropriate entitlements when added to the app store. For more information, see dirtied provisioning profiles.
- Download the new Distribution Profile.
- Associate the profile with your Project, and Target Build Settings for Release.
- Open the Distribution Profile in a text editor and verify the production values. It must contain the following key/value:
aps-environment production. - Build the app.
- Go to iTunes Connect and follow the instructions to submit your app for approval. For more information, see iTunes Connect.
Note:If you use location-based services within your app, you must disclose how you use this data to Apple. For example, “My app can, at the user’s option, use location data to present relevant and timely content.”
Test sending simple push notifications
Using the API, Swagger, or the Campaign UI to send a simple push notification and verify it arrives on your test device.
Send production push notifications
Marketers can now use Acoustic Campaign to create, schedule, and send mobile app messages. For more information, see Create and send a mobile message.
Updated 3 months ago