Build a sample app for the Campaign React Native SDK
Before adding the Campaign SDK to your app, you may want to test it on our Sample App. We offer sample iOS and Android versions based on React Native.
Requirements
Acoustic Campaign
- Your company must have an active Acoustic Campaign subscription.
- You must have a developer account for Acoustic Campaign. The account must have the following permissions enabled: Enable Mobile App Push and Enable Development for Mobile App Push.
Development environment
To install and run the Sample iOS App, you will need the following:
- Xcode 15 with Command Line Tools
- Node.js 18 or later
- React Native 0.64 or later
- Apple Developer Program membership (free accounts do not support push notifications).
To install and configure the Sample Android App, you will need the following:
- Node.js 18 or later
- React Native 0.64 or later
For detailed instructions, see Setting up the development environment in the React Native guide.
Warning
Currently, we do not support the Expo CLI.
Mobile app compatibility
You can install the Sample App on smartphones running the following operating systems:
- iOS 13 and later
- Android 5.0 (API level 21) and later
Before you begin
- In Xcode, go to Account preferences and enter your Apple ID there (if you haven't done it yet).
- In your Apple Developer Account, register an explicit App ID with the push notification service enabled.
- Create a development provisioning profile for the new App ID.
Create a new Firebase project and connect the Sample App to it. For instructions, see Add Firebase to your Android project in the Firebase fundamentals guide.
Important:
- At Step 2: Register your app with Firebase, use the following package name:
co.acoustic.mobile.push.sample. - Skip Step 4: Add Firebase SDKs to your app. The Gradle file is preconfigured in the Sample App.
Set up the Firebase project in the following way:
- Go to Project Settings > Service Accounts and click Generate New Key.
- Download your new private key file (v1 FCM file), which you will use to define your Sample app App Key in the Acoustic console.
- Go to Project Settings > General and download your Sample App google-services.json, which you will use below in your app.
Initial setup
- Clone the public repo Acoustic-Mobile-Push-React-Native.
- In your terminal emulator, switch to the SampleApp directory.
cd SampleApp
- Install dependencies for the project.
yarn install
Xcode project configuration
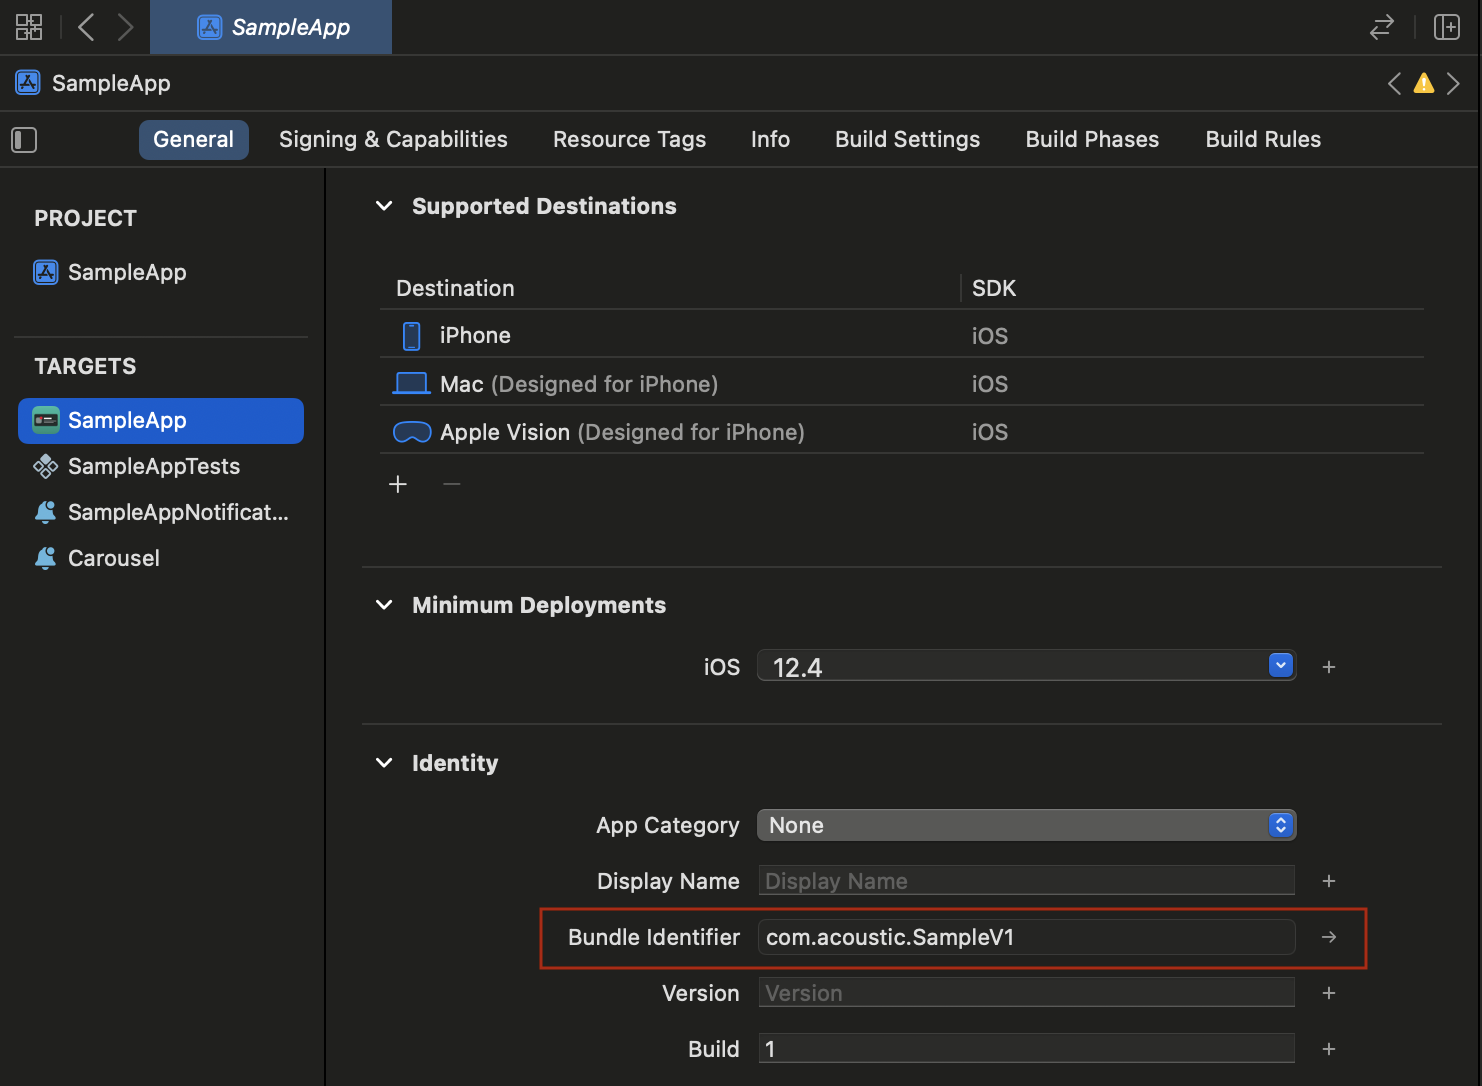
- Open the project in Xcode, select the Sample App target and enter the Bundle ID associated with the App ID you created for the Sample App.
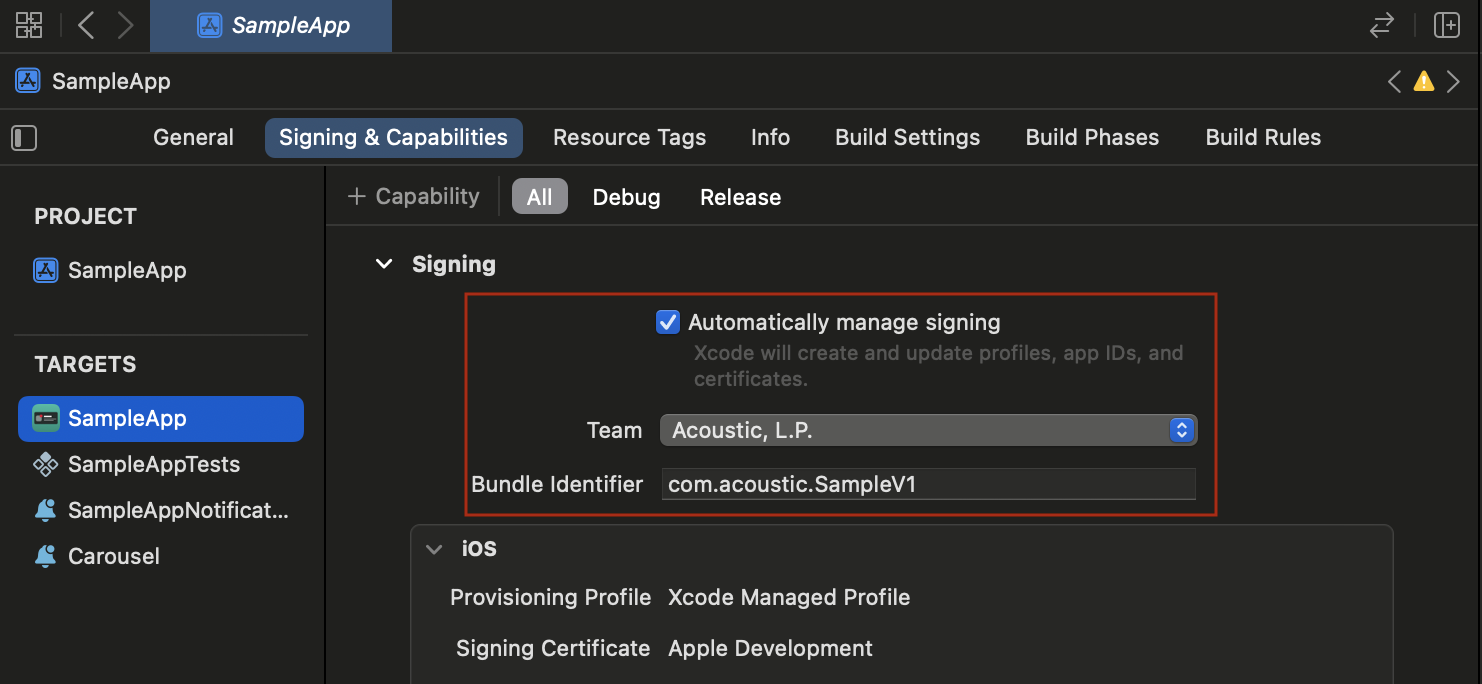
- On the Signing & Capabilities tab, assign the Sample App to your team and enable automatic signing.
- Enable the Push Notifications capability. For instructions, see Adding capabilities to your app in the Xcode guide.
- Register the Sample App with Apple Push Notification service (APNs). You can use either of the following authentication methods to secure connection to APNs: token-based (p8) (recommended by Apple) or certificate-based (p12).
What to prepare for the next step depending on the selected authentication type:
| Authentication type | Credentials to submit to Acoustic Campaign |
|---|---|
| Token-based (p8) | 1) An authentication token signing key, which is a text file with the .p8 extension 2) A 10-character string with the Key ID 3) The Team ID you have assigned to the Sample App 4) The Bundle ID you have assigned to the Sample App |
| Certificated-based (p12) | 1) A certificate file with the .p12 extension 2) CSR (a private key used to encrypt the certificate) |
- Clone the public repo Acoustic-Mobile-Push-React-Native.
- In your terminal emulator, switch to the SampleApp directory.
cd SampleApp
- Install dependencies for the project.
yarn install
- Copy your google-services.json file to
SampleApp/android/app.
Customizing the SDK configuration
Step A: get an app key in Acoustic Campaign
To activate the Campaign SDK within the Sample iOS app, you must generate an app key for it and upload the app's push certificate to Acoustic Campaign.
- Log in to Acoustic Campaign under a developer account.
- In the navigation menu, select Administration > Push developer resources.
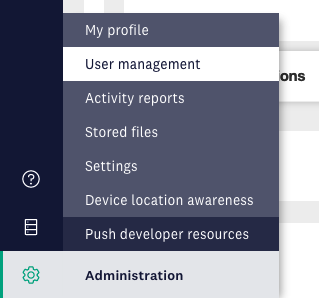
Access to mobile app setup
- Under Apps, click to add a new app.
- In the Push Service field, select APNs. Then select the type of authentication to use: P8 or P12. Provide required credentials for the selected authentication type.
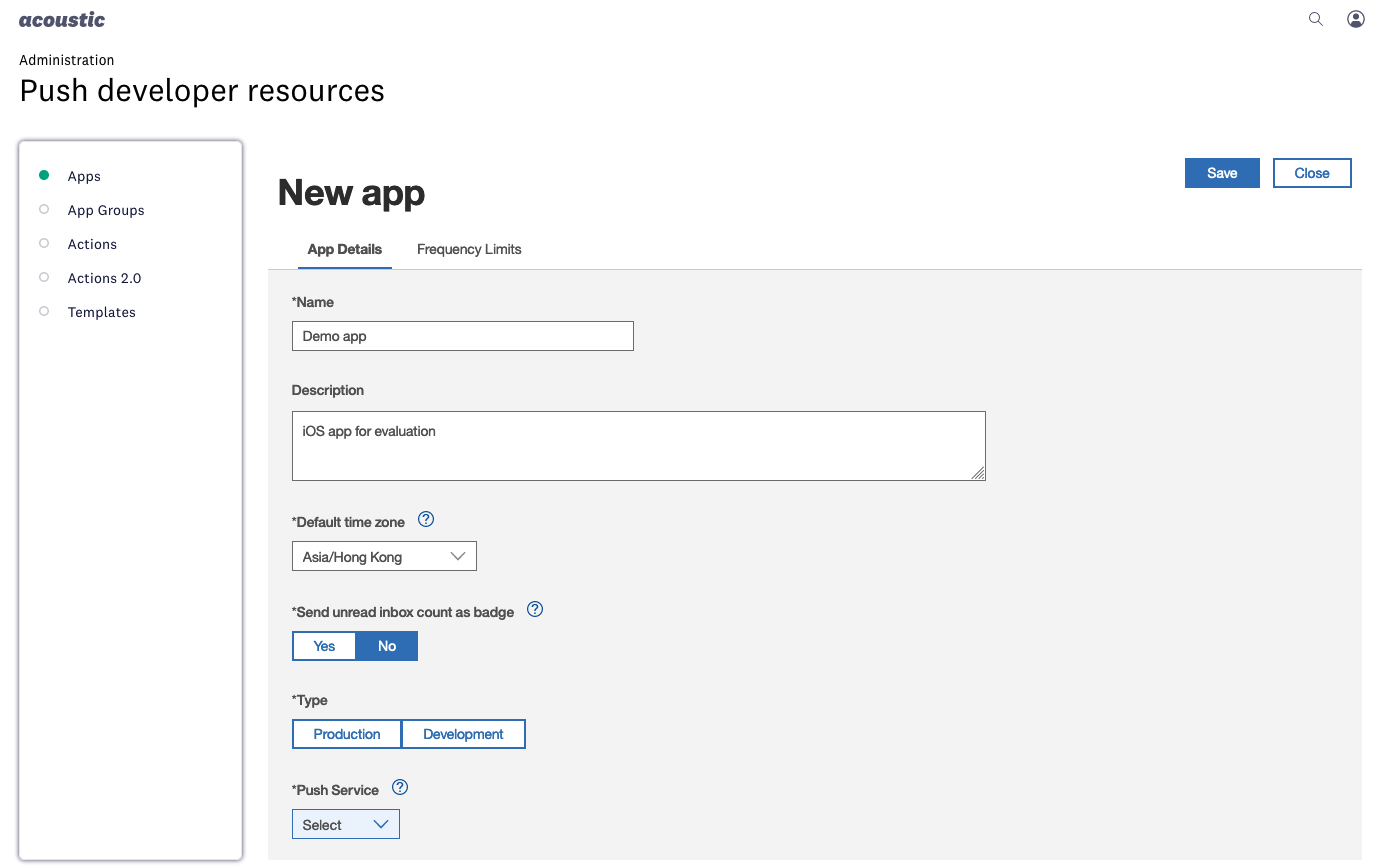
Adding mobile app to Campaign
- Set the Type setting to Development.
- Fill out the remaining settings and save the changes.
- Copy your app key and keep it handy for the next step.
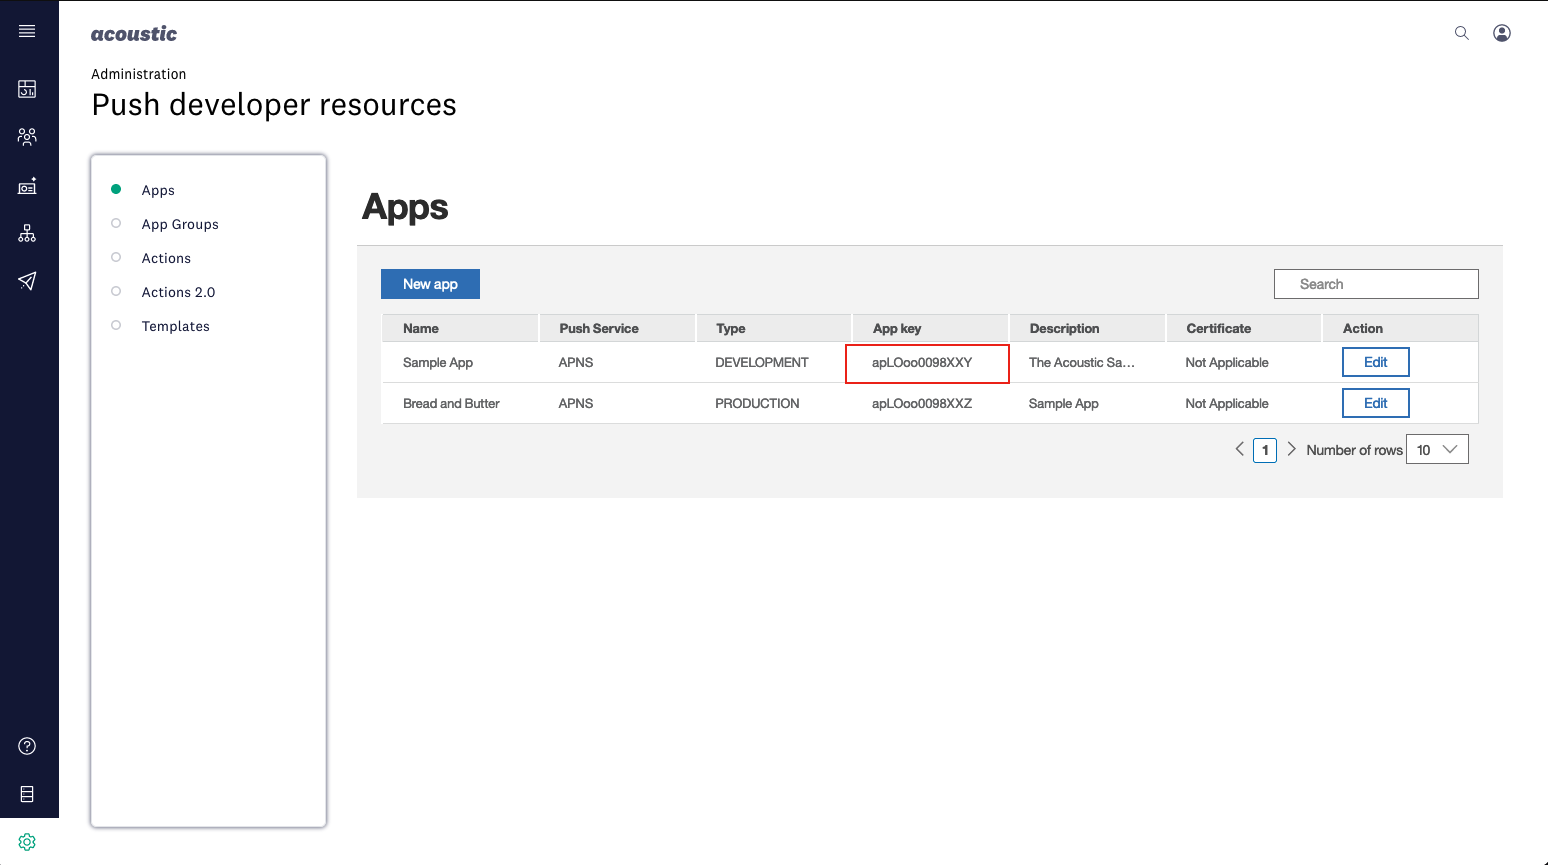
Copy app key
Step B: update the configuration file
- In the root directory of the Sample App, open the CampaignConfig.json file. Use this file to customize the SDK configuration.
- Make sure you are using the right build. During testing, set
useReleasetofalse. For production, usetrue.
"useRelease": true,
- Check the version of Campaign SDK for the Sample App. You can enter a number or remove the value to use the latest version.
"iOSVersion": "",
- In the
iOSsection, enter the app key you generated at step A and and the base URL provided by your account team.
{
  "baseUrl": "https://mobile-sdk-lib-XX-Y.brilliantcollector.com",
  "appKey": {
    "dev": "INSERT YOUR DEV APPKEY HERE",
    "prod": "INSERT YOUR PROD APPKEY HERE"
  }
}
- Important: to apply the changes, run the following Node.js command from the project folder.
node node_modules/react-native-acoustic-mobile-push/postinstall.js ./
Step A: get an app key in Acoustic Campaign
To activate the Campaign SDK within the Sample Android App, you must generate an app key for it.
- Log in to Acoustic Campaign under a developer account.
- In the navigation menu, select Administration > Push developer resources.

Access to mobile app setup
- Under Apps, click to add a new app.
- In the Push Service field, select GCM/FCM. Then set the type of authentication to V1.
- Upload your v1 FCM file from Firebase Console and then enter the ID of the Firebase Project that the Sample App is connected to.

Adding mobile app to Campaign
- Fill out the remaining settings and save the changes.
- Copy your app key and keep it handy for the next step.

Copy app key
Step B: update the configuration file
- In the root directory of the Sample App, open the CampaignConfig.json file. Use this file to customize the SDK configuration.
- Make sure you are using the right build. During testing, set
useReleasetofalse. For production, usetrue.
"useRelease": true,
- Check the version of the Campaign SDK for the Sample App. We recommend using the latest version whenever possible.
"androidVersion": "",
- In the
androidsection, enter the app key you generated at step A and the base URL provided by your account team.
{
  "baseUrl": "https://mobile-sdk-lib-XX-Y.brilliantcollector.com",
  "appKey": {
    "prod": "INSERT APP KEY HERE"
  }
}
- Important: to apply the changes, run the following Node.js command from the project folder.
node node_modules/react-native-acoustic-mobile-push/postinstall.js ./
Final project preparation
When done, run the following commands in your terminal emulator.
- Change to the app's
iosdirectory.
cd ios
- Install dependencies.
pod install
- Start the Sample App.
cd ..
npx react-native run-ios
Run the Sample App on a smartphone paired with Xcode. You can also use a simulated device with limited capabilities.
Run the following commands in your terminal emulator.
- Install Android SDK Platform Tools.
brew install android-platform-tools
- Start the Sample App.
npx react-native run-android
Testing the Sample app
Tests are stored in the SampleApp/e2e directory. All test files of the form *.spec.js will be automatically picked up and run by the CI pipeline.
To run tests, first build the app using the desired configuration using detox -c [config name] build, then run the tests using detox -c [config name] run.
Available configurations are:
- iOS 13-15
- Android 21-34
Test results will be placed in SampleApp/test-results.xml.
Updated over 1 year ago
