
Integrate the Connect SDK into a native iOS app (Swift)
The Connect SDK captures visitors' interactions with mobile applications. You can integrate the library into your native iOS app written in Swift and track the findings in the Acoustic Connect interface. This guide uses the current ConnectSDK API with a dedicated ConnectSDKManager helper for SDK setup.
Language: Swift. For Objective-C, see Integrate the Connect SDK into a native iOS app (Objective-C).
Availability: Pro, Premium, and Ultimate
Requirements
- Acoustic Connect subscription. You must register your app in Connect and get credentials for it (app key and collector URL). For instructions, see Connect mobile apps in the user guide. If you plan to add push notifications to your app, request separate app keys for development and production — each key is tied to a specific APNs environment.
- Development environment. Xcode 26
- Deployment target. iOS 15.1-26.2
Limitations
We offer limited support for iPad apps with a multi-window architecture as well as iOS apps using SwiftUI and UIScene. The library captures data from such apps and makes it available for analytics, but session replays may not work correctly.
Choose a build
The Connect SDK ships in two parallel builds:
- Debug build —
ConnectDebug-SP(Swift Package),AcousticConnectDebug(CocoaPods),ConnectDebug.json(Carthage). Emits verbose console logs that help you confirm the SDK is initialized, see signals leaving the device, and inspect collector responses. - Release build —
Connect-SP,AcousticConnect,Connect.json. Logs are suppressed for production use.
Start with the debug build while you integrate and test, then swap to the release build before shipping. The two builds expose the same public API, so swapping is a dependency change — no code changes required. You cannot use both builds in the same project; pick one per build configuration.
For the full dev-to-production checklist, see Prepare the Connect library for production use on iOS devices.
Initial setup
Choose a package manager to add the Connect iOS library to your app.
The easiest way to add the Connect iOS library is with Swift Package Manager.
-
In Xcode, go to File > Add Package Dependencies.
-
Enter the repository URL
https://github.com/go-acoustic/ConnectDebug-SP. For the release build, replaceConnectDebug-SPwithConnect-SP. -
Set the dependency rule to Up to Next Major Version from 2.0.0 to receive bug fixes and minor updates automatically. To pin to a specific version instead, choose Exact Version and enter the version you want (for example,
2.0.8). See the release notes for available versions.

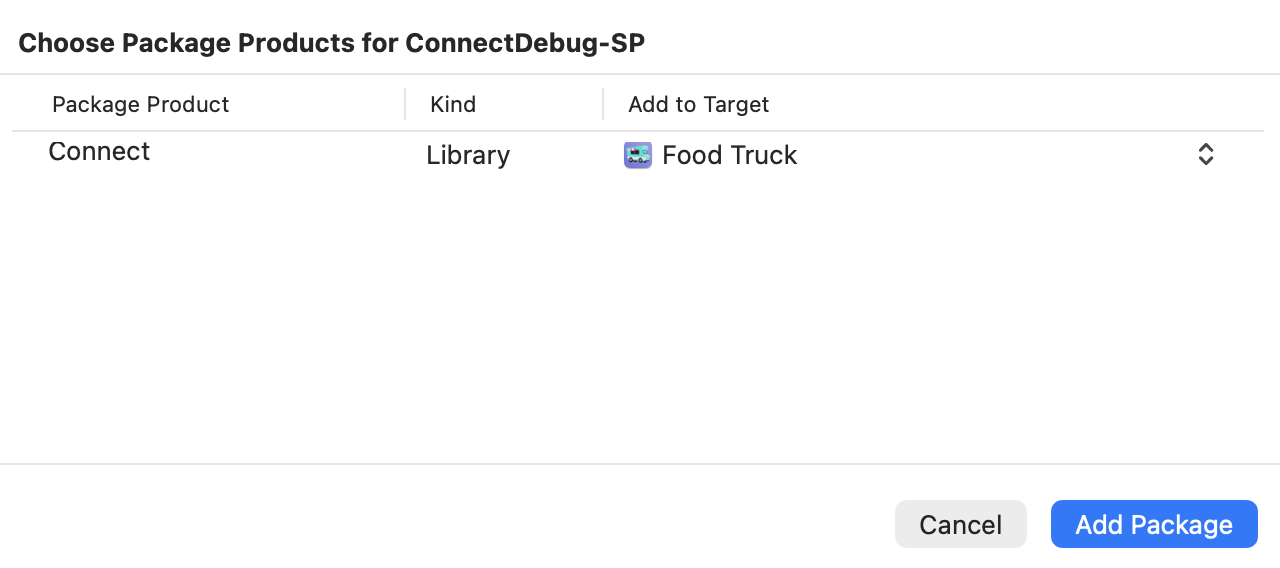
- In the target selection dialog, select your main app target.
Use CocoaPods to add the Connect library if your project already uses Pods.
- Update the
Podfilein your root project directory as shown below. Setpodto eitherAcousticConnectorAcousticConnectDebug, depending on the build you want to use.
platform :ios, '15.1'

target 'YourApp' do
  use_frameworks!
  pod 'AcousticConnectDebug'
  # For production: pod 'AcousticConnect'
end- Install the Pods from the root project directory.
pod install- Close any open Xcode sessions and use the new .xcworkspace file instead of .xcodeproj.
Use Carthage if your project already manages iOS dependencies with Carthage. If you're starting fresh, Swift Package Manager or CocoaPods are usually simpler.
- Create or update a
Cartfilein your root project directory. For the release version, remove Debug from the file name: Connect.json.
binary "https://raw.githubusercontent.com/go-acoustic/Connect/master/ConnectDebug.json" >= 2.1.15-
From the main project directory, run
carthage update --use-xcframeworks. This downloads the prebuilt xcframework intoCarthage/Build/. -
In Xcode, select your target and go to General > Frameworks, Libraries, and Embedded Content.
-
Add the
Connect.xcframeworkframework and make sure Embed & Sign is selected.
Version 2.0.8 or earlier
If you are installing version 2.0.8 or earlier, Tealeaf and EOCore were distributed as separate artifacts — add two more lines to your Cartfile at step 1:
binary "https://raw.githubusercontent.com/go-acoustic/EOCore/master/EOCoreDebug.json" >= 2.3.273
binary "https://raw.githubusercontent.com/go-acoustic/Tealeaf/master/TealeafDebug.json" >= 10.6.288
At step 4, also add these two frameworks with Embed & Sign: Tealeaf.xcframework and EOCore.xcframework.
Notes
Never use the release and debug versions together in the same project.
- Opening .xcodeproj after installing the Pods is a common source of "Module not found" errors.
- If CocoaPods does not load the latest version, run
pod update. - If you get a warning after running
pod install, see Removing CocoaPods warnings during integration.
Adding an AppDelegate (SwiftUI)
The integration relies on the AppDelegate file. If your app is built on SwiftUI, AppDelegate is not generated and not required unless you need UIKit-level lifecycle hooks (like SDK initialization). So you must add it manually and register it with @UIApplicationDelegateAdaptor.
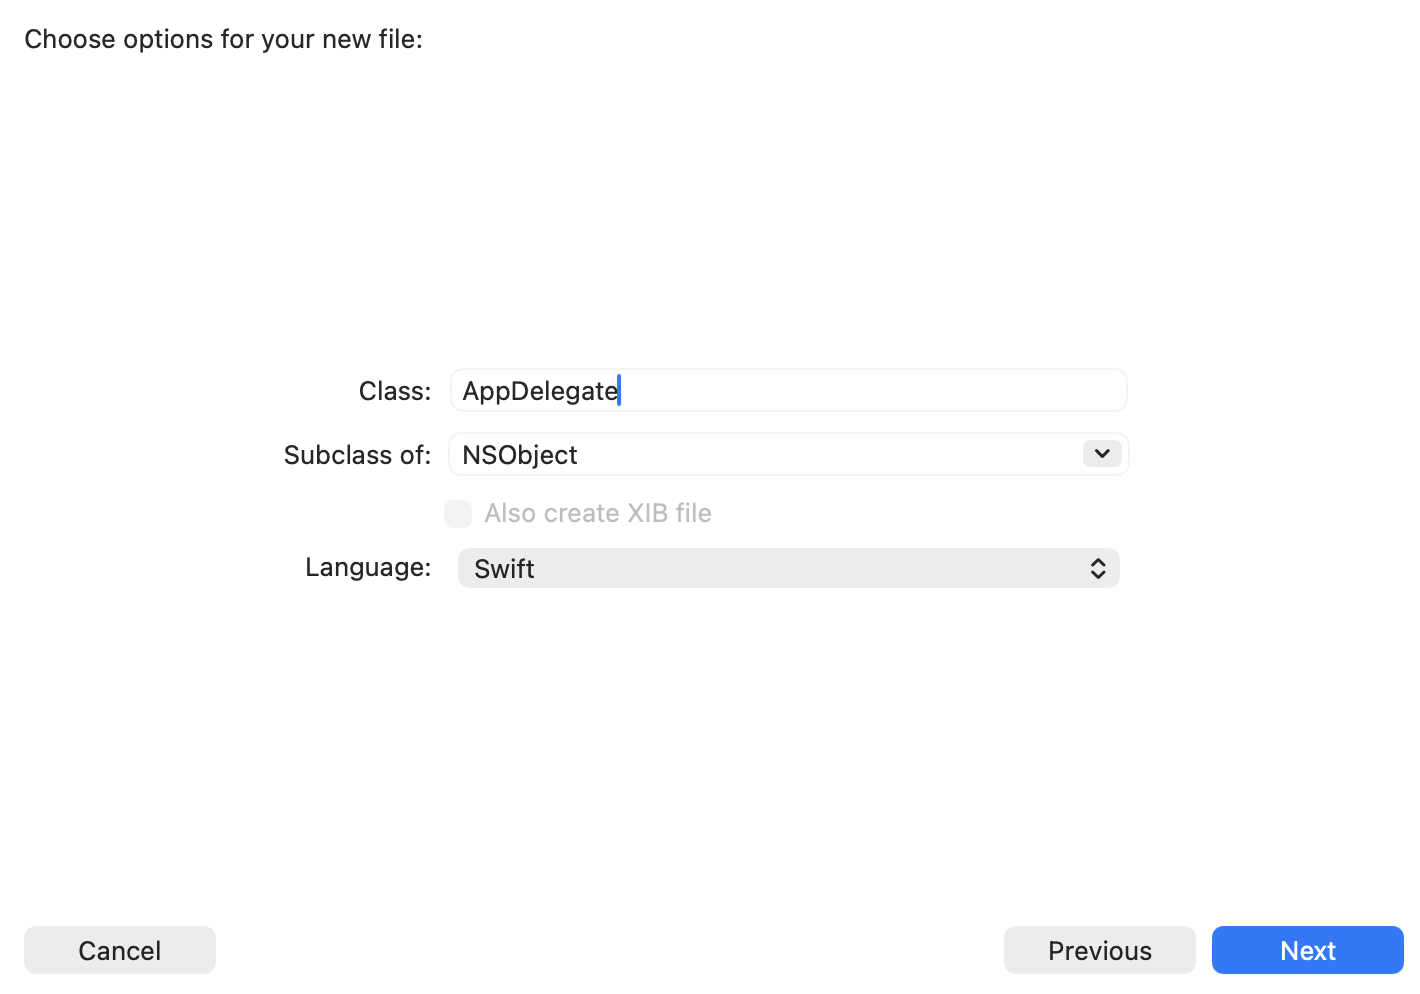
- In Xcode, click File > New > File from template > Cocoa Touch Class.
- Configure the properties as shown below.
-
Under Targets, select your primary target.
-
Replace the contents of the new
AppDelegate.swiftfile with the template below. The default file content lacksUIApplicationDelegateconformance and causes a compile error in the next step; this template adds it. You will add the SDK initialization call to this file in the next section.
import Connect
import UIKit

final class AppDelegate: NSObject, UIApplicationDelegate {
    func application(
        _ application: UIApplication,
        didFinishLaunchingWithOptions launchOptions: [UIApplication.LaunchOptionsKey: Any]? = nil
    ) -> Bool {
        // SDK initialization goes here
        return true
    }
}- In the
@main Appstruct, use@UIApplicationDelegateAdaptorto bridge to theAppDelegate:
import SwiftUI

@main
struct YourApp: App {
    @UIApplicationDelegateAdaptor(AppDelegate.self) private var appDelegate

    var body: some Scene {
        WindowGroup {
            ContentView()
        }
    }
}
Required configuration
Create a dedicated helper that owns the SDK lifecycle. This keeps your credentials in one place and gives you a single entry point for any SDK-related code you add later, such as identity signals, custom events, or push handling.
Create the SDK manager
Add a new Swift file named ConnectSDKManager.swift to your main app target.
import Connect

/// Manages Connect SDK lifecycle for the app.
@MainActor
final class ConnectSDKManager {

    // MARK: - Shared instance

    static let shared = ConnectSDKManager()

    private init() {}

    // MARK: - Configuration
    //
    // Replace these values with your Acoustic Connect credentials.

    private enum ConnectConfiguration {
        /// Your Acoustic Connect application key.
        static let appKey = "YOUR_APP_KEY"

        /// Your Acoustic Connect collector endpoint URL.
        static let postURL = "YOUR_COLLECTOR_URL"
    }

    // MARK: - SDK startup

    /// Enables the Connect SDK. Call once from `AppDelegate.didFinishLaunchingWithOptions`.
    func start() {
        ConnectSDK.shared.enable(
            with: ConnectConfig(
                appKey: ConnectConfiguration.appKey,
                postURL: ConnectConfiguration.postURL
            )
        )
    }
}
Replace YOUR_APP_KEY and YOUR_COLLECTOR_URL with the credentials issued for your organization.
Call the manager from AppDelegate
In application(_:didFinishLaunchingWithOptions:), call ConnectSDKManager.shared.start():
import Connect
import UIKit

final class AppDelegate: NSObject, UIApplicationDelegate {
    func application(
        _ application: UIApplication,
        didFinishLaunchingWithOptions launchOptions: [UIApplication.LaunchOptionsKey: Any]? = nil
    ) -> Bool {
        ConnectSDKManager.shared.start()
        return true
    }
}
Calling enable(with: ConnectConfig(...)) applies the SDK's built-in data capture defaults (such as CaptureUserEvents = true), so events are captured and posted to the collector out of the box. To customize the defaults, pass a ConnectConfig.Layout to the same call. For details, see Configure data capture settings in a native iOS app.
Enable debug logs
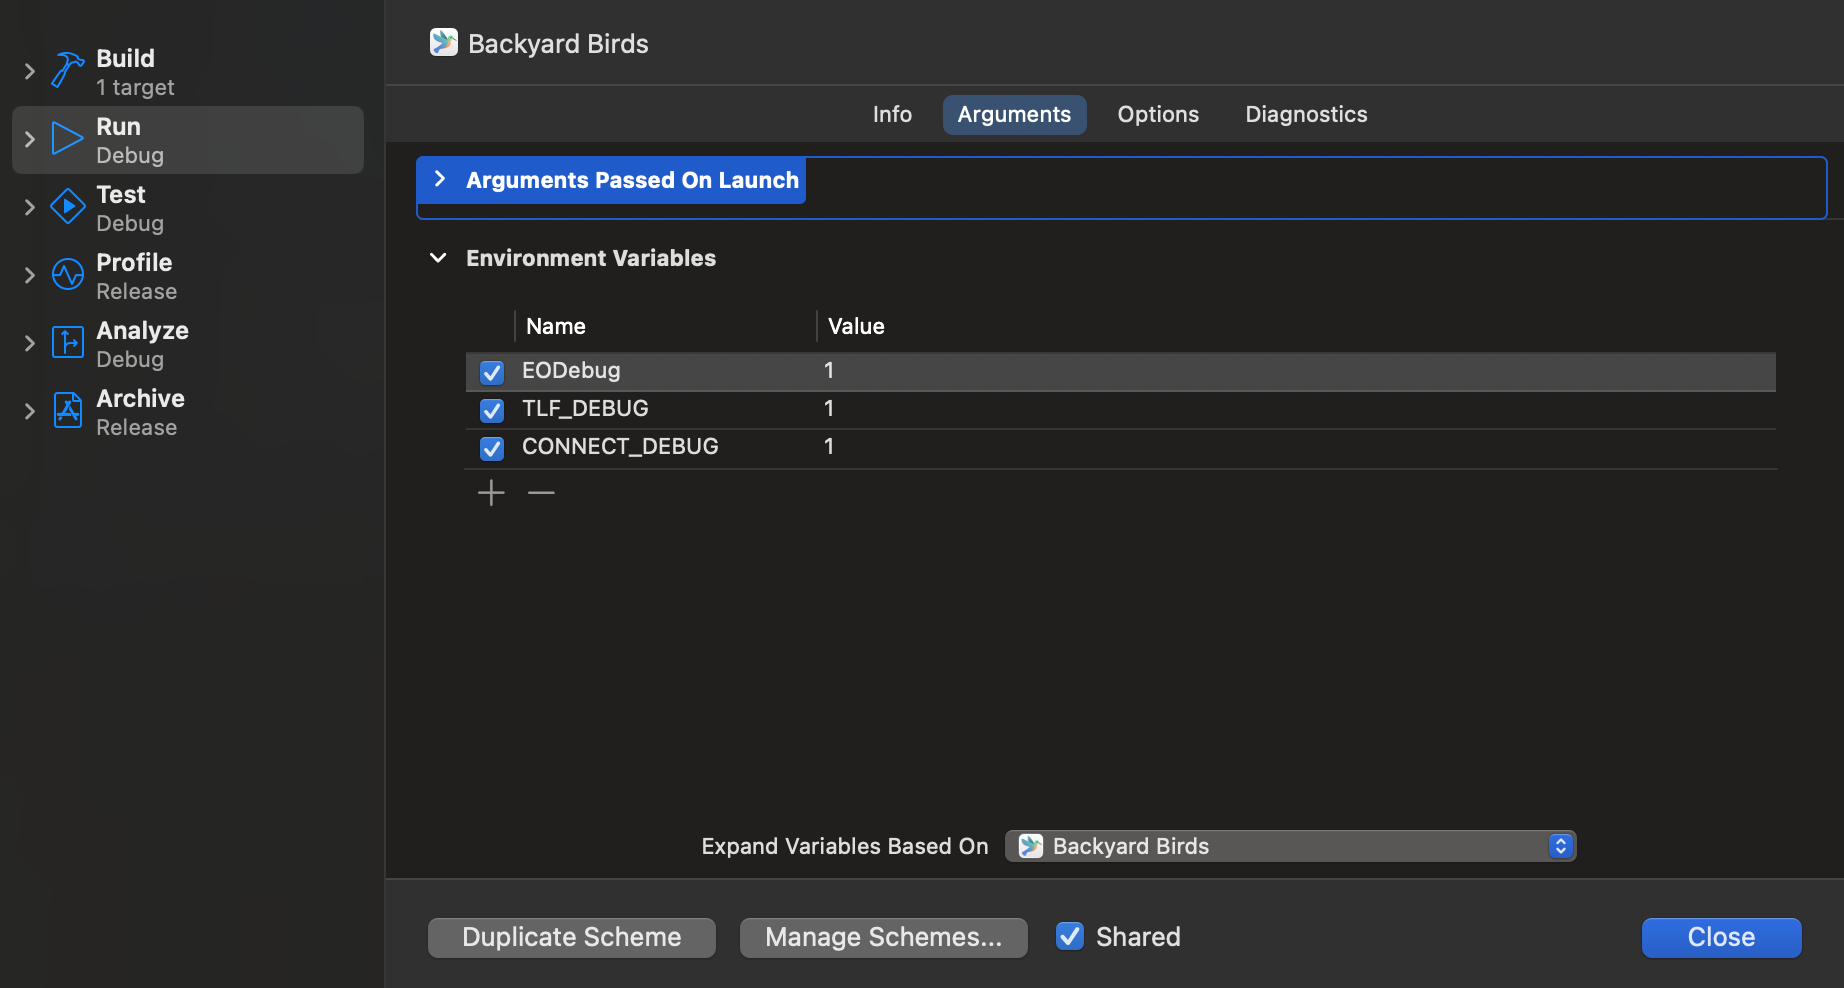
If you have installed the debug version of the SDK, add three environment variables with the value of 1 to the project scheme: EODebug, CONNECT_DEBUG, and TLF_DEBUG. This enables the SDK to write debug logs to your Xcode console window. When reporting an issue to our support team, always attach your debug log — it speeds up troubleshooting.
Troubleshooting
com.apple.commcenter.coretelephony.xpc errors in the Simulator console
com.apple.commcenter.coretelephony.xpc errors in the Simulator consoleSymptom
When running the app on the iOS Simulator, the Xcode console shows errors similar to:
Connection to service named com.apple.commcenter.coretelephony.xpc was invalidated: Connection init failed at lookup with error 3 - No such process.Cause
The iOS Simulator has no cellular radio, so the system framework that normally provides carrier information cannot connect. These messages are emitted by the platform, not by the Connect SDK.
No action is required — the errors do not affect SDK operation and do not appear on physical devices.
Build fails at [CP] Embed Pods Frameworks with rsync "Operation not permitted"
This error may occur when integrating the Connect SDK through CocoaPods.
Symptom
The build fails at the [CP] Embed Pods Frameworks phase. The full error output in the Xcode build log contains lines similar to the following:
rsync(XXXXX): warning: ...Connect.framework/_CodeSignature: unreadable directory: Operation not permitted
rsync(XXXXX): error: Connect.framework/ConnectResources.bundle/: mkpathat: Operation not permitted
rsync(XXXXX): error: ...Connect.framework/Info.plist: open (2) in <project dir>: Operation not permitted
rsync(XXXXX): warning: child XXXXX exited with status 1
Cause
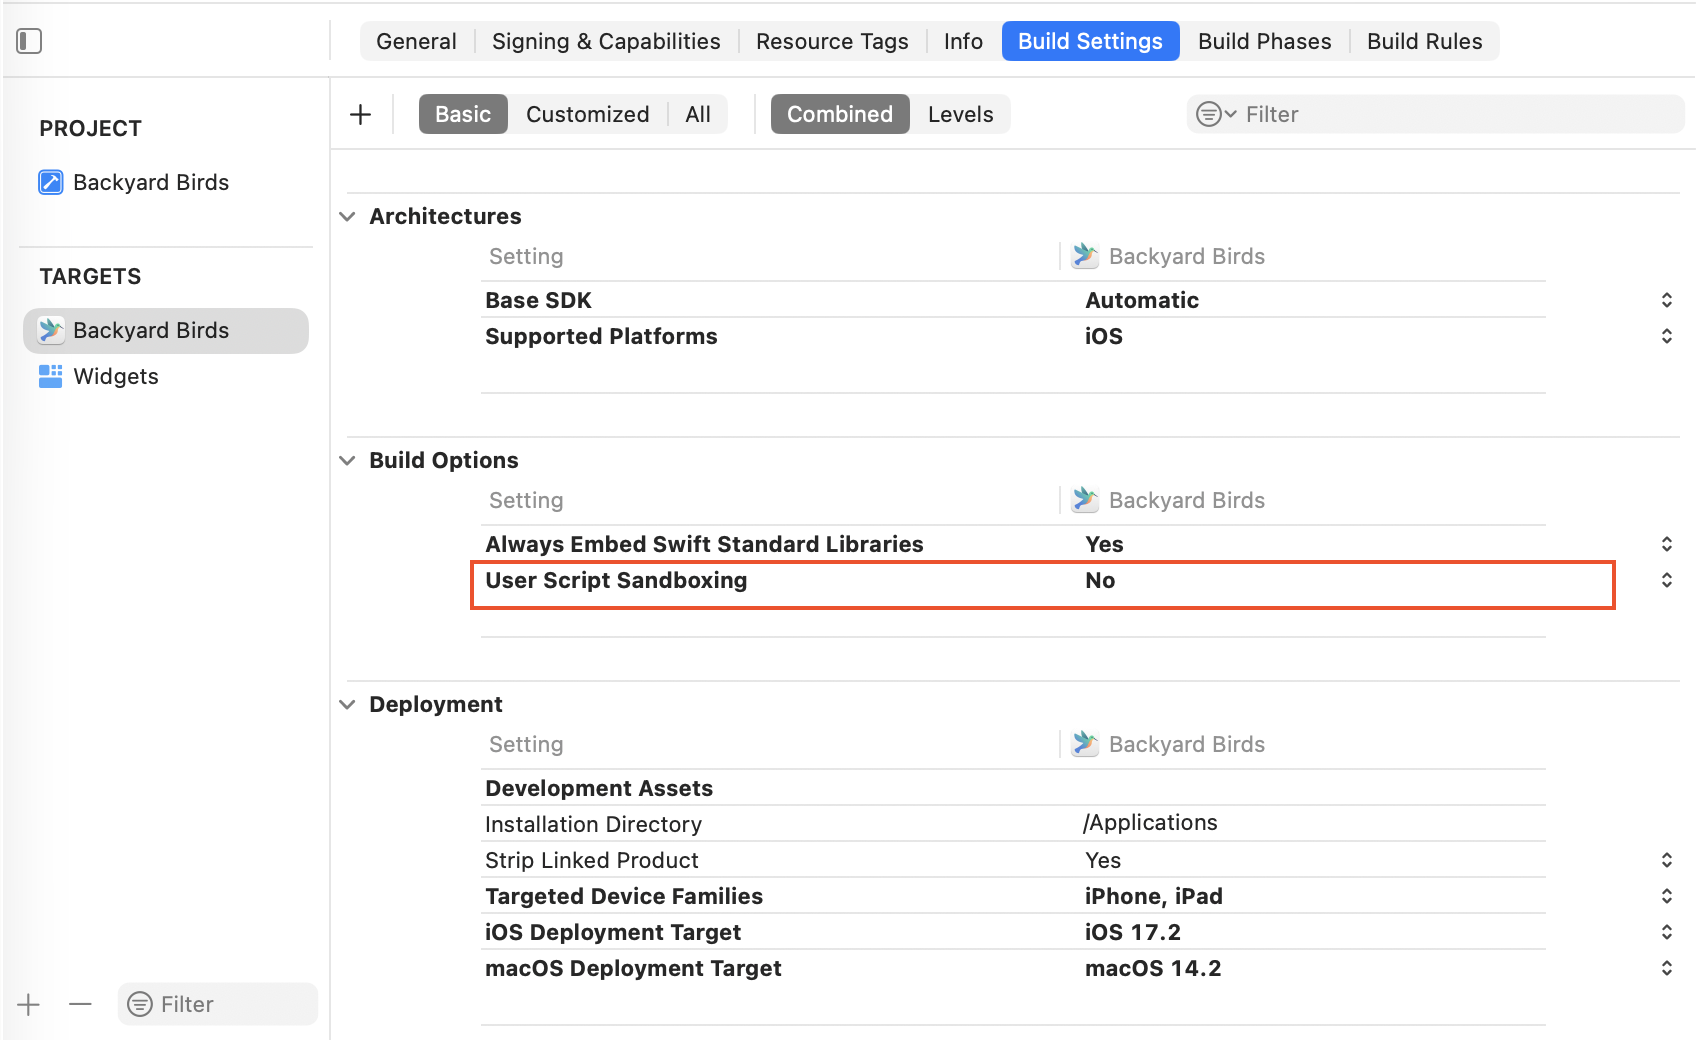
Xcode 15 and later enables User Script Sandboxing (ENABLE_USER_SCRIPT_SANDBOXING) by default. This restricts what build phase scripts can read and write, and prevents the CocoaPods embed-frameworks script from copying xcframeworks into the app bundle at build time.
Fix
Add a post_install hook to your Podfile:
post_install do |installer|
  installer.generated_projects.each do |project|
    project.targets.each do |target|
      target.build_configurations.each do |config|
        config.build_settings['ENABLE_USER_SCRIPT_SANDBOXING'] = 'NO'
      end
    end
  end
end
After adding the hook, run pod install and rebuild.
This approach persists across future pod install runs. If you prefer to apply the fix manually, open the project target, go to Build Settings, and set User Script Sandboxing to No. This setting may not survive a pod install unless the hook is also in place.
Next steps
- Configure push notifications for iOS
- Identify users at sign-in (iOS)
- Identify users at registration (iOS)
Updated 24 days ago