
Enable push notifications in an Android app (Firebase)
This guide walks you through enabling push notifications in your Android app using Firebase Cloud Messaging (FCM) and the Connect SDK.
The Connect SDK supports the following push notification features. Each is authored by your marketing team in Message composer:
- Thumbnail images in the collapsed notification, useful for branding such as a logo.
- Expandable content shown when the user expands the notification — either additional text or a full image.
- Actionable notifications, with a built-in action that fires when the user taps — open the app, call a number, or open a URL.
The notification icon that appears in the status bar and next to the notification is configured in your app code, not in Message composer. See Step 4 for requirements.
Languages: Kotlin and Java
Availability: Pro, Premium, and Ultimate
Scope: This guide covers setting up push notifications for development and testing. For production configuration, see Prepare the Connect library for production use on Android devices.
Prerequisites
- Connect SDK 11.0.11 or later, integrated into your app. See the integration guide for your architecture: View-based or Jetpack Compose.
- An app key that supports push notifications. If your Android project is using an app key from a legacy Web and mobile integration created before April 2026, ask your Connect administrator to create a new Mobile app integration and replace the app key in your project. See Connect mobile apps in the user guide.
- Your project meets the Firebase prerequisites for Android.
Overview
- You — set up Firebase Cloud Messaging in your project
- You — share your FCM credentials with your Connect administrator
- You — update your Gradle configuration
- You — add push configuration to the SDK initialization code
- Connect administrator — uploads your FCM credentials to your Mobile app integration in Connect
Steps 3–4 can be completed while waiting for your Connect administrator to complete Step 5. Push notifications will not be delivered until Step 5 is done.
Step 1: Set up Firebase Cloud Messaging
Set up Firebase in your project following the Firebase guide. All steps are required, with the following considerations:
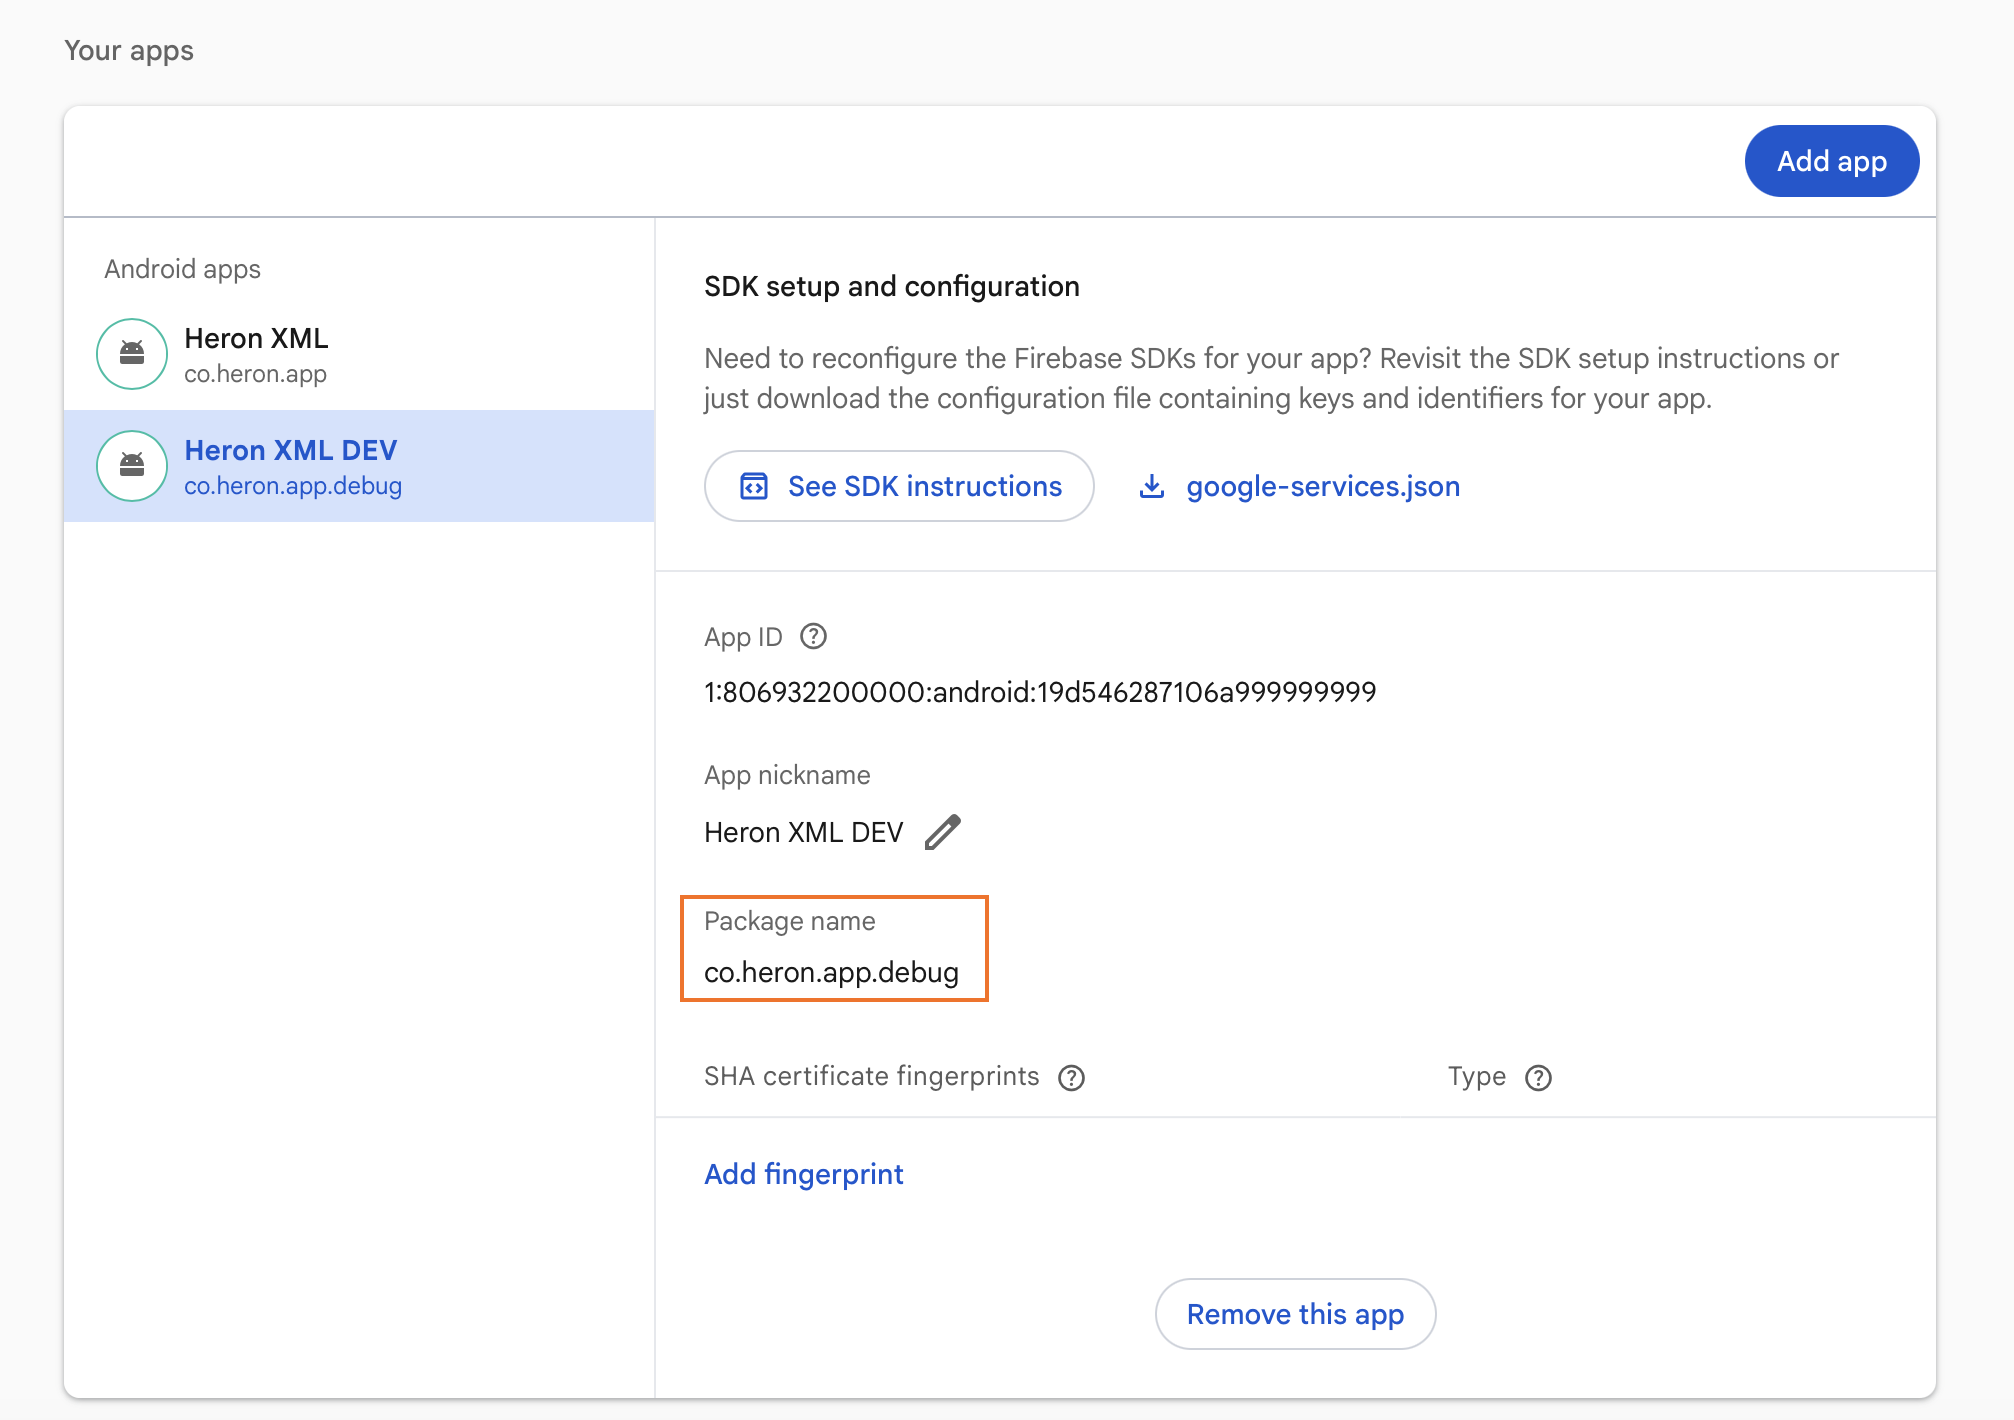
- If your project uses
applicationIdSuffixfor debug builds, register the debug package name as a separate app in your Firebase project before downloadinggoogle-services.json.
- Google Analytics is optional and unrelated to push notifications.
- We recommend using the Firebase Android BoM to control library versioning.
Once you have completed the Firebase guide, generate a service account key: in the Firebase console, go to Settings > Service accounts and click Generate new private key. Connect uses this file to authenticate with FCM on your behalf when sending push notifications. For more information, see Initialize the SDK in non-Google environments.
Step 2: Share FCM credentials with your Connect administrator
Share the service account key with your Connect administrator — they'll upload it to your Mobile app integration in Connect. Your app key will stay the same.
Step 3: Update your Gradle configuration
Replace the connect dependency with connect-push-fcm and add firebase-messaging. connect-push-fcm extends the core SDK with push notification support; firebase-messaging enables FCM message delivery.
In the app-level build.gradle.kts:
dependencies {
    implementation("io.github.go-acoustic:connect-push-fcm:11.0.11")

    implementation(platform("com.google.firebase:firebase-bom:34.14.0"))
    implementation("com.google.firebase:firebase-messaging")
}
When using the BoM, omit the version number from firebase-messaging.
In gradle/libs.versions.toml, update the library entry:
[versions]
connect = "11.0.11"

[libraries]
connect-push-fcm = { module = "io.github.go-acoustic:connect-push-fcm", version.ref = "connect" }
In the app-level build.gradle.kts:
dependencies {
    implementation(libs.connect.push.fcm)

    implementation(platform("com.google.firebase:firebase-bom:34.14.0"))
    implementation("com.google.firebase:firebase-messaging")
}
When using the BoM, omit the version number from firebase-messaging.
Sync the project after making this change.
For a reference implementation, see app/build.gradle.kts in our sample project.
Step 4: Add push configuration to the SDK
Add a ConnectPushConfig to your existing SDK initialization call.
class MyApplication : Application() {
    override fun onCreate() {
        super.onCreate()
        Connect.init(this)
        Connect.enable(
            appKey = "YOUR_APP_KEY",
            postMessageUrl = "YOUR_COLLECTOR_URL",
            pushConfig = ConnectPushConfig(
                application = this,
                iconRes = R.drawable.ic_notification,
                onTokenReady = { token -> },
                onFailure = { exception -> },
                onPermissionResult = { isGranted -> }
            )
        )
    }
}
ConnectWrapper(
navController = navController,
appKey = "YOUR_APP_KEY",
postMessageURL = "YOUR_COLLECTOR_URL",
pushConfig = ConnectPushConfig(
application = application,
iconRes = R.drawable.ic_notification,
onTokenReady = { token -> },
onFailure = { exception -> },
onPermissionResult = { isGranted -> }
)
) {
// Your app content
}For a reference implementation, see MainActivity.kt in the sample project.
Notification icon
Replace R.drawable.ic_notification with a drawable resource from your app. This icon appears on the left side of the notification and in the status bar. It must be entirely white on a transparent background (24×24 dp) with no android:tint attribute — if a colored icon is used, Android will display a white square instead. You can generate a compliant icon using Android Asset Studio.
For a reference implementation, see ic_notification.xml in the sample project.
Notification permission
On Android 13 and above, ConnectPushConfig automatically requests the POST_NOTIFICATIONS runtime permission when the app launches. Use the onPermissionResult callback to react to the user's response — for example, to update UI or show a rationale if the user denies. No manual registerForActivityResult call is needed.
The permission declaration is included in the SDK's manifest and merged automatically — you do not need to add it to your app's AndroidManifest.xml unless you want to restrict it to Android 13 and above using android:minSdkVersion="33".
To check the current permission state without prompting the user:
val isPushEnabled = Connect.push.isPushAccepted(context)Verify the setup
Before proceeding, confirm that your Connect administrator has completed Step 5 — no FCM token will be received until the service account key is uploaded to Connect.
Run the app on a physical device with Google Play Services and an active internet connection — the Android emulator does not support FCM delivery — and open Logcat in Android Studio. Filter by tag ConnectPush and look for the following entry:
ConnectPush co.heron.app.debug D Create token registration event ...This confirms the SDK received an FCM token and queued a push registration event.
Once verified, proceed to Testing to send a test push with your marketing team.
Troubleshooting
The following errors may appear in Logcat during setup.
| Symptom | Cause | Fix |
|---|---|---|
Failed to resolve: com.google.firebase:firebase-messaging:null | google-services.json missing from the app/ directory | Download the file from Firebase Console → Project settings → Your apps and place it in app/ |
| Push token never arrives | Notification permission denied on Android 13+ | Grant POST_NOTIFICATIONS permission when prompted |
AUTHENTICATION_FAILED | Service account key uploaded to Connect is expired or invalid | Generate a new private key in Firebase Console (Settings > Service accounts) and re-upload it to your Mobile app integration in Connect |
Testing
Testing push notifications requires a physical device. Before sending a test push, we recommend enabling identification signals in your app — without them, the device will appear as an anonymous contact in Connect. This reproduces a real-life scenario where you can send pushes to known contacts and verify responses in their activity feed:
Once identification is in place, follow these steps to send a test push:
- Run the app and log in or register to trigger an identification signal.
- Grant notification permission when prompted.
- Coordinate with your marketing team to send a test push to your device.
- Verify the notification appears, images load, and push signals appear in the contact's activity feed in Connect.
Next steps
Push setup is now complete. To make the most of push notifications:
- Enable push notifications (Huawei) — add HMS support if your app targets users on Huawei devices or markets in China, where Google Play Services is unavailable.
- Prepare for production — configure your Firebase and Connect setup for production, enable ProGuard rules, and get your app ready to ship.
Updated about 1 month ago