
Enable push notifications in a Cordova app (Android)
This guide walks you through enabling push notifications in your Cordova app on Android using the Acoustic Connect SDK and Firebase Cloud Messaging (FCM).
Language: JavaScript, with TypeScript definitions
Availability: Pro, Premium and Ultimate
Scope: Test setup - building and running on a connected device or emulator and verifying push delivery.
Sample app: See our GitHub repository for a reference implementation to compare your configuration against.
Prerequisites
- Your project meets the Firebase prerequisites for Android.
- The Connect Cordova SDK integrated in your project, with a Connect app key from a Mobile app integration created after April 2026 (earlier integrations don't support push). See Integrate the Connect SDK into a Cordova app first.
Overview
- Set up Firebase Cloud Messaging.
- Share your Firebase credentials with your Connect administrator.
- Update your Cordova configuration.
- Add a notification icon.
- Request notification permission from your users.
Step 1: Set up Firebase Cloud Messaging
In the Firebase console, create a project (or open an existing one) and walk through the Add Firebase to your Android app wizard. The wizard has three steps:
- Register app. Android package name is the
idattribute from your config.xml's<widget>element. Google Analytics is optional and unrelated to push notifications. - Download google-services.json. Place it at your Cordova project root (alongside ConnectConfig.json) instead of in the
app/module directory shown in the wizard. The plugin'safter_preparehook copies it into the correct location automatically. If the file is missing at build time, the build hard-fails. - Add Firebase SDK. Skip this step. The Connect Cordova SDK adds the Google Services Gradle plugin and Firebase dependencies automatically.
Once the wizard is complete, generate a service account key:
- In the Firebase console, open your project.
- Go to Settings > Service accounts.
- Click Generate new private key and confirm. Firebase downloads a
.jsonfile.
Connect uses this file to authenticate with FCM on your behalf when sending push notifications.
Step 2: Share Firebase credentials with your Connect administrator
Share the service account key (the .json file from Step 1) with your Connect administrator so they can enable Firebase push on your Mobile app integration (see Connect mobile apps in the Connect user guide). You can continue with steps 3–5 while you wait.
Step 3: Update your Cordova configuration
Add the following preferences to the Android platform block in config.xml:
<platform name="android">
    <preference name="GradlePluginGoogleServicesEnabled" value="true" />
    <preference name="GradlePluginGoogleServicesVersion" value="4.4.2" />

    <!-- Route push-tap into the existing activity instead of stacking a new one -->
    <preference name="AndroidLaunchMode" value="singleTask" />
</platform>
What these preferences do
GradlePluginGoogleServicesEnabledtells Cordova to apply the Google Services Gradle plugin, which processes google-services.json into Android resources at build time. Without it, the build cannot resolve your Firebase project configuration.GradlePluginGoogleServicesVersionpins the plugin version for reproducible builds.AndroidLaunchModeprevents a duplicate activity from opening when the user taps a push notification. Many Cordova apps already set this.
Optional: validate google-services.json before every build
Add the before_build hook that checks whether google-services.json is present, valid and synced into the platform directory. This catches missing or corrupted files before the build fails with an opaque Gradle error.
- Create hooks/before_build_check_credentials.js in your Cordova project root:
#!/usr/bin/env node
'use strict';

const fs   = require('fs');
const path = require('path');

module.exports = function (context) {
    const platforms  = context.opts.platforms || [];
    const root       = context.opts.projectRoot;
    const androidDir = path.join(root, 'platforms', 'android');
    const isAndroid  = platforms.includes('android') || fs.existsSync(androidDir);
    if (!isAndroid) return;

    const gservicesPath = path.join(root, 'google-services.json');
    const platformPath  = path.join(androidDir, 'app', 'google-services.json');
    const SEP           = '='.repeat(72);

    // Check the file exists
    if (!fs.existsSync(gservicesPath)) {
        console.warn('\n' + SEP);
        console.warn('  WARNING: google-services.json is missing from the project root.');
        console.warn('  Download it from Firebase Console > Project settings > General.');
        console.warn(SEP + '\n');
        return;
    }

    // Validate JSON
    let json;
    try {
        json = JSON.parse(fs.readFileSync(gservicesPath, 'utf8'));
    } catch (e) {
        console.warn('\n' + SEP);
        console.warn('  WARNING: google-services.json is not valid JSON: ' + e.message);
        console.warn('  Re-download the file from Firebase Console.');
        console.warn(SEP + '\n');
        return;
    }

    // Sync into platforms/android/app/
    const platformAppDir = path.dirname(platformPath);
    if (fs.existsSync(platformAppDir)) {
        try {
            fs.copyFileSync(gservicesPath, platformPath);
        } catch (e) {
            console.warn('\n' + SEP);
            console.warn('  WARNING: could not copy google-services.json to platform directory.');
            console.warn(SEP + '\n');
        }
    }
};- Register it in config.xml under the Android platform block:
<platform name="android">
    <hook type="before_build" src="hooks/before_build_check_credentials.js" />
</platform>
Step 4: Add a notification icon
Android uses a small monochrome icon in the notification drawer. The plugin provides a default, but you should replace it with your own before going to production. Using the launcher icon as a notification icon doesn't work - Android silhouettes it into a white square.
Icon requirements
- XML vector drawable or PNG. Vector is preferred - it scales cleanly across screen densities.
- Entirely white on a transparent background, 24 × 24 dp.
- No
android:tintattribute - if a colored or tinted icon is used, Android displays a white square instead.
-
In Android Studio, right-click
platforms/android/app/src/main/res(or your Android resource source if you keep one outsideplatforms/) and select New > Image Asset. -
Set Icon type to Notification Icons, name it
ic_notificationand import your source image. -
If you've chosen a different name, set it in ConnectConfig.json so the plugin can find it:
{
  "Connect": {
    "AndroidNotificationIconResName": "your_icon_name"
  }
}
Step 5: Request notification permission
On Android 13 (API 33) and later, your app must request notification permission at runtime. Call push.requestPermission() at an appropriate moment in your UX - for example, after an onboarding screen that explains the value of notifications.
const result = await AcousticConnect.push.requestPermission();

if (result.granted) {
  console.log('Notification permission granted');
} else {
  console.log('Notification permission denied:', result.error);
}
push.requestPermission() presents the system permission dialog on Android 13+ when the state is undetermined. On Android 12 and earlier, notifications are granted by default and the method resolves immediately with { granted: true }.
You can also check the current permission state without prompting:
const granted = await AcousticConnect.push.getPermissionState();
// true = granted, false = denied, null = not yet determined
Testing
- Connect a physical device via USB or start an emulator with Google Play Services (FCM does not work on AOSP emulators).
- Build and run:
npx cordova run android. - Grant notification permission when prompted. A new mobile contact is created in Connect and your device becomes eligible to receive pushes.
- Coordinate with your marketing team to send a test push to your device or do it yourself - see Test your push notification setup.
- Verify the notification appears and push signals appear in the contact's activity feed in Connect.
Verification
The steps above are enough to confirm push is working. This section is optional - use it to inspect what the SDK is doing under the hood or to collect diagnostic information when something isn't working as expected.
After you accept the notification permission request, open Logcat in Android Studio. Filter by tag ConnectPush and look for these entries:
| Entry | What it means |
|---|---|
Create token registration event ... | SDK is registering with FCM |
New token received: ... | FCM token obtained - the device can receive push |
Then filter by EOCore and look for the pushRegistration JSON payload inside the posted message. The key fields:
| Field | Expected value | What it means |
|---|---|---|
mobileProvider | FCM | Registered with Firebase Cloud Messaging |
mobileToken | present (long string) | Device token obtained |
acceptPush | true | Notification permission granted |
newRegistration | true on first run, false after | Whether this is a new registration or a refresh |
Finally, confirm the collector accepted the data - look for HTTP/1.1 200 OK in the EOCore output.
After you send a test push from Connect, filter by ConnectPush again and look for:
ConnectPush D Push received logged, metadata: Metadata(sendJobId=..., contactId=..., ...)This confirms the device received the push notification and the SDK logged the delivery signal.
If no push registration entry appears, confirm that google-services.json is valid and in place, GradlePluginGoogleServicesEnabled is true in config.xml and the device has Google Play Services and an active internet connection.
Message structure
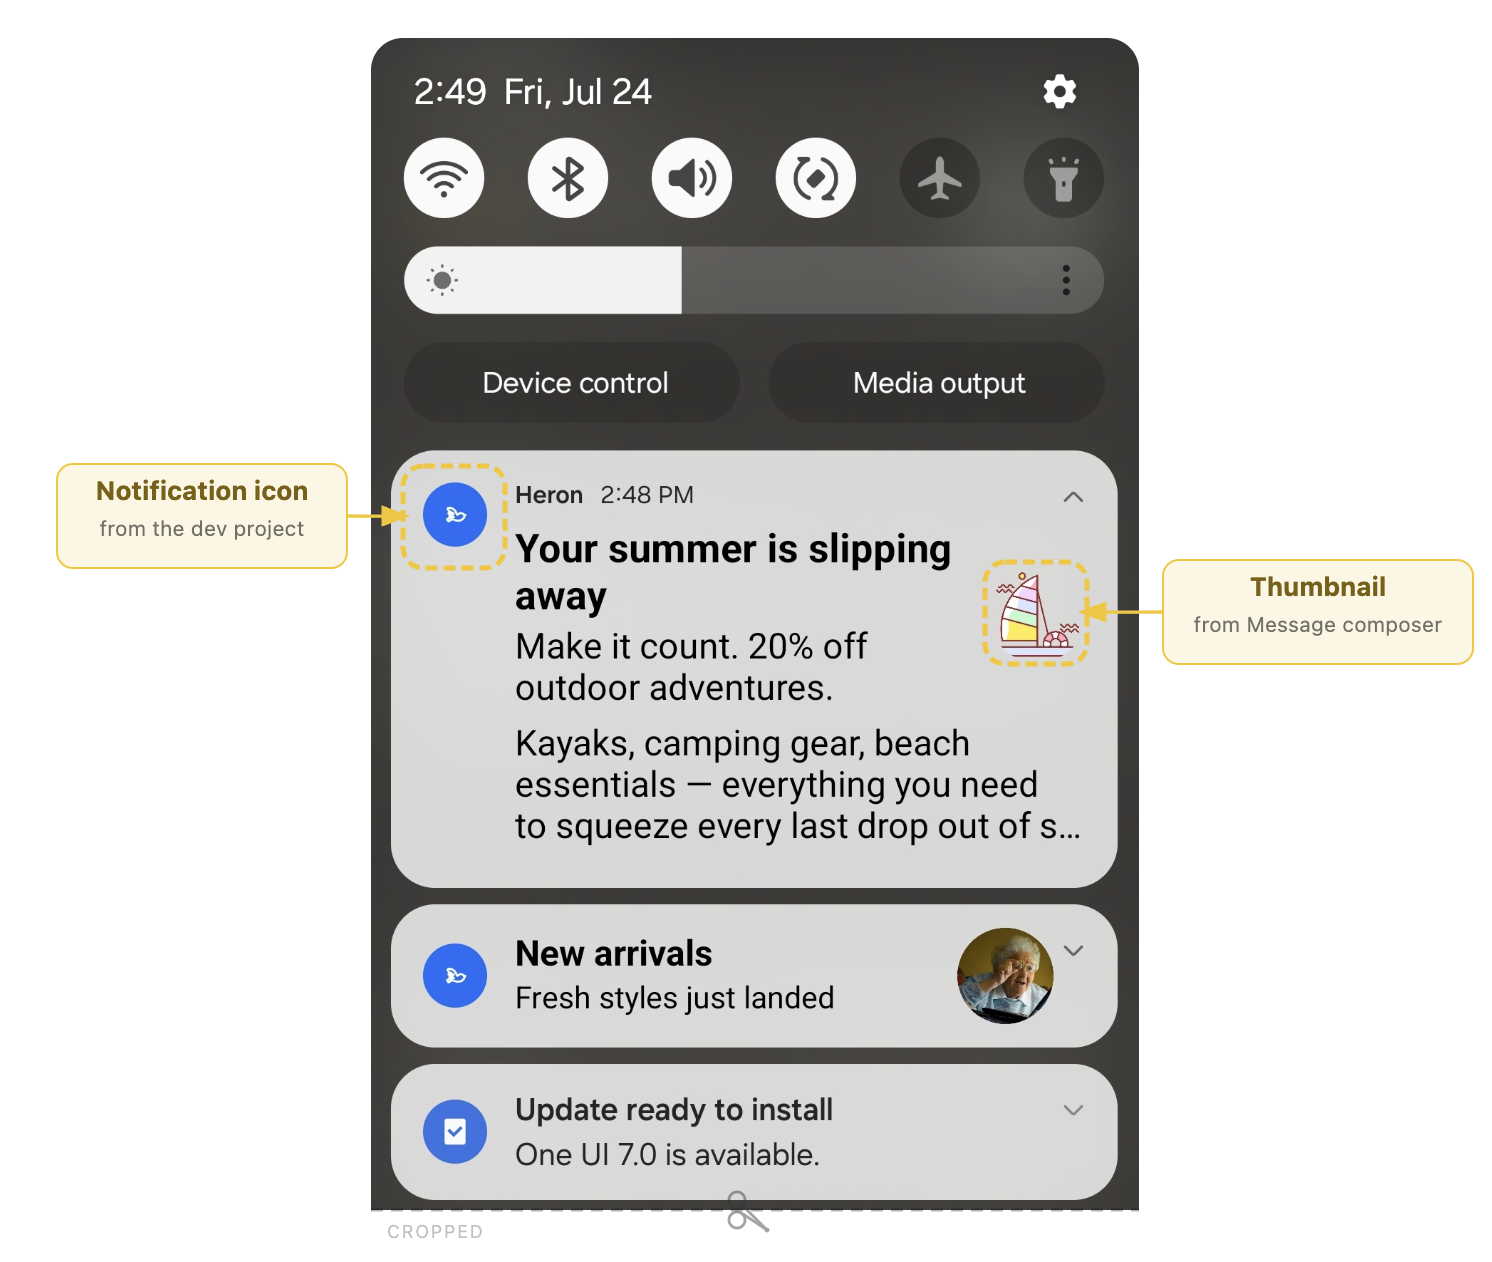
After you complete the setup, your marketing team creates message content in Message composer in Connect. The following elements make up a push message and each has its own source and constraints.
- Notification icon - shown alongside every notification. Always taken from the development project (see Step 4), not from Message composer.
- Body (required) - authored per message. Up to 240 characters.
- Title (optional) - up to 65 characters.
- Thumbnail image (optional) - shown to the right of the notification body. Accepted formats: .jpg, .jpeg, .png. Minimum dimensions: 64 × 64 px. Maximum size: 5 MB.
- Expandable content (optional) - additional text or image shown when the user expands the notification.
- Action (optional) - what happens when the user taps the notification: open the app, call a number, or open a URL.
Troubleshooting
Push notifications not received
- Confirm google-services.json is present at your Cordova project root and matches your Firebase project and package name.
- Confirm the file was copied into
platforms/android/app/- check theafter_prepareconsole output for[acoustic-connect] google-services.json copied to .... If you instead see a warning that it was not found, it means the plugin build proceeded with a missing file (this can only happen if the Google Services Gradle plugin somehow didn't hard-fail first - worth reporting as unexpected if you hit it). - On API 33+, confirm you granted notification permission - call
push.getPermissionState()to check.
Push signals not appearing in Connect
- Confirm
AppKeyandPostMessageUrlin ConnectConfig.json match your Mobile app integration in Connect. - Confirm your Connect administrator uploaded your Firebase service account key to the Mobile app integration - push signals aren't sent without it.
Notification icon not showing correctly
- Confirm
AndroidNotificationIconResNamematches the drawable resource name exactly (no extension, no folder path). - Confirm the icon is a white monochrome design on a transparent background. You can use the following sample icon for testing:
Sample notification icon (XML vector)
Save this as drawable-anydpi/ic_notification.xml in your Android resource directory:
<?xml version="1.0" encoding="utf-8"?>
<vector xmlns:android="http://schemas.android.com/apk/res/android"
    android:width="24dp"
    android:height="24dp"
    android:viewportWidth="24"
    android:viewportHeight="24">
    <path
        android:fillColor="#FFFFFF"
        android:pathData="M12,2L4.5,20.29L5.21,21L12,18L18.79,21L19.5,20.29Z" />
</vector>
This renders a simple diamond shape - white on transparent, no android:tint.
File google-services.json is missing
The Google Services Gradle plugin hard-fails without it. Download it from Firebase Console and place it at your Cordova project root, then re-run npx cordova prepare android.
No matching client found for package name '...'
The package name in google-services.json doesn't match your Cordova project's widget id. This happens if you downloaded the file for a different Firebase Android app (for example, a separate dev/prod environment) or changed config.xml's widget id after registering with Firebase. In the Firebase console, confirm the Android app under Settings has the same package name as the id attribute on your config.xml's <widget> element, then re-download google-services.json.
Next step: Identify app users
Push setup is now complete. If you haven't already, identify the people receiving your push notifications - see Identify users at sign-in.
Updated 3 months ago