
Enable push notifications in an Expo app (iOS)
This guide walks you through enabling push notifications in your Expo app on iOS using the Acoustic Connect SDK. The Connect Config Plugin provisions everything push requires automatically — no manual Xcode steps are needed.
Language: TypeScript and JavaScript
Availability: Pro, Premium, and Ultimate
Scope: Test setup — building, running on the simulator or a connected device, and verifying push delivery. For bare React Native, see Enable push notifications in a React Native app (iOS). For production setup, see Move your React Native integration to production.
Sample app: See our GitHub repository for a reference implementation to compare your configuration against.
Prerequisites
- Apple Developer Program membership — Push notifications require a paid account. Required role: Account Holder or Admin.
- Connect app key that supports push notifications. Push requires an app key from a Mobile app integration created after April 2026. If your integration is older, ask your Connect administrator to create a new one and provide you with the new app key. For instructions, see Connect mobile apps in the Connect user guide.
- Connect React Native SDK version 19.0.9 integrated in your Expo project. If you have not yet integrated the SDK, follow Integrate the Connect SDK into an Expo app first.
Overview
- Generate an APNs authentication key.
- Share your push notification credentials with your Connect administrator.
- Configure push notifications in the Apple Developer portal.
- Configure push notifications in your development project.
- Add code to request notification permission from your users.
Step 1: Get an APNs authentication key
Connect uses token-based APNs authentication. A single .p8 key works across all apps in your team.
- In your Apple Developer account, go to Certificates, Identifiers & Profiles > Keys > +.
- Enter a name (for example, "Acoustic Connect APNs") and enable Apple Push Notifications service (APNs).
- Click Configure next to Apple Push Notifications service (APNs) and set Environment to Sandbox & Production unless your security team requires tighter scoping. This setting cannot be changed once saved.
- Click Save > Continue > Register.
- Download the
.p8file — Apple only allows you to download it once. - Note the Key ID shown on the confirmation page.
- Note your Team ID — a unique 10-character string shown in the top-right of the portal next to your team name.
Step 2: Share push notification credentials with your Connect administrator
Share the following with your Connect administrator so they can enable push notifications in your Mobile app integration.
| Credential | Where to find it |
|---|---|
| Encryption key | The .p8 file you just downloaded |
| Key ID | The confirmation page, or the file name |
| Team ID | Top-right of the Apple Developer portal, or under Membership |
| Bundle ID | app.json → expo.ios.bundleIdentifier |
| Environment | Sandbox — this guide covers test setup |
NoteYour Connect administrator needs to upload these credentials to your Mobile app integration in Connect before push notifications will be delivered. See Connect mobile apps in the Connect user guide. Steps 3–5 can be completed while you wait.
Step 3: Configure push notifications in the Apple Developer portal
Push notifications in Connect require three components working together:
| Component | Purpose |
|---|---|
| Main app | Initializes the SDK with push configuration and requests notification permission from the user |
| Notification Service Extension (NSE) | Downloads rich media (images) and records delivery, including dismissed notifications |
| Notification Content Extension (NCE) | Renders the expanded notification view when the user long-presses a notification |
All three targets share an App Group — a shared container that lets them exchange push data. The App Group identifier must be identical across all three targets and your ConnectConfig.json. A mismatch in any one location causes delivery tracking and rich media to silently fail.
Register or update your App ID
If you are registering a new App ID:
- In your Apple Developer account, go to Identifiers > +.
- Select App IDs > App and click Continue.
- Enter a description and your bundle ID (for example,
com.yourcompany.yourapp). - Under Capabilities, enable Push Notifications and App Groups.
- Click Continue > Register.
If your App ID already exists:
- Click the App ID in the list to open it.
- Under Capabilities, enable Push Notifications and App Groups.
- Click Save.
Register App IDs for the extensions
The Config Plugin creates two extension targets: ConnectNSE and ConnectNCE. Register an App ID for each, enabling App Groups only. Extension App IDs do not require the Push Notifications capability.
com.yourcompany.yourapp.ConnectNSEcom.yourcompany.yourapp.ConnectNCE
Create an App Group
- Go to Identifiers > + and select App Groups.
- Enter a description and an identifier using the
group.prefix convention (for example,group.com.yourcompany.yourapp). - Click Continue > Register.
- Go back to each of your three App IDs (main app, ConnectNSE, ConnectNCE) and assign the App Group you just created.
WarningThe App Group identifier is not the same as your bundle ID. It must start with
group.and be identical across all targets and your ConnectConfig.json. Even a single character mismatch causes delivery tracking and rich media to silently fail.
Step 4: Configure push notifications in your development project
-
Open ConnectConfig.json in the root of your project and add the following keys inside the
Connectobject.{ "Connect": { "PushEnabled": true, "iOSPushMode": "automatic", "iOSAppGroupIdentifier": "group.com.yourcompany.yourapp", "iOSDevelopmentTeam": "YOUR_TEAM_ID" } }Key Value PushEnabledtrue— enables push support in the SDK.iOSPushMode"automatic"— the SDK installs its own notification delegate and handles APNs registration, foreground delivery, and tap actions.iOSAppGroupIdentifierThe App Group identifier you created in Step 3. Must match exactly across all targets and this file. iOSDevelopmentTeamYour 10-character Apple Team ID (found in the Apple Developer portal under Membership). Required — without it the build omits the aps-environmententitlement and APNs does not issue a token. -
Run
npx expo prebuild. The Config Plugin reads your ConnectConfig.json and configures your native project automatically.What the Config Plugin does
- Adds the
ConnectNSENotification Service Extension target to your Xcode project, implementing rich-media attachment download and delivery tracking. - Adds the
ConnectNCENotification Content Extension target, implementing the expanded notification view. - Adds the App Group entitlement to the main app and both extensions.
- Appends
ConnectNSEandConnectNCEtargets to the generatedPodfile, each linking the Connect SDK pod — no manual Podfile edits needed. - Stamps your Team ID onto all three targets so Xcode can provision them.
- Runs
pod installfor you as part of generating the native project, so there's no separate CocoaPods step to run manually.
Re-running
expo prebuildis safe — the plugin will not create duplicate targets. - Adds the
-
Validate your configuration:
npx acoustic-connect doctor --require-pushWhat the Doctor does
--require-pushtreats the push-required values —AppKey, the collector URLs,iOSAppGroupIdentifier, andiOSDevelopmentTeam— as hard failures rather than warnings, so a typo or leftover placeholder is caught here instead of failing later in Xcode or on-device. It's safe to re-run any time you change ConnectConfig.json.
WarningThe values in ConnectConfig.json are baked into the native bundles at build time, not read at runtime. If you edit the file later, re-run
npx expo prebuild --cleanbefore rebuilding — an incremental prebuild is not guaranteed to pick up the change.
Step 5: Request notification permission
Call pushRequestPermission() at an appropriate moment in your app's UX — for example, after an onboarding screen that explains the value of notifications, rather than on first launch.
import AcousticConnectRN from 'react-native-acoustic-connect-beta'

const result = await AcousticConnectRN.pushRequestPermission()

if (result.granted) {
  console.log('Notification permission granted')
} else {
  console.log('Notification permission denied:', result.error)
}
pushRequestPermission() presents the system permission dialog when the state is undetermined. It always resolves and never rejects. If the user abandons the dialog (for example, by switching apps mid-prompt), it resolves with { granted: false, error: 'permission-prompt-abandoned' }.
WarningiOS only shows the system permission dialog once. If the user denies it, the only way to re-enable notifications is through the Settings app. Design your UX accordingly.
You can also check the current permission state without prompting:
const granted = await AcousticConnectRN.pushGetPermissionState()
// true = granted, false = denied, null = not yet determined
Testing
Enabling SDK debug logging
Before testing, add these environment variables with a value of 1 to your scheme so the Xcode console shows verbose SDK output for push registration and delivery: CONNECT_DEBUG, TLF_DEBUG, and EODebug.
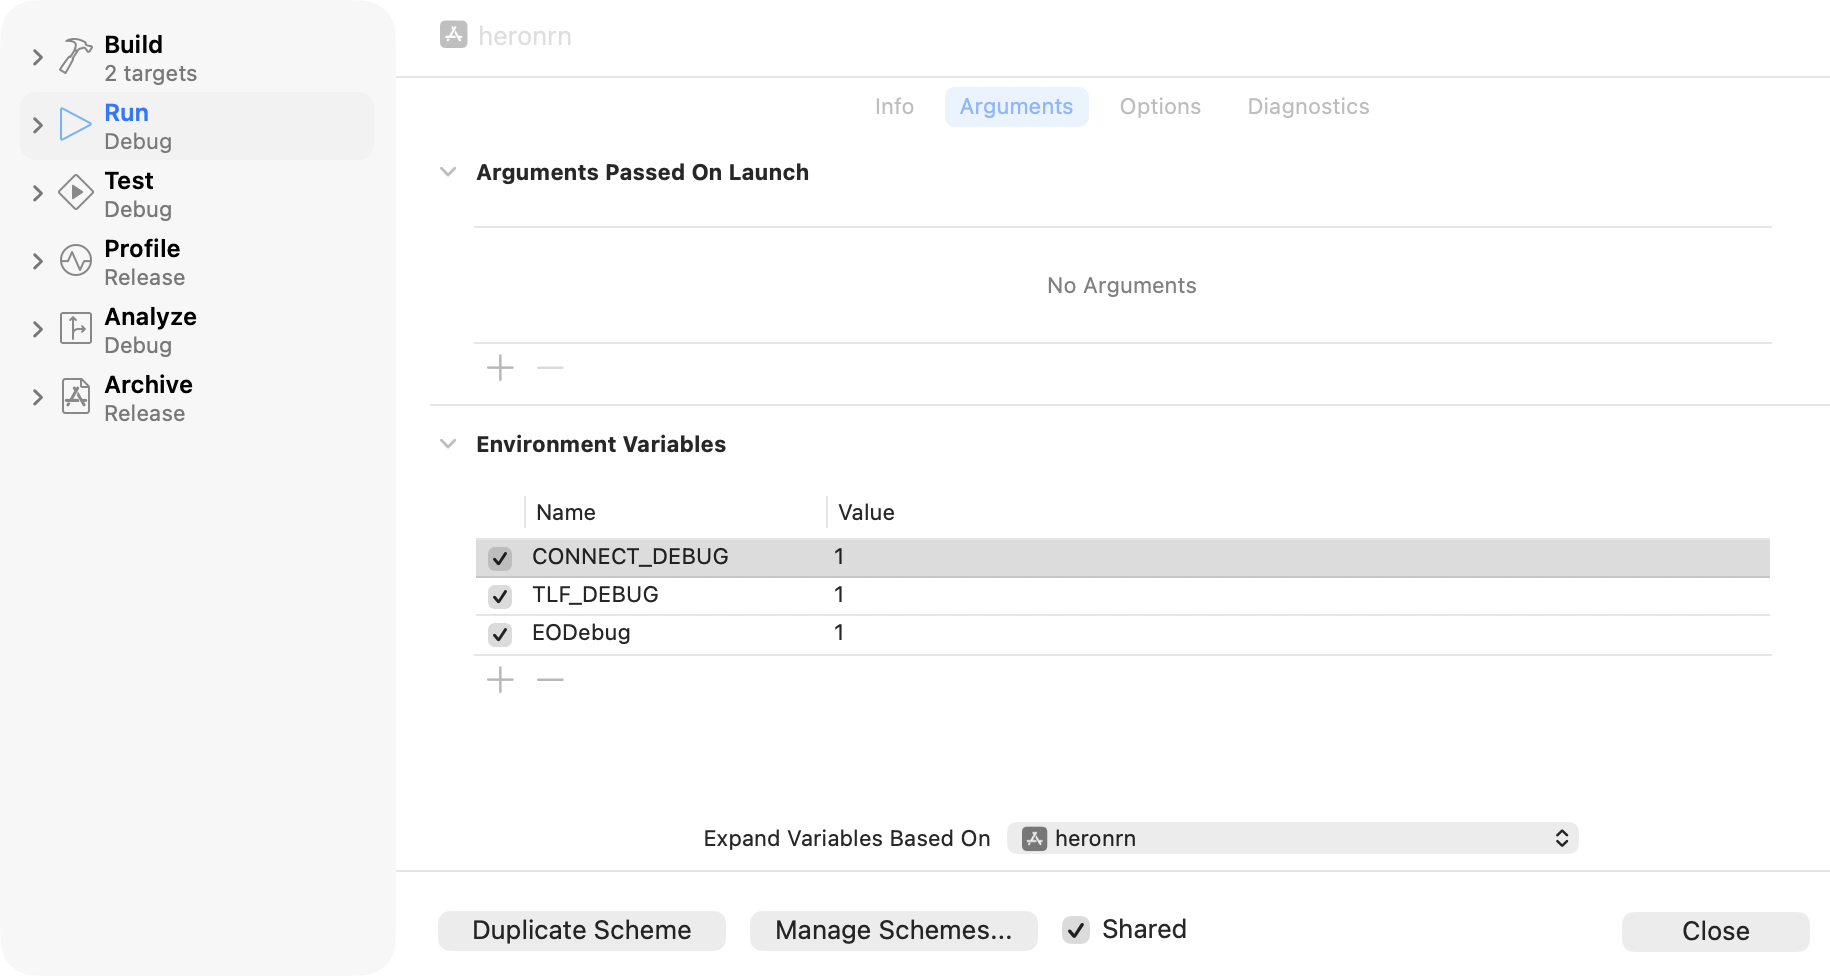
If you ever need to report an issue to support, attach your debug log.
On the simulator — instant verification
You can test push delivery in the simulator using .apns payload files — create them in any text editor and drag them onto the running simulator to send a test notification. This is not a full verification: the simulator confirms basic delivery and NCE invocation, but expanded images in rich notifications may not have time to load. Use a real device to validate that images load correctly.
A basic payload sends a plain notification. Add "mutable-content": 1 and a data.notification object to test rich push — iOS invokes the NSE to display expanded content.
{
    "Simulator Target Bundle": "com.yourcompany.yourapp",
    "aps": {
        "alert": {
            "title": "New arrivals",
            "body": "Fresh styles just landed. Open the app to take a look."
        },
        "sound": "default"
    }
}
{
"Simulator Target Bundle": "com.yourcompany.yourapp",
"aps": {
"alert": {
"title": "New arrivals",
"body": "Fresh styles just landed."
},
"sound": "default",
"mutable-content": 1,
"category": "ACOUSTIC_RICH_NOTIFICATION"
},
"data": {
"notification": {
"expandedImage": "https://example.com/image.jpg",
"expandedBody": "Tap to see everything new this week."
}
}
}On a device — real APNs delivery
-
Make sure your Apple ID is added in Xcode > Settings > Accounts (it is required to resolve signing).
-
Connect an iPhone to your Mac and build with the
--allowProvisioningUpdatesflag, which lets Xcode automatically resolve provisioning for the main app and both extension targets:npx expo run:ios -- --extra-params "-allowProvisioningUpdates" -
Grant notification permission when prompted. A new mobile contact is created in Connect and your device becomes eligible to receive pushes.
-
Coordinate with your marketing team to send a test push to your device, or do it yourself — see Test your push notification setup.
-
Verify the notification appears, images load, and push signals appear in the contact's activity feed in Connect.
Message structure
After you complete the setup, your marketing team creates message content in Message composer in Connect. The following elements make up a push message, and each has its own source and constraints.
- App icon — shown alongside every notification. Unlike the other elements below, it's not set in Message composer; it's taken from your project's icon configuration. In
app.json, setexpo.ios.icon(orexpo.icon) —expo prebuildgenerates the Xcode asset catalog from it. If none is set, notifications fall back to a placeholder instead of your branding. For how to configure it, see Expo's App icons guide.
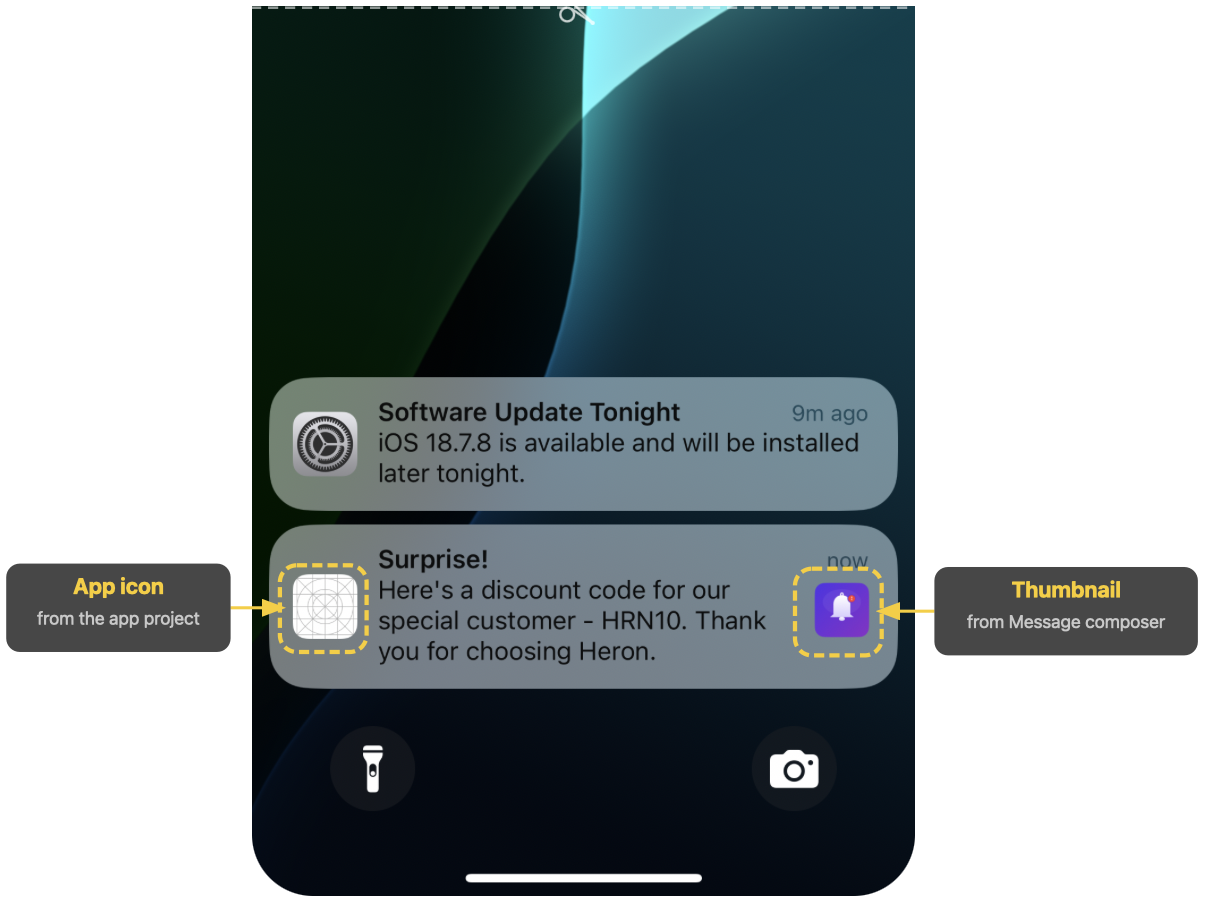
Example with a placeholder app icon
- Title and body — iOS limits titles to 50 characters and the combined title and body to 150 characters.
- Thumbnail image — shown in the collapsed notification, useful for branding. Accepted formats: .jpg, .jpeg, .png. Minimum dimensions: 64 × 64 px. Maximum size: 5 MB.
- Expandable content — additional text or a full image shown when the user expands the notification. This is rich media delivered through the Notification Service Extension and is fully customizable per message, independent of the app icon.
- Actionable notifications — a built-in action that fires when the user taps the notification: open the app, call a number, or open a URL.
Troubleshooting
Push token not received
- APNs tokens are not available on the simulator — test on a real device.
- Confirm the user granted notification permission.
- Confirm
iOSDevelopmentTeamis set in ConnectConfig.json and you re-rannpx expo prebuild --clean. Without a Team ID, Xcode omits theaps-environmententitlement and APNs issues no token.
Rich push images not showing
- Confirm
"mutable-content": 1is present in the push payload. - Confirm
expo prebuildcompleted successfully — theConnectNSEtarget should be visible in your Xcode project. - Confirm the
iOSAppGroupIdentifierin ConnectConfig.json exactly matches the App Group assigned in the Apple Developer portal. - Confirm the image URL is accessible over HTTPS and is not too large.
Push signals not appearing in Connect
- Confirm
AppKeyandPostMessageUrlin ConnectConfig.json match your Mobile app integration in Connect. - Confirm
PushEnabledistrueand you re-rannpx expo prebuild --cleanafter changing ConnectConfig.json.
Push works on one machine but not another ("works for me, not for them")
expo prebuild stamps DEVELOPMENT_TEAM onto the host app and both the ConnectNSE and ConnectNCE targets in project.pbxproj. That stamp lives in local build artifacts — re-run expo prebuild after every fresh clone and any time iOSDevelopmentTeam changes in ConnectConfig.json. Every portal-side check (App ID push capability, provisioning profile, entitlements file contents, App Group registration, .p8 key upload) can look correct and still not reflect what's actually embedded in the binary on the device.
To verify the stamp actually took, check the build artifacts directly rather than re-running and assuming it worked:
# DEVELOPMENT_TEAM must be stamped on the host AND both push extensions
grep DEVELOPMENT_TEAM ios/*.xcodeproj/project.pbxproj

# The installed binary must carry the entitlement — check the actual .app,
# not just the source .entitlements file in your repo
codesign -d --entitlements :- --xml /path/to/YourApp.app
# must show aps-environment in the output
If DEVELOPMENT_TEAM is missing for any of the three targets, or codesign doesn't show aps-environment, re-run npx expo prebuild --clean and rebuild.
expo prebuild does not create extension targets
expo prebuild does not create extension targets- Confirm
react-native-acoustic-connect-betais listed inpluginsin yourapp.json. - Confirm
PushEnabledistruein ConnectConfig.json — the plugin skips extension provisioning when push is disabled.
Next step: Identify app users
Push setup is now complete. To make the most of push notifications, identify the people receiving them — see Identify users at sign-in (React Native) and Identify users at registration (React Native).
Updated 3 months ago